Scene
 Load Scene
 The Load Scene node is used to teleport between different scenes within your VR Experience. Enhancing the overall immersion and interactivity of the experience.
Example
In this example, the Load Scene Node is used to transition the user from one scene to another. This node facilitates changing scenes, allowing for a dynamic experience as users navigate through different environments within the VR application.
 Home Scene
The Home Scene node enables users to return to the initial scene of the VR Experience. This node provides a straightforward way for users to reset the VR Experience to the starting point, ensuring a user-friendly navigation experience.
Example
In this example, the Home Scene Node is used to return the user to the main scene when the trigger event occurs. This allows you to teleport back to the primary environment, enhancing the user experience by providing a clear and intuitive way to return to the starting point.
 Import Scene
The Import Scene node is used to load an external scene into the current VR Experience. This allows users to dynamically bring in additional environments, objects, or elements as needed during runtime.
Example
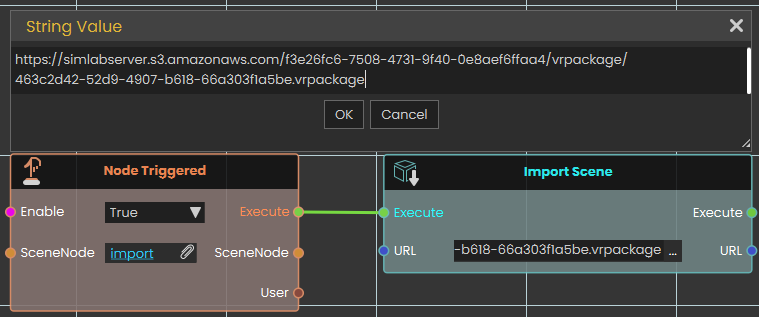

In this example, the Import Scene node is used to load a car model into the scene when the "Import" object is triggered. The Node Triggered event detects user interaction and executes the Import Scene node, which then loads the specified car model from an external VR package file. This allows the car to appear dynamically within the VR environment.
Reload Scene
Restarts the scene that is currently running, bringing it back to the way it was at the start.
What it does
When this node runs, it reloads the current scene from the beginning. Everything in the scene starts over — objects return to their starting positions and the scene plays as if it had just been opened.
It’s a handy way to give the user a “start over” or “try again” option, such as a reset button that puts a training exercise back to the beginning.
Inputs
| Port | Type | What to connect |
|---|---|---|
| Execute | Trigger | Wire this from the previous node’s Execute output — for example, from a button click or another action that should restart the scene. |
Outputs
This node has no outputs.
Example
| Execute input | Wired from a “Restart” button so that clicking it starts the scene over from the beginning. |
Tips
- Reloading starts the scene over completely, so any progress the user has made will be lost — use it when you want a clean fresh start.
- This node has no Execute output, so it’s always the last step in its chain — nothing runs after it.
Enterprise VR Packages
An Enterprise VR Package is a complete VR experience saved as a single, protected .evrpackage file. These packages are encrypted, so only a viewer that has the matching enterprise key can unlock and open them, and creating them is part of a SimLab Enterprise licence. The node below brings one of these packages into the running Viewer and adds it to the main menu, ready to be opened.
Add Enterprise VR Package To Viewer
Fetches an Enterprise VR Package from a web address, unlocks it, and adds it to the Viewer's main menu.
What it does
Give this node the address of an Enterprise VR Package (an .evrpackage file) and, while your experience is running, it downloads the package, unlocks it with its enterprise key, and adds it to the Viewer's main menu — the list of experiences someone can open. The package is stored locally on the device, so from then on it can be opened from the menu like any other entry.
It does not put anything into the scene that's currently playing. This node makes a whole package available to open from the menu; it does not drop models or other content into the running scene. If what you want is to bring content into the current scene, use the Import node instead — that's what it's for.
Because these packages are protected, this only works with genuine Enterprise VR Packages, and the Viewer has to be able to unlock the file. The Success output tells you whether the package was added.
It waits until the package is ready
Downloading a package and unlocking it isn't instant — it takes a moment, and it happens quietly in the background so the rest of your experience keeps running. This node handles that waiting for you. Its Execute output does not fire the moment the node runs; it fires only once the package has been added to the menu or the attempt has failed. So the nodes you wire after this one run when the package is ready, not the instant it's requested, and you don't need to add any delay of your own. Because Execute fires whether it worked or not, always check Success first.
Inputs
| Port | Type | What to connect |
|---|---|---|
| Execute | Trigger | Wire this from the previous node's Execute output. |
| URL | Text | The web address of the Enterprise VR Package (an .evrpackage file) to add. A local file path on the device also works. |
Outputs
| Port | Type | What you get |
|---|---|---|
| Execute | Trigger | Fires once the node has finished — whether the package was added or not. |
| Success | True / false | Yes if the package was downloaded, unlocked, and added to the main menu; No otherwise — for example the address was wrong, the download couldn't be completed, or the package couldn't be unlocked. |
Example
| URL input | https://enterprise.example.com/packages/assembly-training.evrpackage |
| Success output | Yes — the package now appears in the Viewer's main menu |
Tips
Scene actions
These nodes work with the experience that’s currently running — finding out which scene is open, returning to the home screen, saving how the scene looks, and sending the scene back to the cloud. None of them change what’s in your scene; they read from it or move the viewer somewhere else.
Get Running Scene GUID
Gives you the unique ID of the scene that is currently running.
What it does
Every scene (VR package) has its own unique ID — a long piece of text that no other scene shares. This node hands you that ID for the scene that is open and running right now.
It only reads the ID; it doesn’t change anything about the scene. You can use the result to tell scenes apart, to label saved data so you know which scene it came from, or to pass along to other nodes that need to know which scene is loaded.
Inputs
| Port | Type | What to connect |
|---|---|---|
| Execute | Trigger | Wire this from the previous node’s Execute output. |
Outputs
| Port | Type | What you get |
|---|---|---|
| Execute | Trigger | Fires once the node has finished. |
| Result | Text | The unique ID of the scene that is currently running, as text. |
Example
| Result output | 3f2a9c7e-1b4d-4e8a-9c2f-7a1e5d6b0c84 |
Tips
- Two different scenes always have different IDs, so this is a reliable way to check which scene is loaded before running scene-specific steps.
- The exact text will look different for every scene — treat it as a label to match or store, not something to read by eye.
Home Screen
Takes the viewer back to the application’s home screen — the main start screen they see when SimLab Composer first opens.
What it does
When this node runs, it closes out of the current scene and returns the viewer to the home screen, where they can choose what to open next. Think of it as a “back to the main menu” button you can trigger from your scripting.
This node doesn’t change or delete anything in your scene — it simply switches the view back to the home screen. Note that this is different from the Home Scene node, which moves to the home scene inside the content you have open rather than leaving for the main screen.
Inputs
| Port | Type | What to connect |
|---|---|---|
| Execute | Trigger | Wire this from the previous node’s Execute output. The moment it fires, the viewer is taken back to the home screen. |
Outputs
This node has no outputs.
Example
| Execute input | Connect this to a “Quit” or “Exit to menu” button so that pressing it returns the viewer to the home screen. |
Tips
- Use this when a training session is finished and you want the viewer returned to the main screen rather than left in the scene.
- If you only want to jump to the home scene within the open content, use the Home Scene node instead.
Save Visual Settings
Saves how your scene currently looks — its lighting and environment, color adjustments, background, and the appearance of every material — to a visual-settings file (a .vis file) you can import back into SimLab Composer to re-apply that look.
What it does
This node takes a snapshot of the scene’s current visual style and stores it under the name you give it. The snapshot covers the lighting and environment (sun and sky, the surrounding environment light, and fog), the color and exposure adjustments (such as contrast, saturation, white balance, tint, and overall brightness), the background (whether it’s an image, the environment, or a solid color), and how every material in the scene looks (its color, shininess, transparency, reflection, and similar settings).
Saving doesn’t change your scene at all — it only reads the current values and stores them, so everything keeps looking exactly the same. The settings are written to a visual-settings file (a .vis file) named after the name you provide; saving again with the same name replaces the earlier file. Leaving the name empty saves it under a default name.
Applying a saved look
The .vis file this node creates can be imported back into SimLab Composer to apply the saved look to the scene. Save and import it within the same session — don’t close and reopen the scene in between. The saved look is tied to the scene’s internal IDs, and those can change when the scene is reopened, so a file saved in an earlier session may not apply correctly.
Inputs
| Port | Type | What to connect |
|---|---|---|
| Execute | Trigger | Wire this from the previous node’s Execute output. |
| Name | Text | The name for the visual-settings file to create, such as Daytime (saved as Daytime.vis). If you leave it empty, a default name is used. Saving again with the same name replaces the earlier file. |
Outputs
| Port | Type | What you get |
|---|---|---|
| Execute | Trigger | Fires once the node has finished. |
| Name | Text | The same name you provided, passed along so you can reuse it in later nodes. |
Example
| Name input | Daytime |
| Name output | Daytime |
Tips
- Save and import in the same session. Apply the
.visfile before closing and reopening the scene — if the scene is reopened first, its internal IDs may have changed and the saved look might not apply correctly. - Give each look a clear, memorable name (for example
Daytime,Night, orSunset) so it’s easy to recognize when you import it back into Composer. - Reusing a name on purpose is a handy way to update a saved look — the new save simply replaces the earlier
.visfile under that name.
ShareBack Scene
Sends the current scene back to the cloud, saving your changes as a new version of the experience it came from.
What it does
When this node runs, the Viewer shows a “Share Back Scene” prompt and the current scene is saved up to the cloud as a new version of the original experience it was opened from. This lets the changes the viewer made travel back to the shared cloud copy of the experience.
The node waits for the save to finish before it continues, so its result is ready by the time the next node runs. The Success output then tells you whether it worked: true if the scene was saved back as a new version, or false if it couldn’t be shared back right now. This does not change the scene that is currently running — it just publishes a copy back to the cloud.
Inputs
| Port | Type | What to connect |
|---|---|---|
| Execute | Trigger | Wire this from the previous node’s Execute output, for example from a button the viewer presses when they want to send their changes back. |
Outputs
| Port | Type | What you get |
|---|---|---|
| Execute | Trigger | Fires once the scene has finished being shared back — whether it succeeded or not. Check Success before assuming the save worked. |
| Success | True / false | true if the scene was saved back to the cloud as a new version; false if it couldn’t be shared back — for instance if the scene didn’t come from the cloud, the viewer isn’t signed in or doesn’t have permission to update it, or there’s no connection. |
Example
| Execute input | Wired from a “Save my changes” button in the scene |
| Execute output | Continues to a Branch node that reacts based on Success |
| Success output | true |
Tips
- Because the Execute output fires whether the save worked or not, check the Success output first — a Branch node is a handy way to show a “Saved!” message on
trueand a “Couldn’t save” message onfalse. - This only works for scenes that were opened from a cloud experience, and the viewer needs to be signed in with permission to update it.