# SceneNode \ Appearance
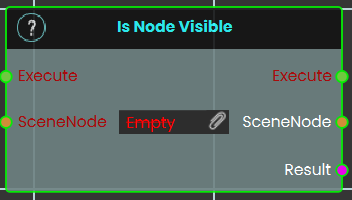
### ![Response_Node_Visibility_Get.png](https://simlab-soft.com/help/uploads/images/gallery/2026-03/scaled-1680-/response-node-visibility-get.png) Is Node Visible

[![image.png](https://simlab-soft.com/help/uploads/images/gallery/2026-03/scaled-1680-/MNnimage.png)](https://simlab-soft.com/help/uploads/images/gallery/2026-03/MNnimage.png)

This node checks the current visibility state of a specified 3D object within the VR Viewer. It evaluates whether the targeted object is currently rendered (shown) or hidden in the scene, and outputs this status as a boolean value (True or False).

##### Example:

[![image.png](https://simlab-soft.com/help/uploads/images/gallery/2026-03/scaled-1680-/DtJimage.png)](https://simlab-soft.com/help/uploads/images/gallery/2026-03/DtJimage.png)

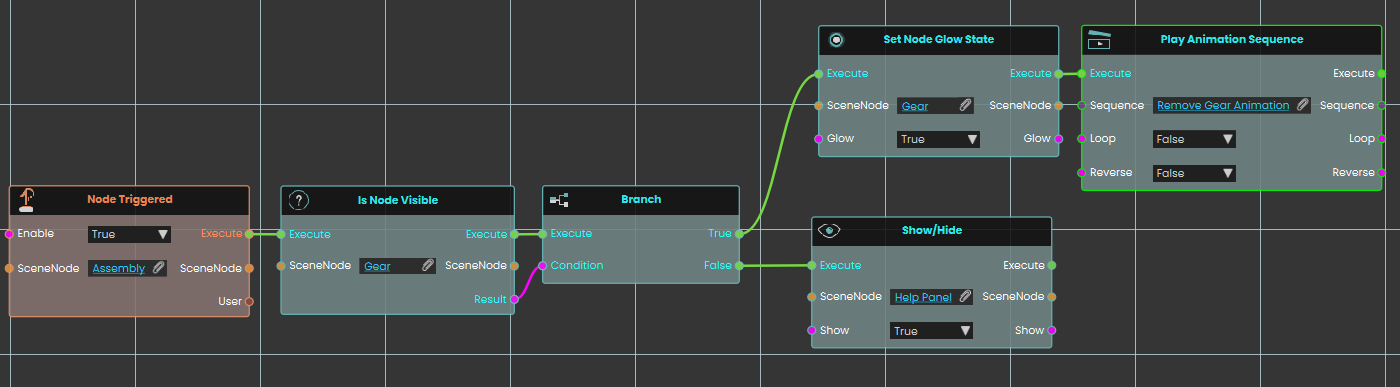
In this example, triggering the "Assembly" object prompts the system to check if the "Gear" node is currently visible. If the gear is visible, the True branch executes, setting the gear to glow and playing a "Remove Gear" animation sequence. However, if the gear is already hidden, the False branch executes instead, displaying a "Help Panel" to the user.

<div dir="auto" id="bkmrk--1"><div dir="auto">---

</div></div>### Get Node Material

Finds out which material is currently applied to a 3D object in your scene.

#### What it does

Point this node at a 3D object and it hands you back the material that is currently on it — the look that gives the object its color, texture, shininess, and so on. You can then pass that material to another object, inspect it, or change it elsewhere in your script.

This only reads the object’s material; it doesn’t change the object or its appearance in any way. The same object comes straight back out so you can keep wiring more steps from it.

#### Inputs

<div dir="auto" id="bkmrk-port-type-what-to-co"><div dir="auto"><table><thead><tr><th style="white-space: nowrap;">Port</th><th style="white-space: nowrap;">Type</th><th>What to connect</th></tr></thead><tbody><tr><td style="white-space: nowrap;">**Execute**</td><td style="white-space: nowrap;">Trigger</td><td>Wire this from the previous node’s Execute output.</td></tr><tr><td style="white-space: nowrap;">**SceneNode**</td><td style="white-space: nowrap;">Scene node</td><td>The 3D object whose material you want to read.</td></tr></tbody></table>

</div></div>#### Outputs

<div dir="auto" id="bkmrk-port-type-what-you-g"><div dir="auto"><table><thead><tr><th style="white-space: nowrap;">Port</th><th style="white-space: nowrap;">Type</th><th>What you get</th></tr></thead><tbody><tr><td style="white-space: nowrap;">**Execute**</td><td style="white-space: nowrap;">Trigger</td><td>Fires once the node has finished.</td></tr><tr><td style="white-space: nowrap;">**SceneNode**</td><td style="white-space: nowrap;">Scene node</td><td>The same object you connected, passed straight back out so you can keep wiring from it.</td></tr><tr><td style="white-space: nowrap;">**Material**</td><td style="white-space: nowrap;">Material</td><td>The material currently applied to that object.</td></tr></tbody></table>

</div></div>#### Example

<div dir="auto" id="bkmrk-scenenode-input-car-"><div dir="auto"><table><tbody><tr><td style="white-space: nowrap;">**SceneNode** input</td><td>`Car Body`</td></tr><tr><td style="white-space: nowrap;">**SceneNode** output</td><td>`Car Body` (unchanged)</td></tr><tr><td style="white-space: nowrap;">**Material** output</td><td>`Red Glossy Paint`</td></tr></tbody></table>

</div></div>#### Tips

<div dir="auto" id="bkmrk-use-this-to-copy-a-l"><div dir="auto">- Use this to copy a look from one object to another: read the material here, then apply it to a different object with a “Set Node Material” node.

---

</div></div>### Set Node Glow State

Turns a glowing highlight on or off for an object in your scene.

#### What it does

This node takes an object from your scene and switches its glow effect on or off. Use it to make something stand out — for example, lighting up the part a trainee needs to pick up next, or highlighting a button they should press.

It only changes whether the glow is showing; nothing else about the object is altered. The same object is handed straight back out so you can keep wiring more actions onto it.

#### Inputs

<div dir="auto" id="bkmrk-port-type-what-to-co-0"><div dir="auto"><table><thead><tr><th style="white-space: nowrap;">Port</th><th style="white-space: nowrap;">Type</th><th>What to connect</th></tr></thead><tbody><tr><td style="white-space: nowrap;">**Execute**</td><td style="white-space: nowrap;">Trigger</td><td>Wire this from the previous node’s Execute output.</td></tr><tr><td style="white-space: nowrap;">**SceneNode**</td><td style="white-space: nowrap;">Scene node</td><td>The object in your scene you want to glow (or stop glowing).</td></tr><tr><td style="white-space: nowrap;">**Glow**</td><td style="white-space: nowrap;">True / false</td><td>Set to `true` to turn the glow on, or `false` to turn it off. Defaults to `true` if you leave it unconnected.</td></tr></tbody></table>

</div></div>#### Outputs

<div dir="auto" id="bkmrk-port-type-what-you-g-0"><div dir="auto"><table><thead><tr><th style="white-space: nowrap;">Port</th><th style="white-space: nowrap;">Type</th><th>What you get</th></tr></thead><tbody><tr><td style="white-space: nowrap;">**Execute**</td><td style="white-space: nowrap;">Trigger</td><td>Fires once the node has finished.</td></tr><tr><td style="white-space: nowrap;">**SceneNode**</td><td style="white-space: nowrap;">Scene node</td><td>The same object you sent in, passed straight back out so you can keep wiring from it.</td></tr><tr><td style="white-space: nowrap;">**Glow**</td><td style="white-space: nowrap;">True / false</td><td>The glow setting you applied (`true` or `false`), passed along.</td></tr></tbody></table>

</div></div>#### Example

<div dir="auto" id="bkmrk-scenenode-input-the-"><div dir="auto"><table><tbody><tr><td>**SceneNode** input</td><td>The `Wrench` object the trainee needs to find next</td></tr><tr><td>**Glow** input</td><td>`true`</td></tr><tr><td>**SceneNode** output</td><td>The same `Wrench` object, now glowing</td></tr><tr><td>**Glow** output</td><td>`true`</td></tr></tbody></table>

</div></div>#### Tips

<div dir="auto" id="bkmrk-to-turn-a-highlight-"><div dir="auto">- To turn a highlight off later, run this node again on the same object with **Glow** set to `false`.
- Because the object comes straight back out, you can chain another action right after — for example, glow it and then play a sound.

---

</div></div>### Set Node Material

Gives a scene object a new look by applying a material to it.

#### What it does

This node takes one of your scene objects and a material, and puts that material onto the object — changing how it looks (its color, texture, shininess, and so on). For example, you could switch a part from a plain gray finish to a glossy red one.

The object itself is the same object as before — only its appearance changes. The node hands the object and the material straight back out, so you can keep wiring more steps from either of them.

#### Inputs

<div dir="auto" id="bkmrk-port-type-what-to-co-1"><div dir="auto"><table><thead><tr><th style="white-space: nowrap;">Port</th><th style="white-space: nowrap;">Type</th><th>What to connect</th></tr></thead><tbody><tr><td style="white-space: nowrap;">**Execute**</td><td style="white-space: nowrap;">Trigger</td><td>Wire this from the previous node’s Execute output.</td></tr><tr><td style="white-space: nowrap;">**SceneNode**</td><td style="white-space: nowrap;">Scene node</td><td>The object in your scene whose look you want to change.</td></tr><tr><td style="white-space: nowrap;">**Material**</td><td style="white-space: nowrap;">Material</td><td>The material to put on the object — the new color, texture, and finish it should have.</td></tr></tbody></table>

</div></div>#### Outputs

<div dir="auto" id="bkmrk-port-type-what-you-g-1"><div dir="auto"><table><thead><tr><th style="white-space: nowrap;">Port</th><th style="white-space: nowrap;">Type</th><th>What you get</th></tr></thead><tbody><tr><td style="white-space: nowrap;">**Execute**</td><td style="white-space: nowrap;">Trigger</td><td>Fires once the node has finished.</td></tr><tr><td style="white-space: nowrap;">**SceneNode**</td><td style="white-space: nowrap;">Scene node</td><td>The same object you sent in, passed straight back out so you can keep wiring from it.</td></tr><tr><td style="white-space: nowrap;">**Material**</td><td style="white-space: nowrap;">Material</td><td>The same material you sent in, passed back out in case you want to use it again.</td></tr></tbody></table>

</div></div>#### Example

<div dir="auto" id="bkmrk-scenenode-input-car_"><div dir="auto"><table><tbody><tr><td style="white-space: nowrap;">**SceneNode** input</td><td>`Car_Body`</td></tr><tr><td style="white-space: nowrap;">**Material** input</td><td>`Glossy_Red`</td></tr><tr><td style="white-space: nowrap;">**SceneNode** output</td><td>`Car_Body` — now showing the glossy red finish, ready to wire into the next step</td></tr></tbody></table>

</div></div>#### Tips

<div dir="auto" id="bkmrk-prepare-the-material"><div dir="auto">- Prepare the materials you want to switch between in your scene first, then feed the right one into this node when you want the object to change.
- Because the object comes straight back out, you can chain several changes — for example, set a material and then move or highlight the same object in the next node.

---

</div></div>### Show/Hide

Shows or hides a scene node, so you can make objects appear and disappear during your scene.

#### What it does

Give this node a scene node and a true/false value. When set to true, the node becomes visible; when set to false, it is hidden from view. This is handy for revealing a part once a step is reached, or hiding a finished assembly to clear the workspace.

Hiding a node only changes whether it can be seen — the object itself stays in your scene, keeps its position, and can be shown again at any time. The same scene node comes straight back out so you can keep wiring more actions from it.

#### Inputs

<div dir="auto" id="bkmrk-port-type-what-to-co-2"><div dir="auto"><table><thead><tr><th style="white-space: nowrap;">Port</th><th style="white-space: nowrap;">Type</th><th>What to connect</th></tr></thead><tbody><tr><td style="white-space: nowrap;">**Execute**</td><td style="white-space: nowrap;">Trigger</td><td>Wire this from the previous node’s Execute output.</td></tr><tr><td style="white-space: nowrap;">**SceneNode**</td><td style="white-space: nowrap;">Scene node</td><td>The object you want to show or hide, such as a part, group, or model in your scene.</td></tr><tr><td style="white-space: nowrap;">**Show**</td><td style="white-space: nowrap;">True / false</td><td>Set to `true` to make the object visible, or `false` to hide it.</td></tr></tbody></table>

</div></div>#### Outputs

<div dir="auto" id="bkmrk-port-type-what-you-g-2"><div dir="auto"><table><thead><tr><th style="white-space: nowrap;">Port</th><th style="white-space: nowrap;">Type</th><th>What you get</th></tr></thead><tbody><tr><td style="white-space: nowrap;">**Execute**</td><td style="white-space: nowrap;">Trigger</td><td>Fires once the node has finished.</td></tr><tr><td style="white-space: nowrap;">**SceneNode**</td><td style="white-space: nowrap;">Scene node</td><td>The same scene node you passed in, handed straight back so you can keep wiring more actions from it.</td></tr><tr><td style="white-space: nowrap;">**Show**</td><td style="white-space: nowrap;">True / false</td><td>The same true/false value you passed in, so you can reuse it further along.</td></tr></tbody></table>

</div></div>#### Example

<div dir="auto" id="bkmrk-scenenode-input-warn"><div dir="auto"><table><tbody><tr><td style="white-space: nowrap;">**SceneNode** input</td><td>`Warning_Light`</td></tr><tr><td style="white-space: nowrap;">**Show** input</td><td>`true` — the warning light appears to alert the trainee</td></tr><tr><td style="white-space: nowrap;">**SceneNode** output</td><td>`Warning_Light`, passed straight back so you can move or color it next</td></tr></tbody></table>

</div></div>#### Tips

<div dir="auto" id="bkmrk-to-hide-an-object%2C-s">- To hide an object, set **Show** to `false`; to bring it back, run the node again with `true`.
- A hidden object is only invisible — it is still in your scene and keeps its place, so showing it again puts it right back where it was.

</div>