# User

### ![Response_User_MouseCursor_Show.png](https://simlab-soft.com/help/uploads/images/gallery/2026-03/scaled-1680-/response-user-mousecursor-show.png) Show Mouse Cursor

[![image.png](https://simlab-soft.com/help/uploads/images/gallery/2026-03/scaled-1680-/GhKimage.png)](https://simlab-soft.com/help/uploads/images/gallery/2026-03/GhKimage.png)

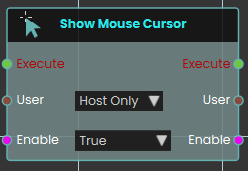
The **Show Mouse Cursor node** explicitly controls the visibility and functionality of the user's mouse pointer within the VR Viewer. When activated, the node checks the boolean Enable input for the specified User. Setting it to True displays the cursor on-screen, allowing the user to freely move it and click to interact with objects utilizing **Node Triggered** events. It is important to note that while this cursor mode is active, standard navigation is suspended—the user cannot walk or rotate their camera view until the node is activated again with the Enable input set to False, which hides the cursor and restores normal movement.  
  
The **Show Mouse Cursor** mode is used for desktop/PC version of VR Viewer

<div dir="auto" id="bkmrk--0"><div dir="auto">---

</div></div>### Enable Gamepad Navigation

Turns gamepad navigation on or off for a user, so they can move through the scene with a game controller.

#### What it does

When you switch this on, the chosen user can use a connected gamepad to navigate the scene. Switch it off and gamepad navigation is turned off again for that user. You decide whether this applies just to the host or to everyone in the session.

The node only changes the gamepad setting for the user you pick — it doesn’t affect anything else about the scene. It also passes the same user and the on/off value straight through, so you can carry on with more steps right after it.

#### Inputs

<div dir="auto" id="bkmrk-port-type-what-to-co"><div dir="auto"><table><thead><tr><th style="white-space: nowrap;">Port</th><th style="white-space: nowrap;">Type</th><th>What to connect</th></tr></thead><tbody><tr><td style="white-space: nowrap;">**Execute**</td><td style="white-space: nowrap;">Trigger</td><td>Wire this from the previous node’s Execute output.</td></tr><tr><td style="white-space: nowrap;">**User**</td><td style="white-space: nowrap;">User</td><td>Choose which participant this applies to: **Host Only** or **All Users**. You can also wire in a specific user from an earlier node.</td></tr><tr><td style="white-space: nowrap;">**Enable**</td><td style="white-space: nowrap;">True / false</td><td>Set this to true to turn gamepad navigation on, or false to turn it off.</td></tr></tbody></table>

</div></div>#### Outputs

<div dir="auto" id="bkmrk-port-type-what-you-g"><div dir="auto"><table><thead><tr><th style="white-space: nowrap;">Port</th><th style="white-space: nowrap;">Type</th><th>What you get</th></tr></thead><tbody><tr><td style="white-space: nowrap;">**Execute**</td><td style="white-space: nowrap;">Trigger</td><td>Fires once the node has finished.</td></tr><tr><td style="white-space: nowrap;">**User**</td><td style="white-space: nowrap;">User</td><td>The same user, passed along so you can chain more user steps after this one.</td></tr><tr><td style="white-space: nowrap;">**Enable**</td><td style="white-space: nowrap;">True / false</td><td>The same on/off value you set, passed along for any later steps that need it.</td></tr></tbody></table>

</div></div>#### Example

<div dir="auto" id="bkmrk-user-input-all-users"><div dir="auto"><table><tbody><tr><td style="white-space: nowrap;">**User** input</td><td>`All Users`</td></tr><tr><td style="white-space: nowrap;">**Enable** input</td><td>`true`</td></tr><tr><td style="white-space: nowrap;">**User** output</td><td>The same user, ready for the next step</td></tr><tr><td style="white-space: nowrap;">**Enable** output</td><td>`true`</td></tr></tbody></table>

</div></div>#### Tips

<div dir="auto" id="bkmrk-use-the-same-node-wi"><div dir="auto">- Use the same node with **Enable** set to false later in your scene to turn gamepad navigation back off when it’s no longer needed.

---

</div></div>### Start QR Detection

Turns on QR code scanning for a participant so the scene can react when they point their view or device at a QR code.

#### What it does

When this node fires, the chosen participant starts looking for QR codes. From that moment on, whenever they aim at a QR code it can be picked up and used elsewhere in your scene. You can also choose whether an on-screen scanning panel appears to guide them, or whether detection happens quietly in the background.

This only switches scanning on — it doesn’t change the participant or the scene in any other way. The same participant is passed straight back out so you can connect more participant-related nodes after it.

#### Inputs

<div dir="auto" id="bkmrk-port-type-what-to-co-0"><div dir="auto"><table><thead><tr><th style="white-space: nowrap;">Port</th><th style="white-space: nowrap;">Type</th><th>What to connect</th></tr></thead><tbody><tr><td style="white-space: nowrap;">**Execute**</td><td style="white-space: nowrap;">Trigger</td><td>Wire this from the previous node’s Execute output.</td></tr><tr><td style="white-space: nowrap;">**User**</td><td style="white-space: nowrap;">User</td><td>Choose who starts scanning: **Host Only** (just the main user) or **All Users** (everyone in the session). You can also wire in a participant from an earlier node.</td></tr><tr><td style="white-space: nowrap;">**Show UI?**</td><td style="white-space: nowrap;">True / false</td><td>Set to `true` to show the on-screen scanning panel that guides the participant, or `false` to scan quietly in the background. Defaults to `true`.</td></tr></tbody></table>

</div></div>#### Outputs

<div dir="auto" id="bkmrk-port-type-what-you-g-0"><div dir="auto"><table><thead><tr><th style="white-space: nowrap;">Port</th><th style="white-space: nowrap;">Type</th><th>What you get</th></tr></thead><tbody><tr><td style="white-space: nowrap;">**Execute**</td><td style="white-space: nowrap;">Trigger</td><td>Fires once the node has finished.</td></tr><tr><td style="white-space: nowrap;">**User**</td><td style="white-space: nowrap;">User</td><td>The same participant you chose, passed along so you can connect more participant nodes after this one.</td></tr></tbody></table>

</div></div>#### Example

<div dir="auto" id="bkmrk-user-input-host-only"><div dir="auto"><table><tbody><tr><td style="white-space: nowrap;">**User** input</td><td>`Host Only`</td></tr><tr><td style="white-space: nowrap;">**Show UI?** input</td><td>`true`</td></tr><tr><td style="white-space: nowrap;">**User** output</td><td>The same participant, ready to pass on to the next node</td></tr></tbody></table>

</div></div>#### Tips

<div dir="auto" id="bkmrk-set-show-ui%3F-to-fals"><div dir="auto">- Set **Show UI?** to `false` when you want scanning to feel seamless — for example, automatically recognizing a code the participant walks up to without a panel popping up.
- This node only starts scanning. Use a matching stop node when you want the participant to stop looking for QR codes.

---

</div></div>### Stop QR Detection

Turns off QR code scanning for a participant, so the app stops looking for QR codes through their headset or device camera.

#### What it does

When you start QR detection, the chosen participant’s view keeps watching for QR codes in the real world around them. This node switches that watching back off. Once it runs, the app no longer scans for QR codes for that person, which is handy after they’ve scanned the code you needed, or when a part of your scene that relied on scanning is finished.

You pick who it applies to with the **User** input — just the host, or everyone. It only stops the scanning; it doesn’t undo anything that was already detected, and it has no effect if scanning wasn’t running for that participant. The same participant is passed straight through the **User** output, so you can carry on with more steps for that person.

#### Inputs

<div dir="auto" id="bkmrk-port-type-what-to-co-1"><div dir="auto"><table><thead><tr><th style="white-space: nowrap;">Port</th><th style="white-space: nowrap;">Type</th><th>What to connect</th></tr></thead><tbody><tr><td style="white-space: nowrap;">**Execute**</td><td style="white-space: nowrap;">Trigger</td><td>Wire this from the previous node’s **Execute** output.</td></tr><tr><td style="white-space: nowrap;">**User**</td><td style="white-space: nowrap;">User</td><td>Choose who this applies to: **Host Only** (the default) or **All Users**. You can also wire in a participant passed along from an earlier user node.</td></tr></tbody></table>

</div></div>#### Outputs

<div dir="auto" id="bkmrk-port-type-what-you-g-1"><div dir="auto"><table><thead><tr><th style="white-space: nowrap;">Port</th><th style="white-space: nowrap;">Type</th><th>What you get</th></tr></thead><tbody><tr><td style="white-space: nowrap;">**Execute**</td><td style="white-space: nowrap;">Trigger</td><td>Fires once the node has finished, so you can continue to the next step.</td></tr><tr><td style="white-space: nowrap;">**User**</td><td style="white-space: nowrap;">User</td><td>The same participant you chose, passed along so you can chain more user nodes after this one.</td></tr></tbody></table>

</div></div>#### Example

<div dir="auto" id="bkmrk-user-input-host-only-0"><div dir="auto"><table><tbody><tr><td style="white-space: nowrap;">**User** input</td><td>`Host Only`</td></tr><tr><td style="white-space: nowrap;">**User** output</td><td>The same participant, ready for the next user node</td></tr></tbody></table>

</div></div>#### Tips

<div dir="auto" id="bkmrk-pair-this-with-start"><div dir="auto">- Pair this with **Start QR Detection**: switch scanning on when you need a code read, then switch it off here once you’re done.
- Make sure the **User** choice matches the one you used to start scanning — if you started it for **All Users**, stop it for **All Users** too.

---

</div></div>### Show User Search Menu

Opens the user search menu on screen so a participant can look up and find other people in the session.

#### What it does

When this node runs, it brings up SimLab’s built-in user search menu for the participant you choose. From that menu the participant can search through the people in the session — handy in multi-user scenes where someone needs to locate a specific teammate.

You decide who sees the menu with the User input: either just the Host (`Host Only`) or everyone in the session (`All Users`). The node only opens the menu — it doesn’t change anything about the participant, and it passes that same user along on its output so you can connect more user-related nodes after it.

#### Inputs

<div dir="auto" id="bkmrk-port-type-what-to-co-2"><div dir="auto"><table><thead><tr><th style="white-space: nowrap;">Port</th><th style="white-space: nowrap;">Type</th><th>What to connect</th></tr></thead><tbody><tr><td style="white-space: nowrap;">**Execute**</td><td style="white-space: nowrap;">Trigger</td><td>Wire this from the previous node’s Execute output to open the menu.</td></tr><tr><td style="white-space: nowrap;">**User**</td><td style="white-space: nowrap;">User</td><td>Chooses who the search menu opens for. Pick `Host Only` to show it just to the host, or `All Users` to show it to everyone in the session.</td></tr></tbody></table>

</div></div>#### Outputs

<div dir="auto" id="bkmrk-port-type-what-you-g-2"><div dir="auto"><table><thead><tr><th style="white-space: nowrap;">Port</th><th style="white-space: nowrap;">Type</th><th>What you get</th></tr></thead><tbody><tr><td style="white-space: nowrap;">**Execute**</td><td style="white-space: nowrap;">Trigger</td><td>Fires once the menu has been opened, so you can continue to the next node.</td></tr><tr><td style="white-space: nowrap;">**User**</td><td style="white-space: nowrap;">User</td><td>Passes the same user along, so you can chain more user nodes after this one.</td></tr></tbody></table>

</div></div>#### Example

<div dir="auto" id="bkmrk-user-input-all-users-0"><table><tbody><tr><td style="white-space: nowrap;">**User** input</td><td>`All Users`</td></tr><tr><td style="white-space: nowrap;">**User** output</td><td>The same participant, ready to pass to the next user node.</td></tr></tbody></table>

</div>