SimLab Composer Addons
Help and tutorials from SimLab Composer and VR Studio Addons Created by SimLab Soft.
- Add-ons Manager
- LOD Generator
- Doors Accessibility
- Gamepad Integration
- Objects Menu
- Groups Menu
- CSV Attributes Manager
- MR Spatial Sync
Add-ons Manager
The Add-ons Manager serves as the central hub for extending the capabilities of SimLab Composer. It allows you to discover, install, and manage extra tools—like the CSV Attribute Manager or Gamepad Integration—to customize your workflow.
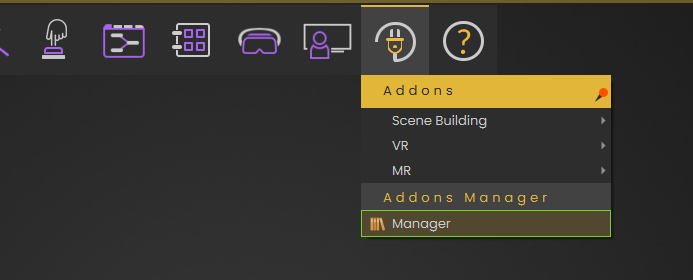
Accessing the Manager
To open the manager, navigate to the main toolbar:
-
Click the Add-ons icon (resembling a power plug).
-
Select Manager from the bottom of the dropdown list.
Key Features & Interface
The Manager window provides a comprehensive overview of all your installed tools.
1. Finding and Organizing
-
Search Bar: Quickly locate a specific add-on by typing its name in the search field at the top.
-
Filter Criteria: You can refine your search results by Name, Author, Description, or Version.
2. Managing Installed Add-ons
-
Enable/Disable: Use the toggle switch on the right side of any add-on to turn it on or off without uninstalling it.
-
Play Video: Click the Play icon to watch a video tutorial or demonstration of how the add-on works.
-
Help Documentation: Click the Link icon (chain link) to open the official help page or documentation for that specific tool.
-
Remove Add-on: Click the Trash icon to completely uninstall the add-on from your system.
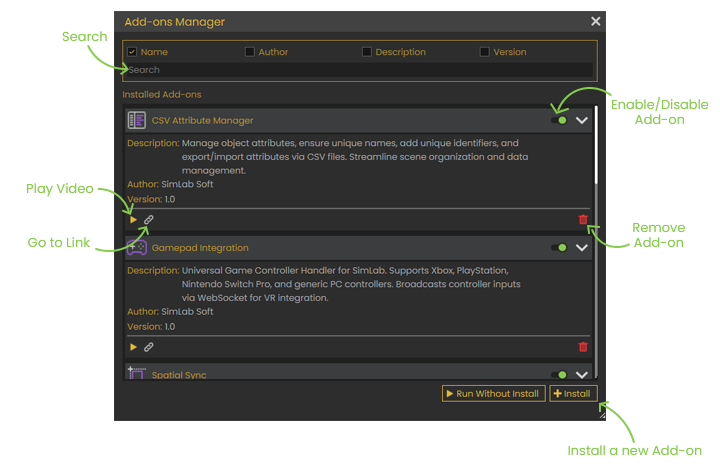
How to Install a New Add-on
Add-ons are typically provided as .zip files. To add a new tool to your library:
-
Click the + Install button located at the bottom right of the Manager window.
-
In the file browser that appears, locate and select the ZIP file for the add-on you wish to install.
-
Click Open. The tool will appear in your "Installed Add-ons" list, where you can then enable it for use.
[!TIP] Run Without Install: If you want to test an add-on briefly without adding it to your permanent library, you can use the Run Without Install button next to the install option.
LOD Generator
This guide explains how to use the VR LOD Generator in SimLab Composer to optimize large scenes for a smooth, high-performance VR experience.
What is LOD (Level of Detail)?
LOD is a system that swaps a 3D model with lower-polygon versions in real-time to save processing power. The switch between levels is determined by two main criteria:
-
Distance: How far the user is from the object.
-
Screen Coverage: How much space the object takes up in the user's field of view.
1. Pre-LOD Optimization
Before generating LODs, you must reduce "draw calls" (the number of separate objects) and clean up materials.
-
Selection Rule: Expand groups and select individual assemblies (e.g., all separate chairs) rather than just the single top-level parent assembly.
-
Step 1 (Materials): Merges identical materials and optimizes texture sizes/compression.
-
Step 2 (Merge Objects): Combines parts within each assembly to reduce complexity while keeping objects distinct from one another.
2. Identifying "Heavy" Objects
The plugin provides a surgical way to find which objects are taxing performance:
-
Filter: Set a Minimum Polygon count to populate the plugin table with complex objects.
-
Analyze & Zoom: View exact polygon counts in the table. Clicking any item in the table will automatically zoom the camera to that object in the scene for inspection.
3. Creating & Managing LODs
Define your decimation percentages for each level. Note that LOD 0 represents the model when the user is closest to it; decimating this level reduces the polygon count of the "original" model itself.
-
LOD 0: Initial decimation to optimize the model at its closest distance.
-
LOD 1 & 2: Increasing levels of reduction for mid-to-far distances.
-
LOD 3: Enable the Hide option to completely remove distant objects from the render.
-
Global Settings: Use this to determine if the system swaps levels based on Distance or Screen Coverage.
Watch This Tutorial to Learn more
Doors Accessibility
The Door Accessibility plugin is designed to streamline navigation in VR architectural walkthroughs. In a realistic VR environment, objects have physical properties like collision to prevent users from walking through walls or falling through floors. However, since doors in 3D models are typically closed, they can unintentionally block a user's path.
This plugin provides a fast, automated way to manage door accessibility across large models without the need for manual setup in the Training Builder.
The Goal: Fluid VR Movement
While collision is essential for a grounded experience, navigating through a building requires a way to bypass doors. Instead of manually disabling collisions for every door one by one, this tool allows you to batch-process all door assemblies into two distinct behavior categories.
Using the Door Accessibility Interface
The plugin features a simple two-list interface. To manage your doors, select the desired door assemblies in your scene and use the controls described below.
1. Invisible Nodes (Left List)
This mode creates an interactive experience where the user "opens" the door by clicking it.
-
Behavior: The door is visible and solid in VR. When the user clicks on it, the door becomes invisible, and its collision is removed, allowing the user to walk through.
-
How to add: Select the door assemblies and click the Plus (+) button under the Invisible Nodes list.
-
How to remove: Select the item in the list and click the Minus (-) button.
2. Passthrough (Right List)
This mode is ideal for quick walkthroughs where you want the user to move freely without needing to interact with every door.
-
Behavior: The door remains visible at all times, but its collision is automatically disabled. The user can simply walk straight through the door as if it were a "ghost" object.
-
How to add: Select the door assemblies and click the Plus (+) button under the Passthrough list.
-
How to remove: Select the item in the list and click the Minus (-) button.
Mode Comparison
| Feature | Invisible Nodes (Left) | Passthrough (Right) |
| User Interaction | Requires clicking the door. | No action required. |
| Visibility | Becomes invisible after click. | Remains visible at all times. |
| Collision | Disabled only after interaction. | Disabled by default. |
| Experience Style | Interactive / Simulated. | Seamless / Fluid. |
Gamepad Integration
The Gamepad Integration addon bridges the gap between standard game controllers (Xbox, PS4/PS5, etc.) and your SimLab Composer VR experience. This allows users to navigate or interact with the scene using a familiar gamepad instead of traditional VR controllers.
How It Works: The Logic
The addon translates physical button presses into Variables within SimLab Composer.
-
The Input: Pressing a button sends a signal (e.g., "Pressed/Released" or a pressure value from 0.0 to 1.0).
-
The Response: In the Training Builder, you use nodes like Watch Boolean Expression or Branch on Expression to monitor these variables and trigger specific actions in your scene.
Setup Guide
1. Discovering Your Controller
Once you launch the addon, it will detect any connected controllers.
-
Discover: If you connect your controller after the addon is open, click Discover. A popup will appear showing the controller’s name and image.
-
Mapping Buttons: While the Discover dialogue is open, press any button on your gamepad. The variable name and its current value will appear in the list.
-
Add Variable: Click the Add Variable button next to the desired input. This automatically creates that variable in the Training Builder for you to use.
2. Linking the System
After mapping your variables, close the Discover dialogue to return to the main menu.
-
Link VR Experience: Click this to generate the internal Training Builder system that allows SimLab to talk to the controller server.
-
Connect to VR: Click this to establish the live connection. This step starts a local server that handles the communication.
3. Running the Experience
Because the addon uses a server-based connection, your gamepad input can be sent to multiple platforms:
-
PC VR: Standard wired or wireless connection.
-
Mobile & Standalone Headsets: Since the connection happens via a server, you can control experiences running on mobile devices or headsets like the Meta Quest.
Input Types Reference
| Input Type | Value Range | Best Use Case |
| Discrete (Buttons) | Pressed / Released | Toggling lights, opening doors, or teleporting. |
| Analog (Triggers/Sticks) | 0.0 to 1.0 | Controlling movement speed or dimming lights. |
Closing the Session
When you are finished testing or presenting, click Disconnect from VR. This terminates the server connection and stops the variable tracking.
Workflow Summary
-
Discover: Connect and identify your gamepad.
-
Map: Press buttons and click Add Variable to send them to Training Builder.
-
Link: Use Link VR Experience to build the connection logic.
-
Connect: Hit Connect to VR and launch your scene.
Watch this tutorial to learn more
Objects Menu
Step 1: Object Selection & Activation
-
Add Objects: Select an object in your scene and click the Plus (+) button in the left-hand list.
-
Activation Mode: Use the dropdown at the top to choose how the menu is summoned in VR:
-
Trigger: The menu appears when the user clicks the object.
-
Hover: The menu appears when the user points at or hovers over the object.
-
-
VR Placement: When activated in the VR experience, the menu will automatically appear directly on top of the object.
Step 2: Creating Menu Tabs
-
Scene States Tab: Drag and drop Scene States from the bottom panel of SimLab Composer. You can choose to display them as numbers, original thumbnails, or custom images.
-
Animation Sequences Tab: Drag and drop Animation Sequences from your library to allow users to trigger object movements directly from the menu.
-
Training Builder Actions Tab: This tab is for custom logic. Each "Action" you create is assigned a unique Training Builder ID.
Step 3: Training Builder Integration
The logic for custom Actions is managed through the Training Builder. To make this process seamless, each Action widget includes a Training Builder shortcut button next to the ID field.
The Automated Workflow:
When you click the Training Builder button, SimLab Composer automatically opens the Training Builder and creates the event node for you. * It natively generates the Dynamic Menu Item Triggered (Node + ID) event.
-
It automatically attaches the target object and fills in the Action ID.
-
Your Task: Simply connect the desired responses (like playing a sound or jumping to a new scene) to the auto-generated node.
While the shortcut natively creates the Node + ID event, the system also supports other events (like Dynamic Menu Item Triggered, ID, or Node) if you wish to build a custom logic system manually.
Step 4: Visual Customization (Settings)
Click the Settings button at the top left to define the look of your menu:
Step 5: Applying Changes
Summary Table: Menu Types
| Tab Type | Input Method | Best Use Case |
| Scene States | Drag & Drop | Changing materials, colors, or layout options. |
| Animations | Drag & Drop | Opening drawers, operating machinery, or moving parts. |
| TB Actions | Training Builder IDs | Custom logic and complex interactions. |
Watch this tutorial to learn more
Groups Menu
The Concept: Batch Control via Attributes
This addon is designed to leverage Attributes. In SimLab Composer, objects can store data (like specific animation sequences, scene states, or text values) as attributes. By grouping objects, you can create a single menu button (e.g., "Play") that calls an attribute. When a user interacts with an object in that group, the menu triggers that object's unique attribute, allowing you to control hundreds of items with a single setup.
1. Organizing Groups & Objects (Left Panel)
-
Groups List (Top): Click (+) to create a group. Double-click the name to rename it (e.g., "All Windows").
-
Objects in Group List (Bottom): Select objects in your 3D scene and click (+) to add them to the selected group.
-
Note: An object can only belong to one group at a time.
-
-
Activation Mode: Use the dropdown to choose between Trigger (click) or Hover (look at) to summon the menu.
-
VR Behavior: In the VR experience, the menu will dynamically appear directly on top of the specific object that you triggered or hovered over.
2. Building the Menu Content (Right Panel)
The right side is where you define the tabs and buttons that appear in your VR menu.
3. Training Builder Integration
The interaction logic is managed through the Training Builder. To make this seamless, each Action widget features a Training Builder icon button next to the ID field.
The Automated Workflow: When you click the Training Builder button, SimLab Composer automatically opens the Training Builder and creates the event node for you. It natively generates the Dynamic Menu Item Triggered (Node + ID) event, attaches the correct object, and fills in the Action ID.
[!TIP] While SimLab provides other events for custom systems (like Dynamic Menu Item Triggered, ID, or Node), the Node + ID event is the native choice for this addon because it identifies exactly which object in the group was clicked and which button was pressed.
Once the node is created automatically, all you need to do is connect your desired responses (like "Play Attribute Animation").
4. Utility Controls & Settings
-
Copy Group: Copies all tabs and actions from a group to a new one. Note: Objects are not copied, as they must remain unique to one group.
-
JSON Export/Import: Save your entire menu configuration as a JSON file to transfer setups between different projects.
-
Settings Icon:
-
Border Shape: Choose between Sharp Square, Rounded/Beveled Square, or Circle.
-
Colors: Customize the Primary Color (icons/numbers), Border Color (strokes), and Background Color (fills).
-
Workflow Summary
-
Group: Create a group and add all relevant objects.
-
Define: Create tabs and add Action widgets with unique IDs.
-
Automate: Click the Training Builder button in each widget to auto-generate the Node + ID event nodes.
-
Link: Connect your responses to the auto-generated nodes.
-
Style: Customize the visuals in Settings and click Apply.
Watch this tutorial to learn more
CSV Attributes Manager
The CSV Attributes Manager is a powerful productivity tool in SimLab Composer 15 designed to manage metadata for hundreds or thousands of objects simultaneously. Instead of manually entering attributes for individual items (such as a scene containing every country in the world), you can export, edit, and import data using standard CSV files.
Key Functions
The add-on interface is divided into four main utilities to ensure your scene data is organized and easily accessible for logic-heavy experiences.
1. Guarantee Unique Names
In large scenes, identical object names can cause issues with logic and tracking.
-
Fix Duplicates: Automatically scans your selection and renames duplicate objects by adding a numerical suffix (e.g., "Chair" becomes "Chair#1", "Chair#2").
2. Add Unique Identifier (GUID)
-
Add GUIDs: Adds a unique "ID" attribute to every selected object. This is essential for developers who need a permanent, unique reference for objects that persists even if names are changed later.
3. Export CSV
This section allows you to pull data out of SimLab Composer to edit it in external programs like Microsoft Excel or Google Sheets.
-
Export Names Only: Creates a CSV file with a single column titled "name". This is the perfect starting point for adding new data to a scene.
-
Export Names with Attributes: Exports the object names along with any existing attributes they already possess.
4. Import CSV – Apply Attributes
This is the core of the workflow. It reads data from your spreadsheet and applies it to the corresponding objects in your 3D scene.
-
Select CSV File: Once you have edited your CSV, select your objects in the scene and use this button to apply the new data.
The Workflow: Adding Data in Bulk
To add complex data (like Capital, Population, and Area) to many objects at once, follow these steps:
-
Selection: Select all objects in the scene tree that require attributes.
-
Export: Use Export Names Only to generate your base file.
-
External Edit: Open the CSV in Excel or a similar tool.
[!IMPORTANT]
Column Formatting: The first column MUST be titled name in all lowercase letters for the importer to recognize the objects.
-
Add Attributes: Create new columns for each attribute you want (e.g., a "Population" column). Fill in the rows with the corresponding data.
-
Import: Back in SimLab Composer, with the objects still selected, click Select CSV File and choose your edited document.
Summary Table
| Feature | Best Use Case | Benefit |
| Fix Duplicates | Scenes with many repeated assets (trees, chairs). | Prevents naming conflicts in logic. |
| Add GUIDs | Complex VR training or database-driven scenes. | Provides a permanent "ID" for every object. |
| Export Names | Initializing a new project's data. | Quickly creates a "master list" of your scene. |
| Import CSV | Applying population, price, or technical data. | Saves hours of manual data entry. |
Watch this Tutorial to lean more
MR Spatial Sync
The Spatial Sync add-on for SimLab Composer allows you to perfectly align your virtual 3D environment with your real-world physical space. This is essential for Mixed Reality (MR) experiences, where virtual objects (like a new kitchen layout) need to sit accurately within your actual room.
Prerequisites
Before launching the add-on, you must organize your scene:
[!IMPORTANT]
Naming Convention: All objects that you want to appear in Mixed Reality must be placed inside a single group named interior (written in all lowercase).
1. The Setup Wizard
Open the Add-ons menu, navigate to the MR tab, and launch Spatial Sync. The wizard will guide you through these steps:
-
Select Group: Choose the
interiorgroup you created. -
Corner Alignment: A yellow sphere will appear at the scene center. Shift your 3D model so that one of its room corners aligns with this sphere.
-
Avatar Placement: Position the avatar at a natural starting point, such as the room's entrance.
-
Rotation Guide: Rotate the provided group until the two green planes line up with the edges/walls of your virtual room. These serve as visual markers for the user in VR.
-
Filter Non-MR Objects: Select any objects that should not be visible in Mixed Reality (e.g., placeholder walls, structural guides, or background environments) and click Next.
2. Real-World Alignment (In VR/MR)
Once you launch the experience on your headset in Mixed Reality mode, follow these steps to sync the scene:
-
Positioning: Grab the virtual sphere and place it at the exact physical corner of your real room that you selected during setup. Press the Grip button to set it.
-
Rotating: A rotation ring will appear. Grab and rotate it until the green planes on your screen perfectly overlap with your real physical walls.
-
Finalizing: Press Apply to bring the interior objects into view. If the alignment looks correct, click Confirm to save the position.
Summary Table: Alignment Tools
| Tool | Action in VR | Purpose |
| Yellow Sphere | Grab & Place at corner | Sets the "Anchor Point" for the room. |
| Rotation Ring | Grab & Spin | Matches virtual orientation to real walls. |
| Green Planes | Visual Overlay | Acts as a guide to ensure 90° alignment. |
| Confirm Button | Click to Save | Permanently locks the virtual scene to your room. |
Why use Spatial Sync?
-
Precision: Ensures virtual furniture or renovations are viewed at the correct scale and position.
-
Ease of Use: Replaces complex manual coding with a simple "grab-and-place" mechanic.
-
Persistence: Once confirmed, the virtual interior stays locked to the real world, allowing for a stable walkthrough.
Watch this tutorial to learn more