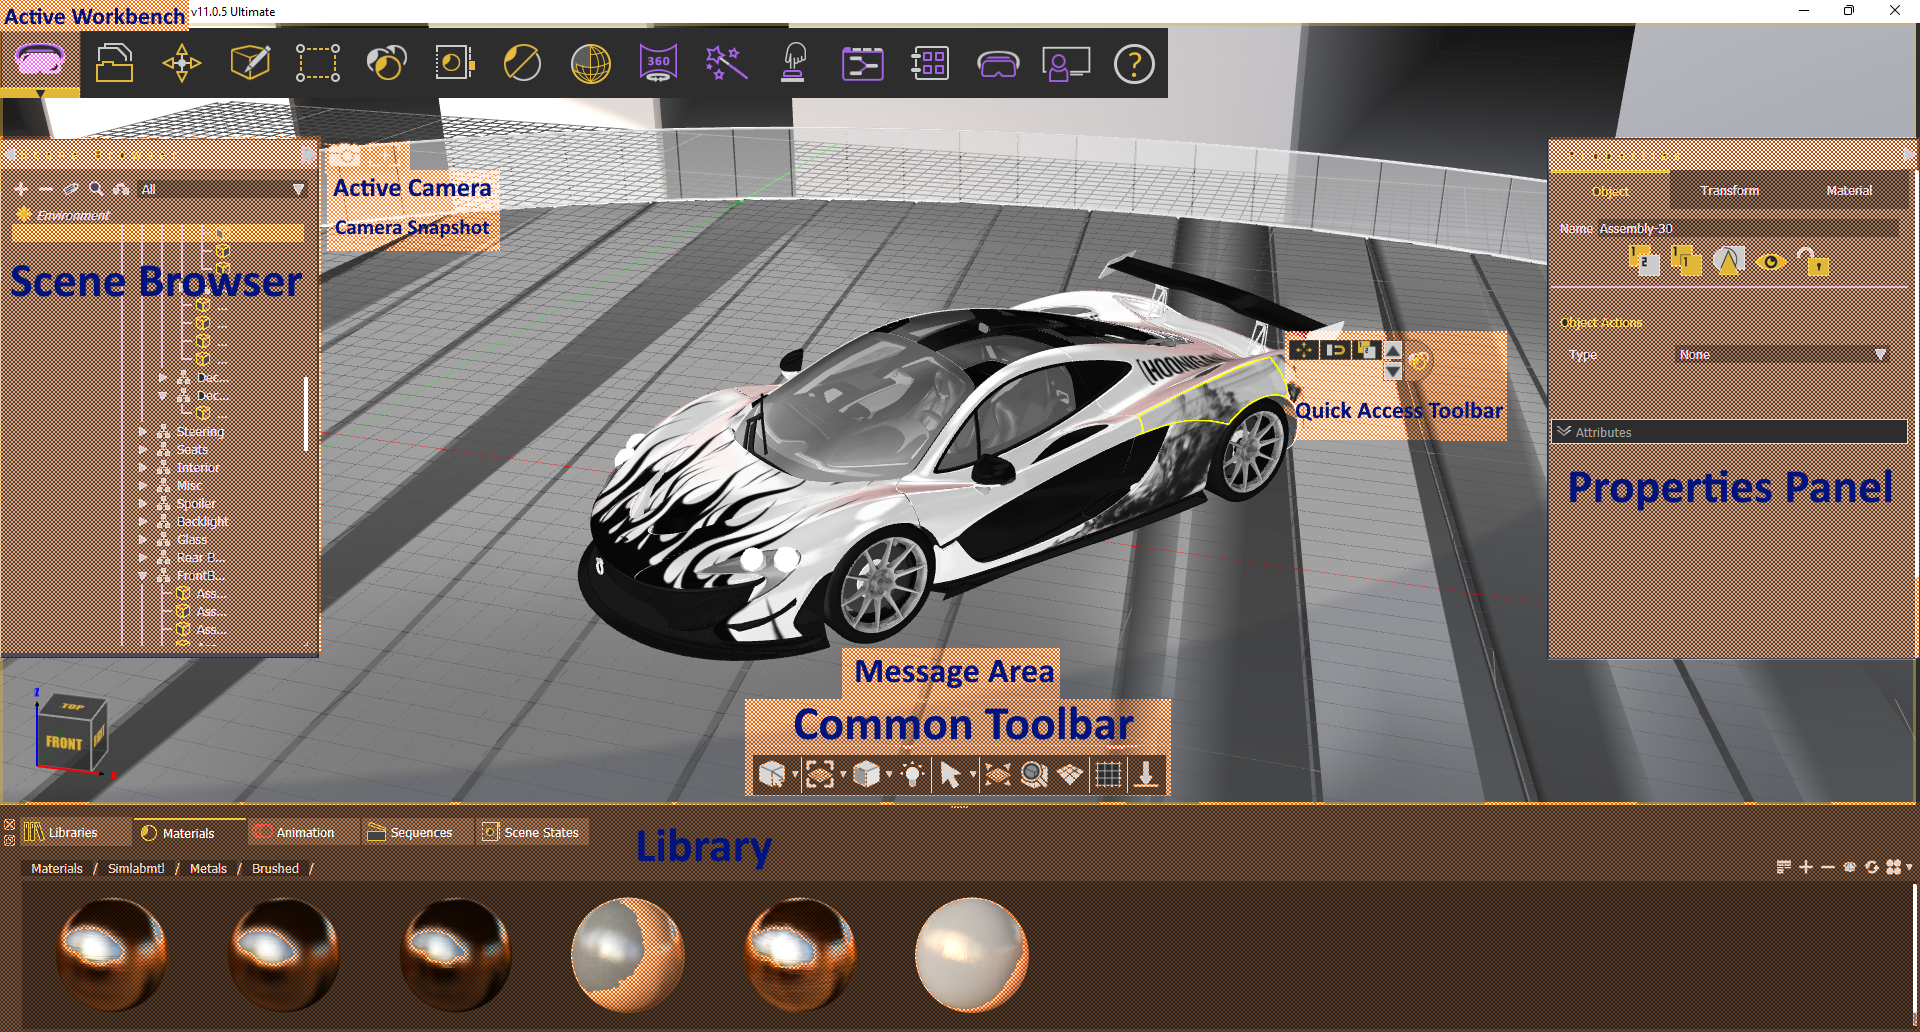
SimLab Composer interface is organized into workbenches. Upon selecting a workbench the allocated tools in that workbench will appear, and the interface will be changed to display the defaults of that selected workbench.
There are several elements that provide structure to how the commands are presented in the user interface. In addition to the 3D Area, the Main Window includes the following components:
- [Main Toolbar](https://simlab-soft.com/help/books/simlab-composer-11-help-final/page/main-toolbar)
- [Scene Browser](https://simlab-soft.com/help/books/simlab-composer-help/page/scene-browser)
- [Properties Panel](https://simlab-soft.com/help/books/simlab-composer-help/page/properties-panel)
- [Library ](https://simlab-soft.com/help/books/simlab-composer-help/page/library)
- [Assets Library](https://simlab-soft.com/help/books/simlab-composer-help/page/assets-library)
- [Material Library](https://simlab-soft.com/help/books/simlab-composer-help/page/material-library)
- [Animation Timeline](https://simlab-soft.com/help/books/simlab-composer-help/page/animation-timeline-CYu)
- [Sequences Library](https://simlab-soft.com/help/books/simlab-composer-help/page/sequence-library)
- [Scene States Library](https://simlab-soft.com/help/books/simlab-composer-help/page/scene-states-library)
- [Common Tool Bar](https://simlab-soft.com/help/books/simlab-composer-help/page/common-toolbar)
- [Quick Access Tool Bar](https://simlab-soft.com/help/books/simlab-composer-help/page/quick-access-toolbar)
- [Active Camera](https://simlab-soft.com/help/books/simlab-composer-help/page/active-camera)
These components are shown in the following image
[](https://simlab-soft.com/help/uploads/images/gallery/2022-09/uRcimage.png)
# Scene Browser
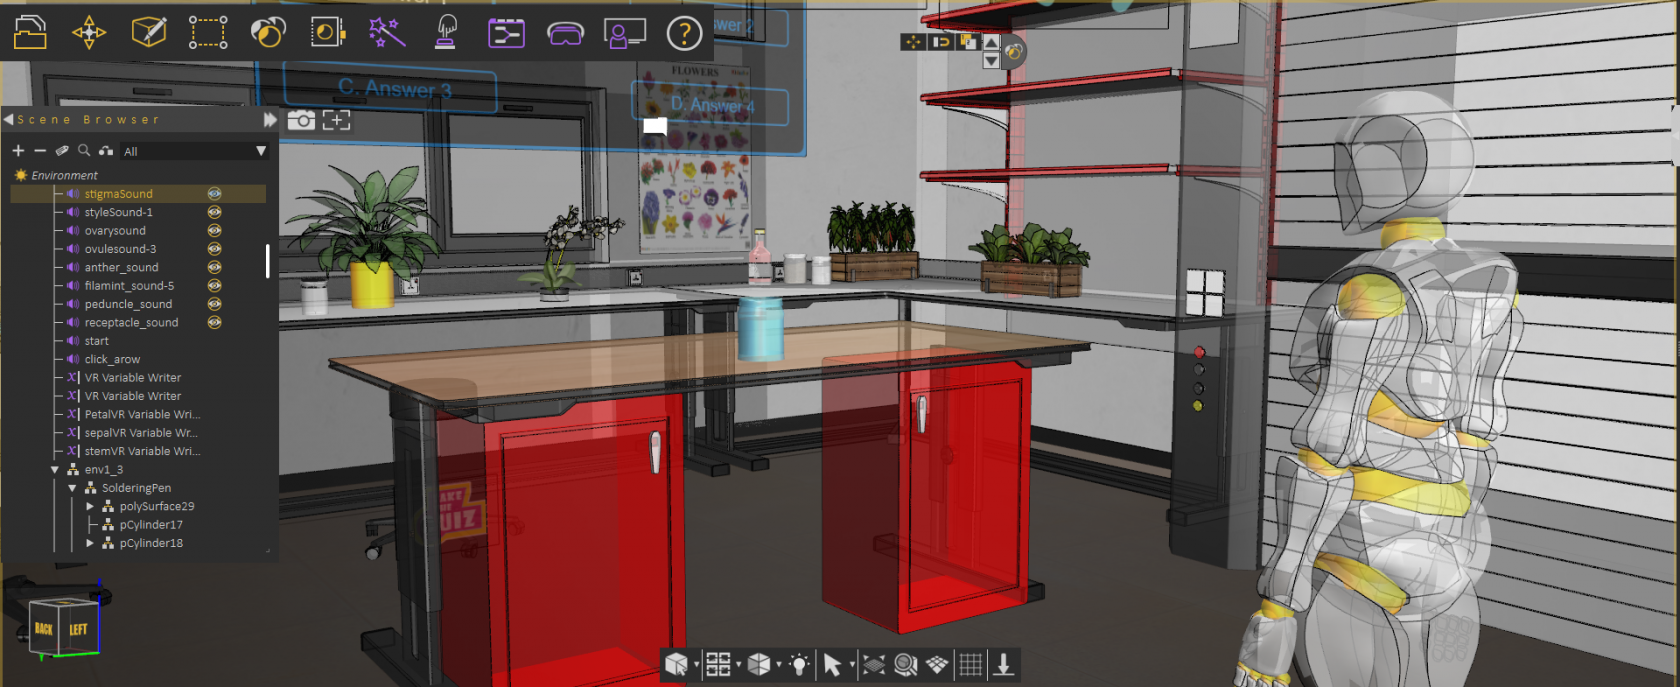
[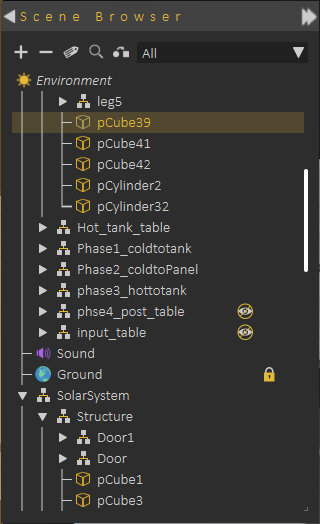](https://simlab-soft.com/help/uploads/images/gallery/2021-12/scene-browser.png)**Scene Browser** lists all elements in the scene and shows clear tree structure of the models, where the user can view parent/child relationships.
When a **parent** in the Scene Browser is selected and hidden/deleted, the effect is automatically applied to all its **children** so they are automatically hidden/deleted.
**Scene Browser** allows using **Shift** or **Ctrl** to select multiple items.
Changing **parent**/**child** relationship in Scene Browser can be done easily by **dragging** an object or group off objects and **dropping** them onto a new parent.
**+/-** buttons on top of the Scene Browser allows expanding all level in the tree (**+ button**) , or closing all and keeping just the top level (**- button**)
**Environment** at the top of the **Scene Browser**, always exists and can not be deleted. When you click on **Environment** in the Scene browser, **Properties Panel** is updated to show the properties of the environment, which allows you to make changes.
[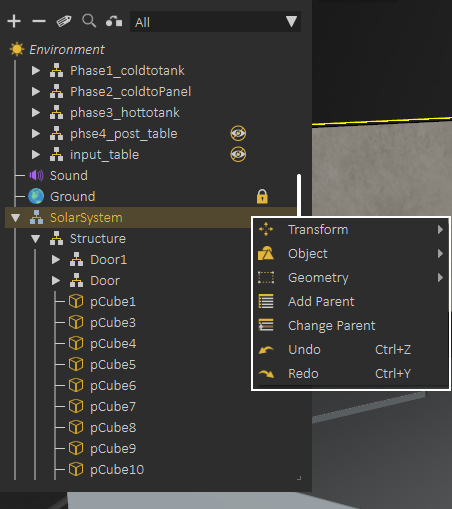](https://simlab-soft.com/help/uploads/images/gallery/2021-12/scene-browser-right-click.png)
Selecting object(s), then **right clicking**, shows a helping menu allowing quick actions like **Hide/Show** object(s), **Change parent**, **Add parent**, or perform a **geometry operation**.
---
[](https://simlab-soft.com/help/uploads/images/gallery/2021-12/scene-browser-filter.png)
Scene Browser uses icons to identify the object types, but even with icons for large scenes it may not be easy to find the object(s) you are looking for. For helping in this task Scene Browser provides two options:
**Scene Browser Filters:** Select filter to show only object(s) of specific type, for example select Lights filter to view all lights in the scene.
**Searching Scene Browser:** By clicking the search button the user can search for objects in the Scene Browser based on **names** or **object attributes**
The size and location of the Scene Browser can be changed easily, as well as choosing whether to hide it or not. Its appearance can be changed from File -> Preferences, Appearance tab, where Tree Transparency can be changed.
---
**Attributes Manager**
From the top bar of Scene Browser, **Attribute Manager** can be started. **Attribute Manager** allows viewing attributes attached to objects in the scene, and updating them.
[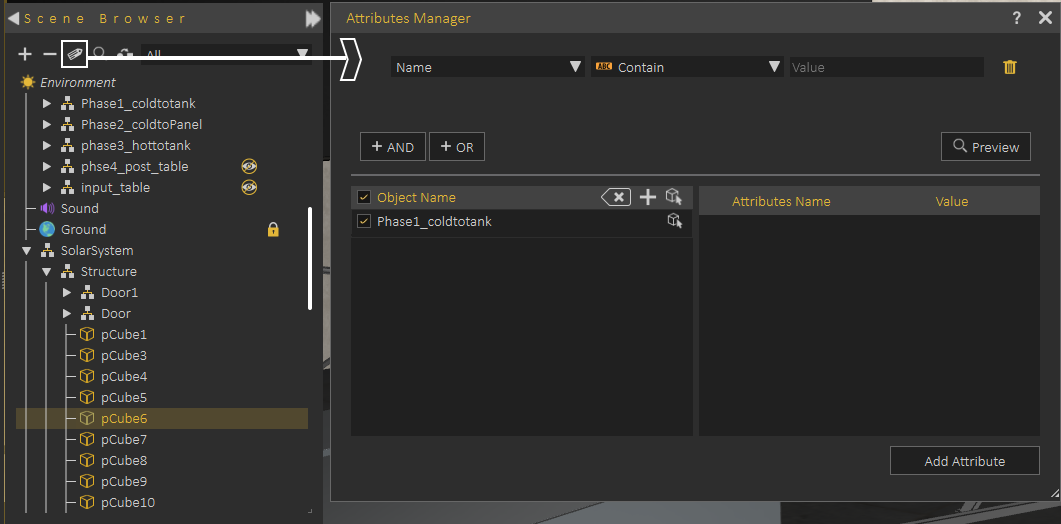](https://simlab-soft.com/help/uploads/images/gallery/2021-12/scene-browser-attributes-manager.png)
The following tutorial shows how to use **Attribute Manager**.
**Selection Sets**
Makes selecting multiple objects more convenient. Usually, users select objects using the tree structure in SimLab Composer. This works well for single selections but can be tricky for multiple selections. Sometimes users want to select multiple objects repeatedly without changing the tree structure. For example, selecting all car wheels or the tops of multiple desks while keeping their original organization.
The solution - **Selection Sets**, allows users to save groups of objects which can be quickly selected whenever needed. It doesn't alter the original tree structure, so objects still move and behave correctly.
The following tutorial demonstrates how to use these Selection Sets effectively in SimLab Composer:
# Properties Panel
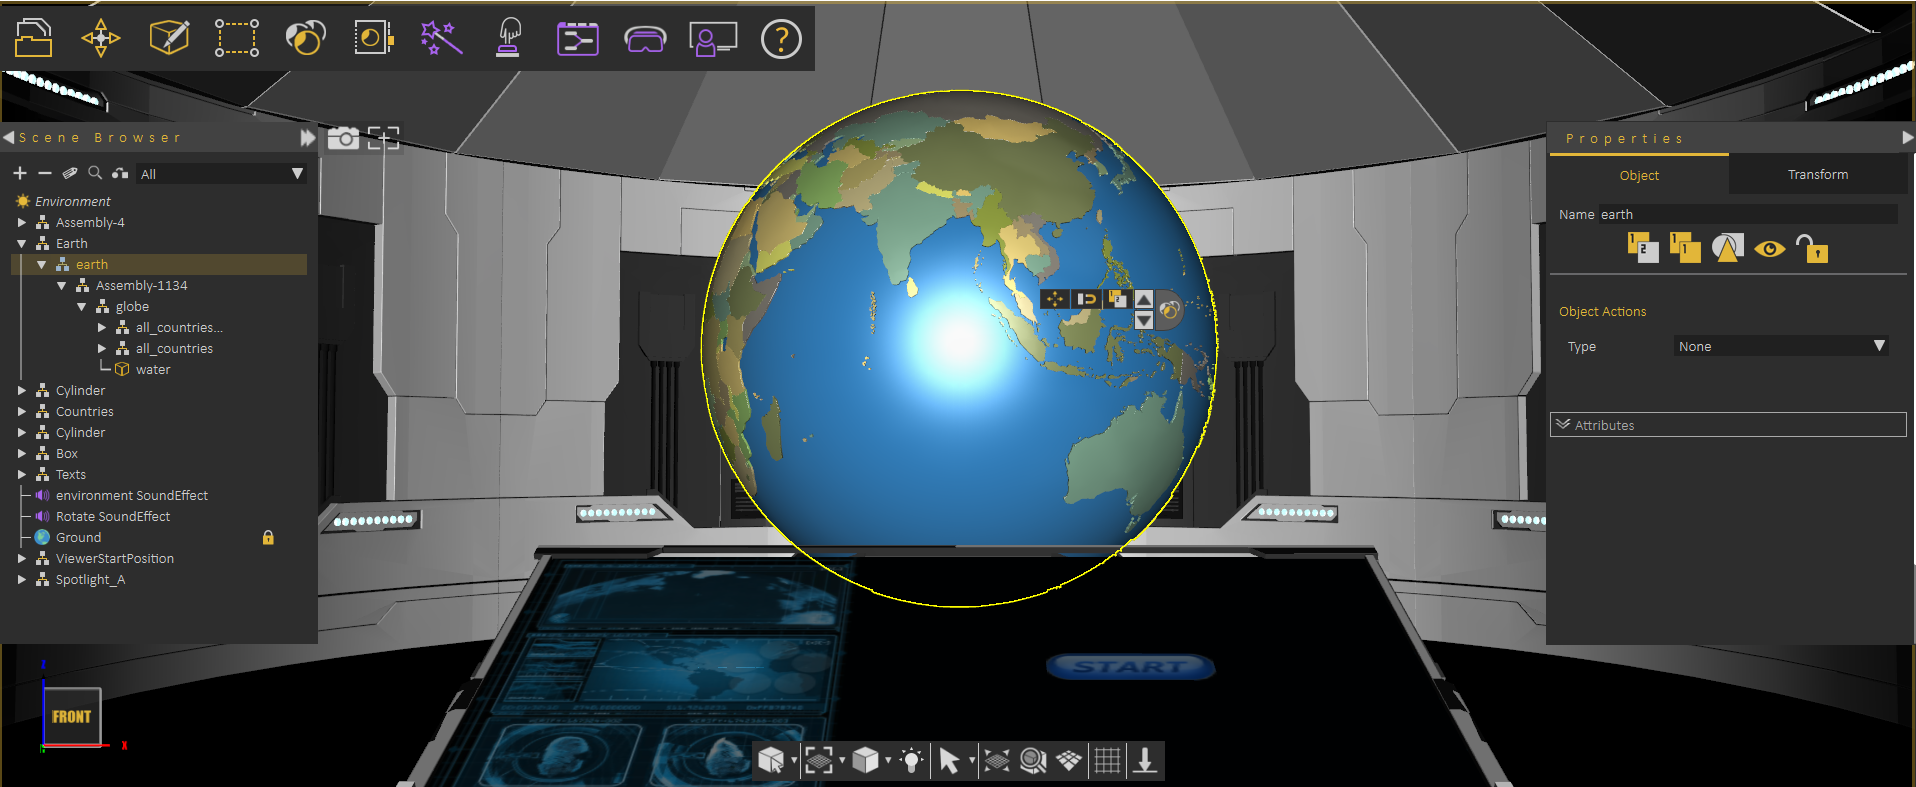
When selecting an object or entity in the scene the **Properties Panel** appears in the right side of the application showing its properties.
Objects are shown in the Scene Browser, they are part of the model tree is the **Scene Browser.** An object can be selected by clicking on it in the **3D Area** or by selecting it from the **Scene Browser.**
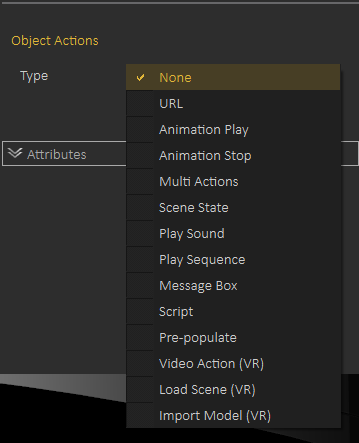
**Properties Panel**, may have two tabs or more depending on the object type.
When selecting a part of an assembly object (not the end leaf in the tree) Properties Panel usually shows two tabs as shown in the following image
[](https://simlab-soft.com/help/uploads/images/gallery/2021-12/image-1640430837801.png)
those tabs are **Object Tab**, and **Transform Tab**
#### Object Tab
**Object Tab** includes functionality that can be applied to any object in the scene. This includes: **Copy Object**, **Create Instance**, **Isolate**, **Hide/Show**, **Freeze/Unfreeze**, in addition to changing the name of an object.
The described functionality is available in the top of the Object Tab
[](https://simlab-soft.com/help/uploads/images/gallery/2021-12/image-1640431098733.png)
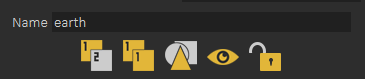
##### Object Actions
Object Tab also includes **Object Actions**, which is a simple way of defining what to do if the user clicks on the object in the VR Experience.
[](https://simlab-soft.com/help/uploads/images/gallery/2021-12/image-1640431209267.png)
Object Actions can be one of the following
1- Open URL
2- Play/Stop Animation
3- Multi Action (you can assign multiple actions to be executed when the object is clicked)
4- Apply Scene State
5- Play Sound (thought it is better to use SimLab Composer Sound object)
6- Play Sequence
7- Show Message Box
8- Video Action
9- Load Scene
10- Import Model
---
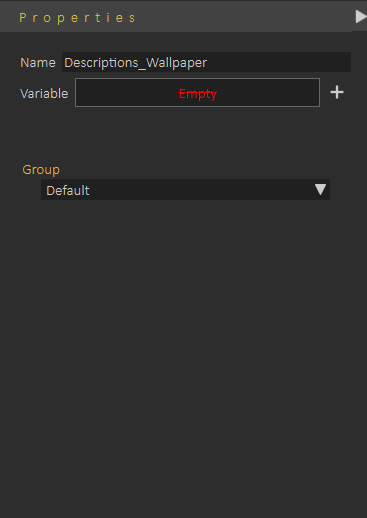
##### Attributes Panel
**Attributes Panel** shows attributes assigned to the object. Attributes can be imported when importing the 3D model, or created using **Attribute Panel** or the [**Attribute Manager**](https://simlab-soft.com/help/books/simlab-vr-studio-help/page/scene-browser#:~:text=bkmrk%2Dattributes%2Dmanager-,Attributes%20Manager,-From%20the%20top) (which is accessible in the Scene Browser)
[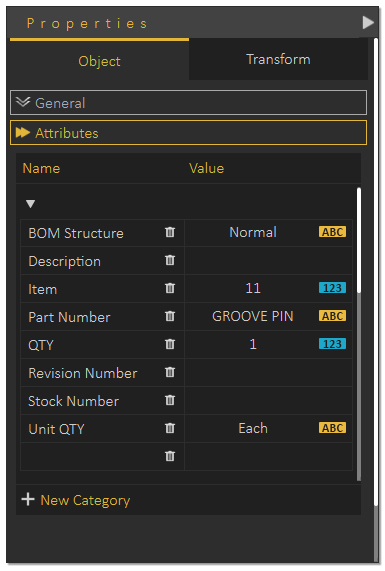](https://simlab-soft.com/help/uploads/images/gallery/2021-12/image-1640431618384.png)
The following tutorial shows how the user can utilize attributes in VR Experiences
---
#### Transform Tab
Allows the user to view/modify local and global location, orientation and scale of the object and its pivot. The Apply Transform tool resets an object's transformations while retaining its correct position, scale, and appearance. It's ideal for animating models with non-uniform scaling, preventing distortion, and optimizing performance in scenes with inconsistent or extreme scales. Check this [video](https://youtu.be/BIjtnigG36o).
[](https://simlab-soft.com/help/uploads/images/gallery/2025-04/image.png)
---
##### Extra Tabs
Based on the object type, additional tabs may be added to the **Properties Panel**, for example if user selected a leaf object (3D object) the **Material Properties** tab is added, as shown in the following image:
[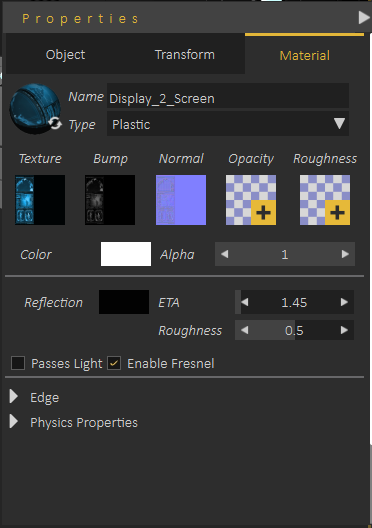](https://simlab-soft.com/help/uploads/images/gallery/2021-12/image-1640432142123.png)
The following video shows a detailed tour for the Material Properties tab:
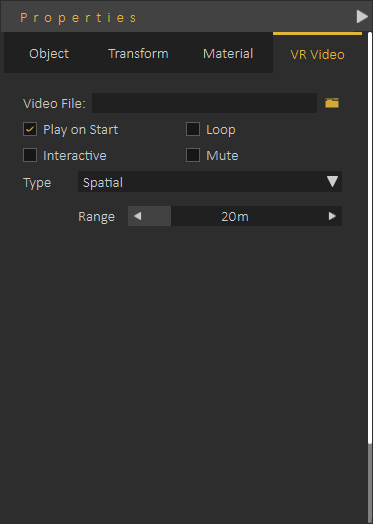
Effects like VR Fire, VR Smoke, VR Showers, VR Video, VR Sound and others will add an additional VR or VR properties tab, allowing the user to set specific properties for the selected object, the following image shows the new **VR Video** property tab added when selecting a VR Video:
[](https://simlab-soft.com/help/uploads/images/gallery/2021-12/image-1640432550643.png)
---
#### Entity Panel
When the user clicks ESC (to make sure no object is selected) the user can go to the library and click on a sequence, a scene state or a key in the animation timeline to view its properties in the **Properties Panel**
##### Sequence Properties
[](https://simlab-soft.com/help/uploads/images/gallery/2021-12/image-1640432913677.png)
##### Scene State Properties
[](https://simlab-soft.com/help/uploads/images/gallery/2021-12/image-1640432958460.png)
##### Key Frame Properties
[](https://simlab-soft.com/help/uploads/images/gallery/2021-12/image-1640433047093.png)
---
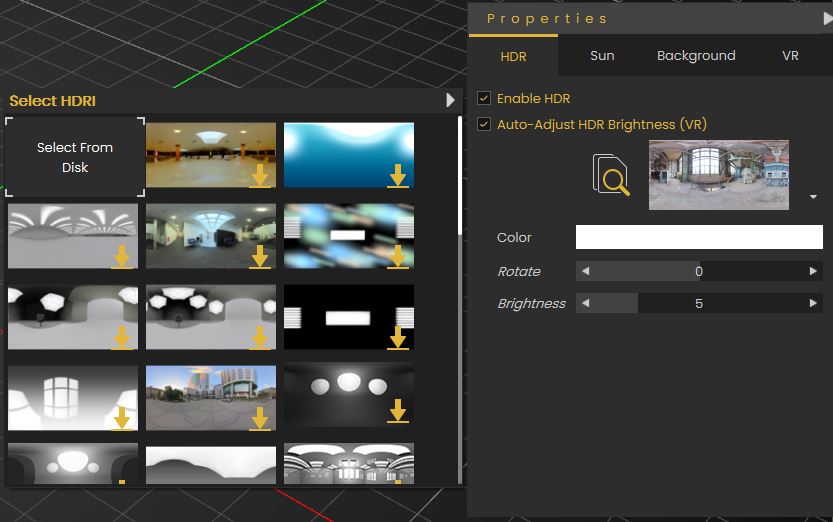
#### Environment Properties
By clicking on **Environment** (always the top element in Object Browser) , the **Properties Panel** will the **Environment Properties**
Environment properties include the following tabs:
\- HDR
\- Sun
\- Background
\- VR
##### HDR Tab
This tab allows the user to select the environment image used to light the scene, also it allows user to control its power, orientation and brightness.
**"Auto Adjust HRD Brightness (VR)"** will put a limit on the brightness of the HDR when running the VR Experience on the Viewer, if you want to have high brightness for the Viewer, you should disable this setting.
[](https://simlab-soft.com/help/uploads/images/gallery/2021-12/image-1640433445761.png)
##### Sun Tab
[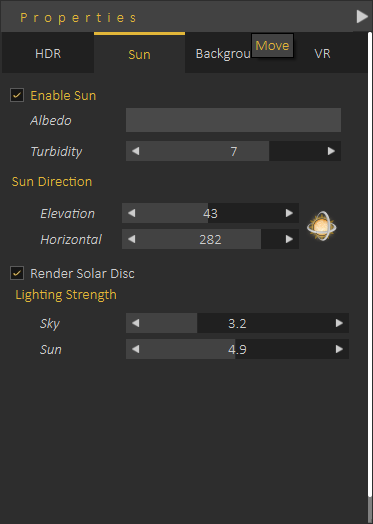](https://simlab-soft.com/help/uploads/images/gallery/2021-12/image-1640433662015.png)
Sun tab allows the user to enable/disable the sun effect, and to control the sun/sky powers in the scene.
It also allows the user to set initial sun location in the scene.
---
#####
Ground Tab
[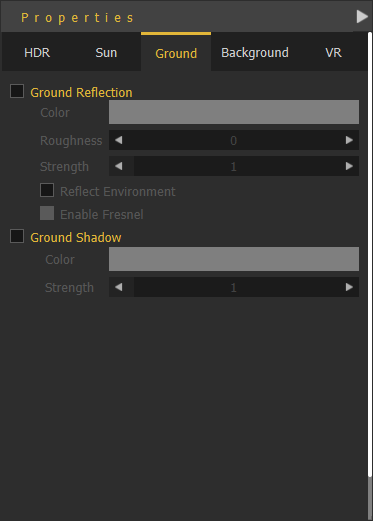](https://simlab-soft.com/help/uploads/images/gallery/2022-09/Xgqimage.png)
In this tab, the user can set ground effects like reflection and shadow (This tab is for **Rendering** mode only)
---
#####
Background Tab
[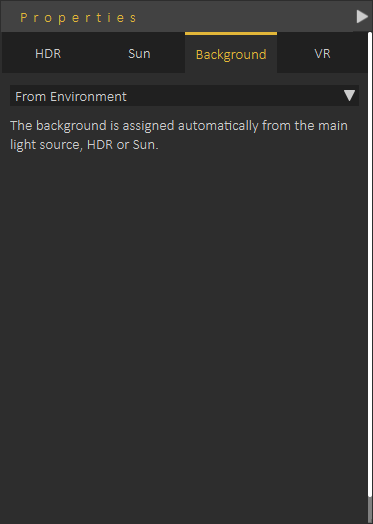](https://simlab-soft.com/help/uploads/images/gallery/2021-12/image-1640433771915.png)
This tabs allows the user to select background to be used for the VR scene, it can be from environment (HDR , or Sun) or the user can select a background image or color to be used as a background
---
##### VR Tab
[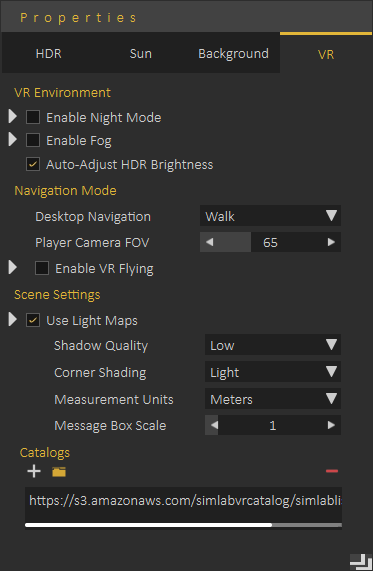](https://simlab-soft.com/help/uploads/images/gallery/2021-12/image-1640444069514.png)
VR Tab allows user to control the created VR Experience, the user can control the Environment, Navigation mode, Scene Settings, and to decide to make VR Catalog(s) available in the VR Experience.
We will explain some settings which may not have a clear meaning:
Under the **VR** tab, let's clarify the following settings:
**"Enable VR flying":** Since users can't switch between navigation modes while running experiences in VR mode, this is the setting to make the VR Experience run with flying navigation mode On.
**"Use Light Maps":** Allows you to use baked lighting, either created in SimLab Composer or imported with the model. Light maps simulate lighting effects without requiring real-time calculations, reducing performance demands and ensuring a smoother VR Experience, especially on lower-end devices.
**"Multiple lights on Standalone Devices":** This affects artificial lights (lights that you add from the "Create" menu), it will enable or disable them when specifically running them on standalone devices, since these lights can heavily affect the performance on them.
**"Enable Highlights":** This will enable/ disable the highlights that you see on objects that you can interact with or grab. **"Accurate Physics":** If you have physics in you experience, this will increase the accuracy by making more calculations for the simulation of physics, but with a cost on performance.
**"Adding Catalogs":** Catalogs are specialized asset collections that can be created in SimLab Composer and uploaded online for easy access. This feature allows you to link external assets to a scene, enabling users to import them dynamically during the VR Experience runtime. Unlike standard assets, catalogs can be stored and retrieved from an online repository, making them accessible across multiple projects and devices.
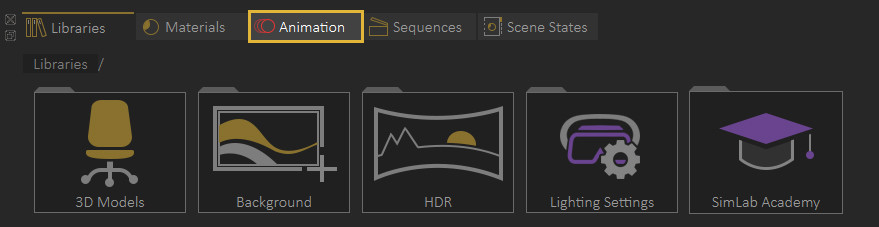
# Library
[](https://simlab-soft.com/help/uploads/images/gallery/2025-09/LlMimage.png)
Libraries Panel at the lower part of the application interface, provides access to following elements in SimLab Composer:
[Assets Library](https://simlab-soft.com/help/books/simlab-composer-help/page/assets-library)
[Material Library](https://simlab-soft.com/help/books/simlab-composer-11-help/page/material-library) [Animation Time Line](https://simlab-soft.com/help/books/simlab-composer-11-help/page/animation)[Sequences Library](https://simlab-soft.com/help/books/simlab-composer-11-help/page/sequence-library)[Scene States Library](https://simlab-soft.com/help/books/simlab-composer-11-help/page/scene-states-library)
Both **Asset Libraries** and **Material** Library are mainly used to access assets and materials provided from SimLab Soft. The user can still add her/his own assets to the asset libraries.
**Animation**, **Sequences,** and **Scene States** tabs provide access to user-created elements in the scene and add more elements to the current scene.
Signing up is required only once, and login is needed every time you attempt to download a 3D model in a session.
[ ](https://simlab-soft.com/help/uploads/images/gallery/2022-10/XPRimage.png) [](https://simlab-soft.com/help/uploads/images/gallery/2022-10/lEIimage.png)
The user can download items from different libraries by double-clicking on any of them, where the **Download Item** box appears. Click download then a progress bar will appear, and after that, the 3D model will be added to the data content of your SimLab application so you don't have to download that 3D model again.
[](https://simlab-soft.com/help/uploads/images/gallery/2022-10/KYZimage.png)
The user can download all content available in the active 3D models' library at once by clicking the **Download Content** button as shown in the image below:
[](https://simlab-soft.com/help/uploads/images/gallery/2022-10/rXNimage.png)
After the download process is successfully completed, the new item(s) will be directly available in the corresponding library without the need to download again or restart the application. The user can add models to the 3D library through the **Add New Item** *'+'* button, on the top right of the material library.
[](https://simlab-soft.com/help/uploads/images/gallery/2025-03/kigimage.png)
# Assets Library
The libraries tab has assets categorized into groups: 3D Models, 3D Scenes, Sketchfab, VR Warehouse, Backgrounds, Scripts, HDR, Lighting Settings, Sounds, and SimLab Academy..
[](https://simlab-soft.com/help/uploads/images/gallery/2025-09/ONkimage.png)
#### 3D Models
The 3D Models category provides the user with stock 3D models to compose scenes out of them.

#### 3D Scenes
The 3D Scenes category contains complete environments to be used for desktop and VR Experiences.

#### Sketchfab
The Sketchfab library allows users to display 3D, VR, and AR content from the Sketchfab platform website right in-app without the need for an Internet browser. The user is allowed to browse, review, and instantly download public models into an open scene.

#### Backgrounds
The Backgrounds category consists of image and spherical backgrounds.
#### Scripts
The Scripts category is where the user finds ready-to-run Python scripts that automate certain tasks in SimLab Composer.
Distribute on path, is one example of these powerful Python scripts. It enables users to place objects along a path with just a few clicks. This makes it faster to build scenes and add unique visual effects.
#### HDR
The HDR (High Dynamic Range) category has various options to select from.

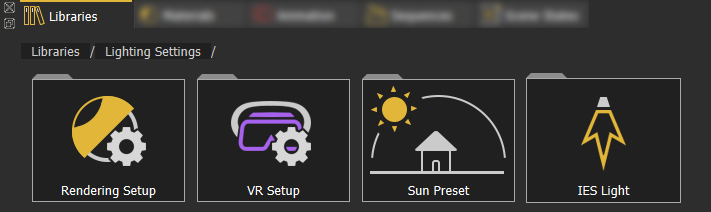
#### Lighting Settings
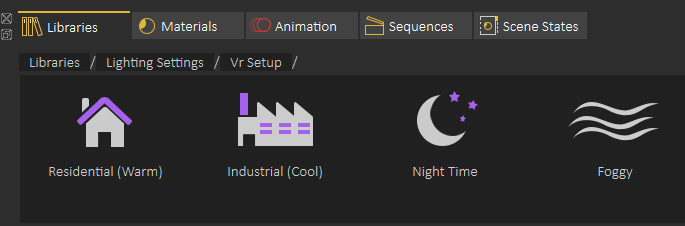
The Lighting Settings category provides lighting presets for rendering, VR, sun, and IES.
**Predefined VR Lighting Settings** are shown in the following image:
[](https://simlab-soft.com/help/uploads/images/gallery/2021-12/image-1640351007127.png)
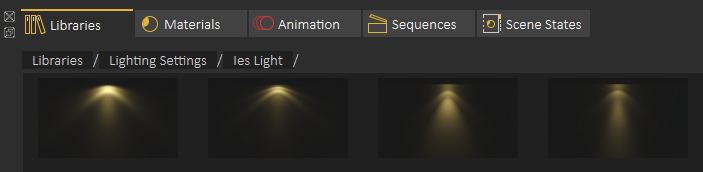
The following image shows some of the **IES lights** included in SimLab Composer:
#### [](https://simlab-soft.com/help/uploads/images/gallery/2021-12/image-1640351082006.png)
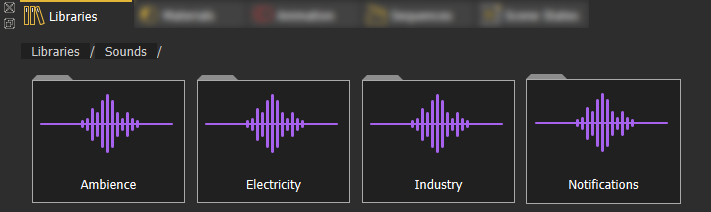
Sounds
The **Sounds** library offers a collections of sound effects that can help you enhance your scene without the need to always go and search for the appropriate sounds externally.
Adding an element from Asset Libraries to a scene can be done in one of two ways: **(1)** Dragging an element from the library and dropping it in the 3D area. **(2)** Double-click the element on the Asset Library.
#### SimLab Academy
SimLab Academy includes free step-by-step tutorials with all models needed to follow along with the available tutorials.
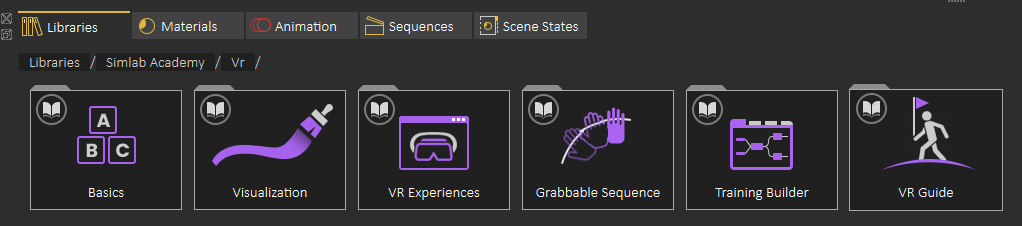
For example: to start learning VR creation, the user clicks on SimLab Academy, then selects VR.
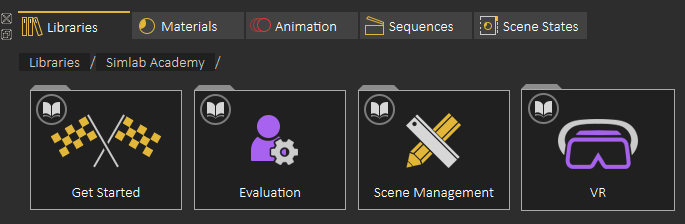
Then the user selects what he/she wants to learn such as Basics.
The following video shows SimLab Academy in action
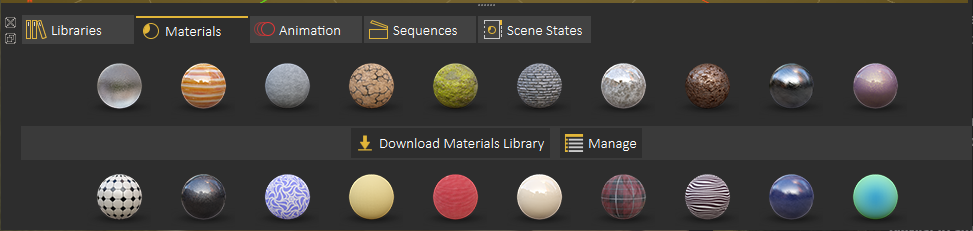
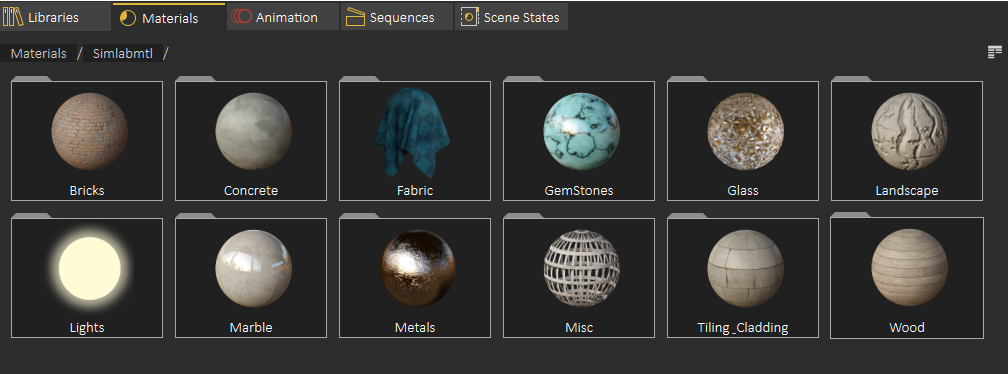
# Material Library
Default Material Library can be downloaded by selecting the **Material** tab in the **Library**, and clicking **Download Materials Library**.
[](https://simlab-soft.com/help/uploads/images/gallery/2021-12/image-1640363072381.png)
After installing the library the user can select the material group
[](https://simlab-soft.com/help/uploads/images/gallery/2021-12/image-1640360516256.png)
To assign a material to an object in the scene just drag the material and drop it onto that object in the **3D Area** or in the **Scene Browser**.
[](https://simlab-soft.com/help/uploads/images/gallery/2021-12/image-1640360577793.png)
The following tutorial shows the material management capabilities:
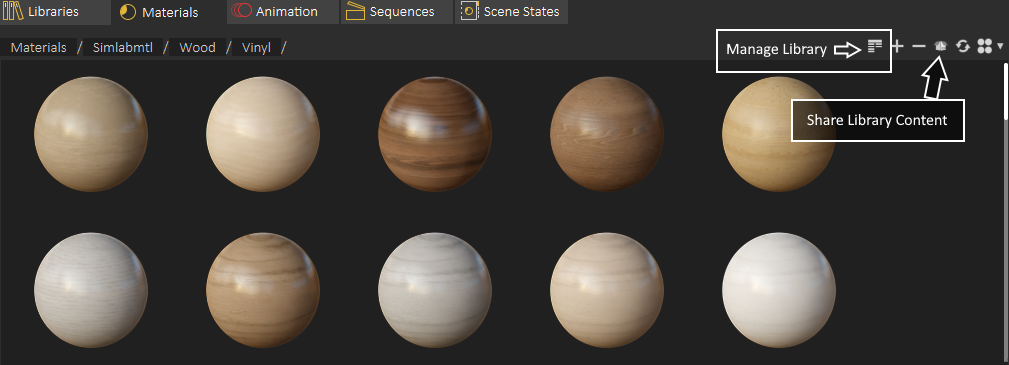
Using **+/-** at the top right side of the Materials Library the user can add new materials, and delete unused ones.
[](https://simlab-soft.com/help/uploads/images/gallery/2021-12/image-1640362266943.png)
For managing Material Library the user can click on **Manage Library**, For sharing part of contents library (Materials or 3D models), the user can use **Share Library Content**
The following image shows the **Manage Library** dialog
[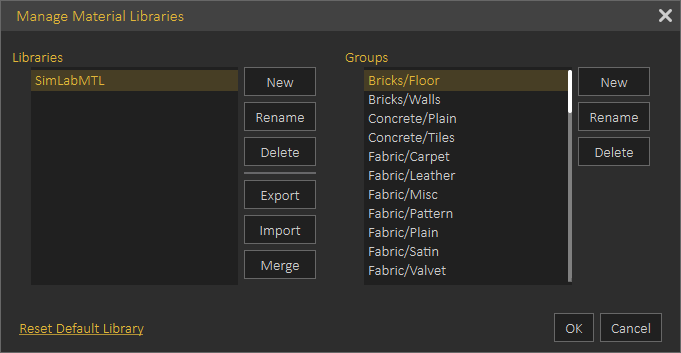](https://simlab-soft.com/help/uploads/images/gallery/2021-12/image-1640362317924.png)
---
#### Share Contents
With this feature, sharing different resources is simplified significantly. The rule is clear, if a resource exists in a library, then it can be shared.
Resources can be:
Materials
HDRs
Models
Background Images
And even more...
To share a resource, just drag and drop it from the **Library Panel** to the area with the title **Drop to Share,** surrounded by orange dotted border. Sharing dialog includes the following control elements, as shown in the following image:
[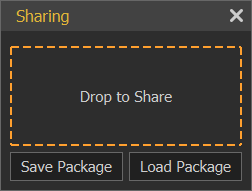](https://simlab-soft.com/help/uploads/images/gallery/2022-01/image-1642008091795.png)
**Drop to Share:** Area where the user should drop in the resource to be shared
**Save Package**: Exports the recourse to be shared with colleagues and save it as \*.spk (SimLab Package).
**Load Package**: Allows the recipient to import the \*.spk package received into SimLab Composer library.
# Animation Timeline
SimLab Composer/Studio is able to Import Rigid and flexible (Joints-based rigged) bodies animations as well as create animation for objects in the animation timeline through several tools.
To access the Animation timeline, open the **Animation Tab** in the library panel at the bottom of SimLab Composer/Studio.
[](https://simlab-soft.com/help/uploads/images/gallery/2021-12/access-animation.jpg)
---
#### Animation Timeline User Interface
[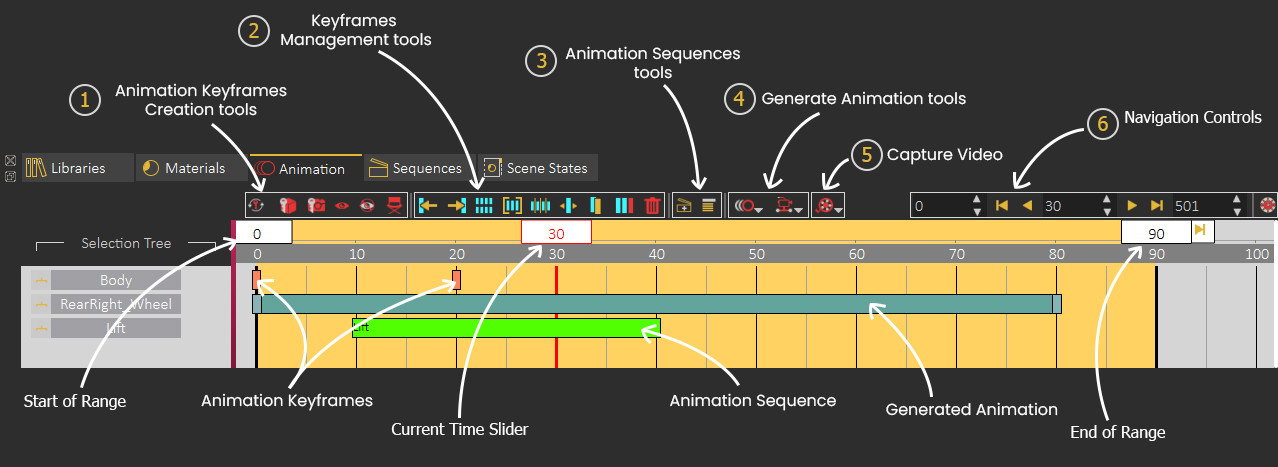](https://simlab-soft.com/help/uploads/images/gallery/2021-12/timeline-layout3.jpg)
**1. Animation Keyframes Creation tools**
Creates an animation **where a camera** revolves up to 360 degrees around its center point of view while descending downwards.
**5. Capture Video**
[](https://simlab-soft.com/help/uploads/images/gallery/2021-12/create-video-fromview.png)
Render View in VR
Renders an animated camera as a sequence of images using the SimLab VR Viewer.
Sets the end of the animation range by being dragged to a specific frame or by double clicking and entering the value numerically.
---
### Animation Creation
To create Animations in SimLab Composer/Studio there are two methods that can be followed depending on the type of animation you want to create, you can either manually create the animation by transforming objects and capturing keyframes, or you can use object and camera tools to generate procedural animation such as wheel and path animation.
Watch these tutorials to learn more about animation in SimLab Composer/Studio
##### 1. Animation Through Capturing Keyframes
If the auto key button is toggled, all you need to do to animate an object is to move the current time indicator/slider to a frame other than 0, then move, rotate or scale the object (change its transformation) and 2 key frames will be created, a key frame at frame 0 to store its initial transformation, and the second key at the current time to store the new transformation.
When playing the animation, an interpolation between the 2 keyframes will be automatically created and the object will transform from its initial state to the new state.
[](https://simlab-soft.com/help/uploads/images/gallery/2022-01/animationexample.jpg)In this example, the car object was selected, and the current time slider was moved to frame 30, then the car was moved 2 meters, so 2 keyframes were created at frame 0 and frame 30 to denote the animation of the car
In addition to the standard transformation animation, there are other attributes or elements you can animate, each with a different keyframe type representing it in the timeline.
Created when a camera has a change of transformation (position, target) along the timeline, either through capturing or using the director record tool.
##### 2. Automatic Camera and Object Animation
SimLab Composer/Studio have several tools that enable you to automatically create a procedural animation for an object or a camera without manually adjusting the time slider and changing the objects transformation.
These tools can be accessed from the Object Animation and the Camera Animations menus at the top of the timeline panel.
[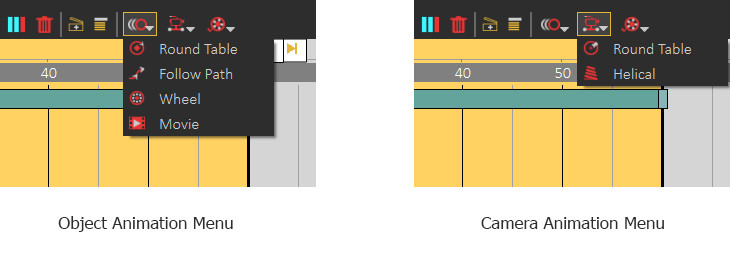](https://simlab-soft.com/help/uploads/images/gallery/2022-01/animationmenus2.jpg)
When an object or a camera is selected and one of those tools is clicked, a dialog will appear to set the parameters for the automatic animation that is to be generated.
[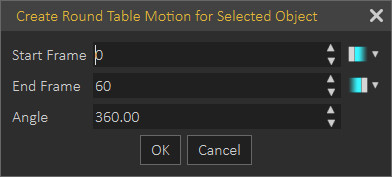](https://simlab-soft.com/help/uploads/images/gallery/2022-01/rounddialog.jpg)
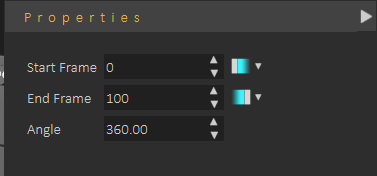
This is an example of an animation dialog that appears when the user selects the round table animation. In this dialogue, the user has to specify the start frame and the end frame, as well as the angle of rotation for the object or the camera.
[](https://simlab-soft.com/help/uploads/images/gallery/2022-01/roundtableanimation.png)
The Round table animation will be represented as a single block instead of multiple keyframes, since it *cannot* be modified manually but rather through its attributes that appear in the panel to the right.
---
##### Keyframes Interpolation (Ease in and Ease out)
Animations in SimLab Composer/Studio have a linear interpolation by default, which means that objects or attributes are animated at a constant speed throughout the animation range, however, there is a way to change the interpolation of animation by setting the keyframes interpolation to to an ease in or ease out interpolation.
[](https://simlab-soft.com/help/uploads/images/gallery/2022-01/prop1.jpg)
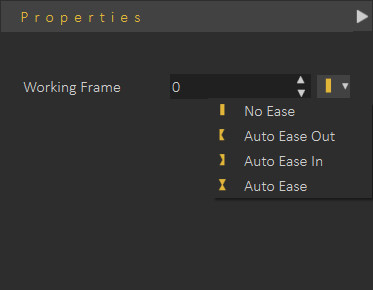
To change a keyframe interpolation, **Select the key frame**, and from the **Properties panel** to the right, open the interpolation drop down menu and select ease in, ease out, or auto ease.
[](https://simlab-soft.com/help/uploads/images/gallery/2022-01/prop2.png)
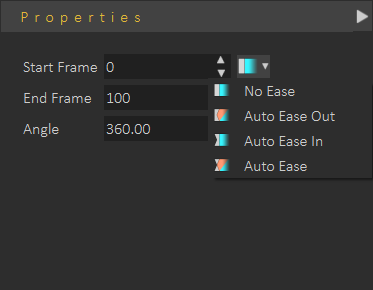
To change the interpolation for an object or a camera's automatic animation, **Select animation block**, and from the **Properties panel** to the right, open the interpolation drop down menu for the start frame and select ease in, ease out, or auto ease, and the menu for the end frame to change the interpolation at the end of the animation
When choosing the **Ease out** interpolation, which should be applied at a frame at the beginning of the animation, the speed of the animation starts at 0 and then accelerates gradually to get to a constant speed.
With the **Ease in** interpolation, which should be applied to frame at the end of an animation, the speed decelerates towards 0 instead of abruptly changing to 0.
The **Auto Ease** interpolation combines both the Ease in and Ease out and is usually used for keyframes in the middle of an animation where the speed goes down as the current time slider approaches that keyframe, and it picks up again as it leaves it.
[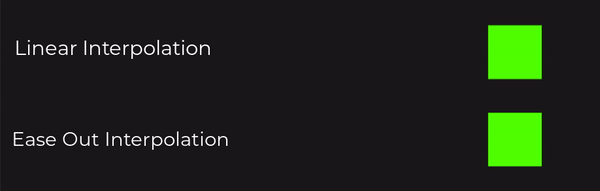](https://simlab-soft.com/help/uploads/images/gallery/2022-01/interpolation.gif)
Notice the constant speed in the default linear interpolation (top) and the acceleration in the Ease out interpolation (bottom).
---
#### **Utilizing Animation in VR**
To utilize imported or created animation in VR you need to first store it as a component named **"Animation Sequence",** and then you can either attach it to a **Play Sequence Response** in the Training Builder, or use it as a **Grabbable Sequence**.
##### Animation Sequence Creation
To create an Animation Sequences you need to select all the animation keyframes regardless of their type for all the objects you want to include in the animation sequences, then click on the **"Create Animation Sequence"** button in the animation panel.
[](https://simlab-soft.com/help/uploads/images/gallery/2022-01/create-sequencebutton.png)
[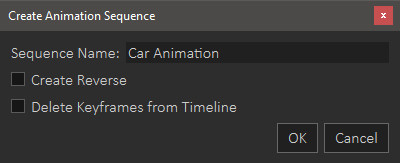](https://simlab-soft.com/help/uploads/images/gallery/2022-01/sequencecreationdialog.jpg)
In the creation Dialog, type a name for the Sequence. and choose whether you want to create a reversed version of the animation, and whether you want to delete the animation from the timeline or not.
Created Animation Sequences can be found in the Sequences tab next to the Animation tab in the bottom panel in SimLab Composer/Studio.
[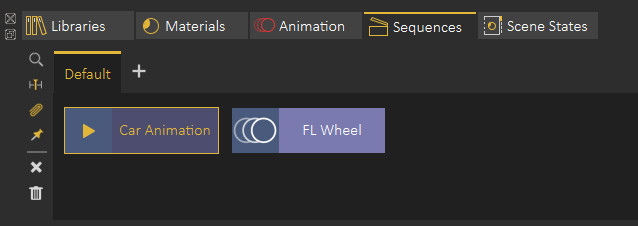](https://simlab-soft.com/help/uploads/images/gallery/2022-01/sequences-tab.jpg)
from the Sequences tab you can:
- Preview Animation Sequences.
- Attach Animation Sequences to responses in the Training Builder.
- Find the objects that are affected by the animation sequence.
- Send Animation Sequences to the timeline.
- Attach Sequence to object (in case if importing a flexible body animation and you want to attach it to a joints-rigged object).
- Make flex object stationary (in case of having a walk cycle for example, and you need to keep the walking animation but dispose of the object's translation).
##### Attaching Animation Sequence to Responses
In the Training Builder, create a Play Sequence Response, then select the Animation Sequence from the Sequences tab and then click the attach button on the Play Sequence Response.
[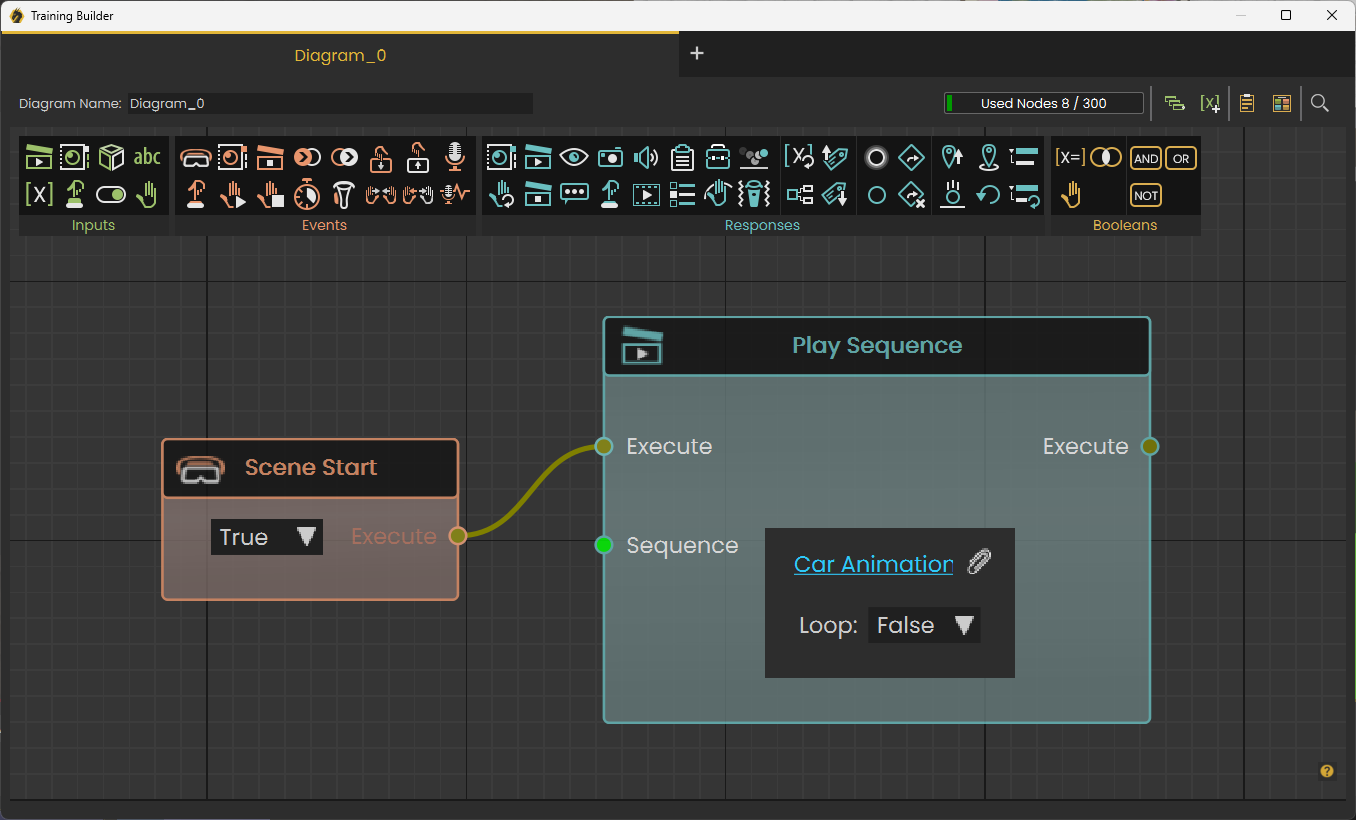](https://simlab-soft.com/help/uploads/images/gallery/2022-01/trainingbuilder.jpg)
The Animation in VR will play once the Event attach to the response occurs.
##### Grabbable Sequences
Grabbable Sequences are a type of objects grabbing that constricts the movement of the grabbable object through an Animation Sequence.
[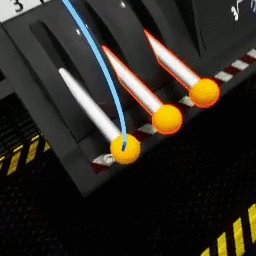](https://simlab-soft.com/help/uploads/images/gallery/2022-01/make-grabbable-sequences-256x256.gif)
A practical example would be to create a Lever's animation of it going up and down, then set it as a Grabbable Sequences where the user can grab the Lever arm but can only move it up and down in accordance with its created animation, unlike regular grabbing where the user can move and rotate the object in any direction.
To create a Grabbable Sequence from an animation Sequence follow these steps:
1. From the interactions menu select "Make Grabbable Sequence".
2. Select the 3D object that you need to make grabbable and click the check mark.
3. Select the Animation Sequence you want to attach to the object and click the check mark again.
4. Specify the grabbing visual helper's size then click the check mark again to finish the process.
# Sequence Library
The **Sequence Library** shows a list of all sequences in the scene.
[](https://simlab-soft.com/help/uploads/images/gallery/2021-12/image-1640362662585.png)
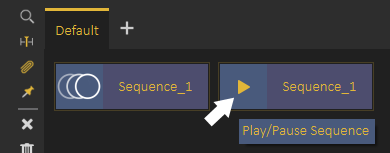
**Sequence Preview**
To preview a sequence without converting it into animation, the user can highlight the animation icon part of the sequence, which will be converted into a play icon, clicking the play icon will preview the sequence, as shown in the following image:
[](https://simlab-soft.com/help/uploads/images/gallery/2021-12/image-1640518756428.png)
On the left side of the Sequence library the user can do the following:
**Find affected Objects**: Focuses the view in the 3D area to the objects affected by this sequence, which makes it easy to find what objects the sequence affect in the scene.
**Apply Sequence to Animation Time Line:** Adds the contents of a sequence to the animation timeline, this can also be achieved by dragging the animation and dropping it on the 3D Area
[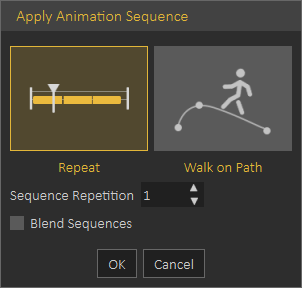](https://simlab-soft.com/help/uploads/images/gallery/2021-12/image-1640519040909.png)
When applying a Sequence to **Animation Timeline** the following dialog appears allowing the user to repeat the sequence multiple times. or to use it in a follow path animation.
Sequences will be added starting from the **current frame** in the **Animation Timeline**
**Attach Sequence with Object**: This option attaches selected unattached sequence to the selected object to affect it, better explained in the tutorial found below.
**Make Flex Object Stationary**: In case you have a sequence moving **VR Guide** legs , and at the same time moving it from its place, you can use this option to remove the move from place part from the sequence and make the **VR Guide move in place**, this is very useful to apply user desired motion on the **VR Guide.
Delete Selected Sequence**: Deletes the currently selected sequence
**Delete All Sequences**: Deletes all sequences in the Sequence Library
The following tutorial shows how to use the **Sequence Library** to add a **VR Guide** to the VR Experience:
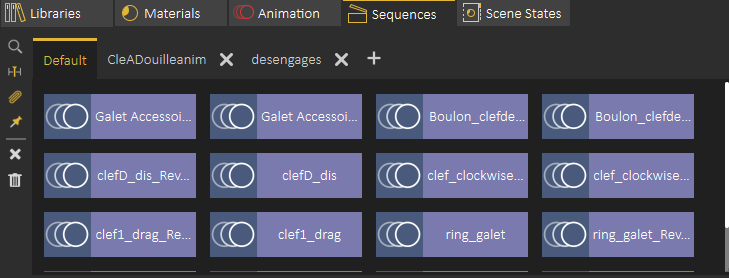
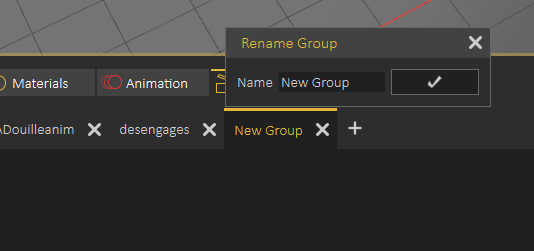
**Sequence Groups**
Sequences in the **Sequence Library** can be organized in groups, a new group can be added by clicking on the **+** button next to group tabs, to rename a **Sequence Group** the user needs to double click on its tab label as shown below
[](https://simlab-soft.com/help/uploads/images/gallery/2021-12/image-1640519960885.png)
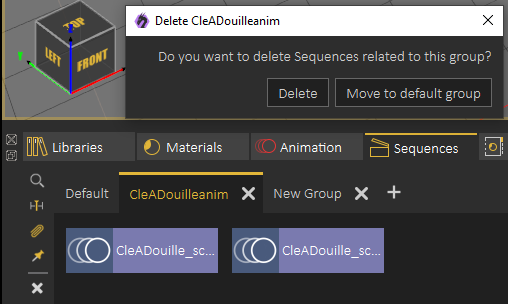
When deleting a sequence group the user will get the option to delete sequences in the group or to move them to the Default sequence group, as shown in the following image:
[](https://simlab-soft.com/help/uploads/images/gallery/2021-12/image-1640520117324.png)
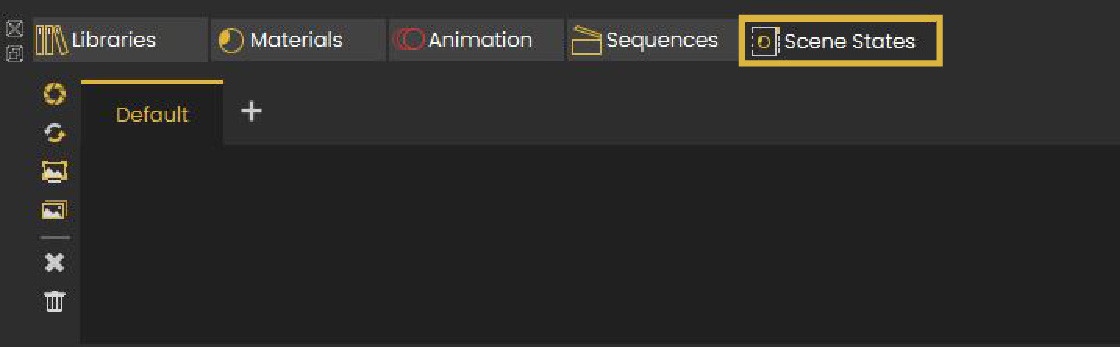
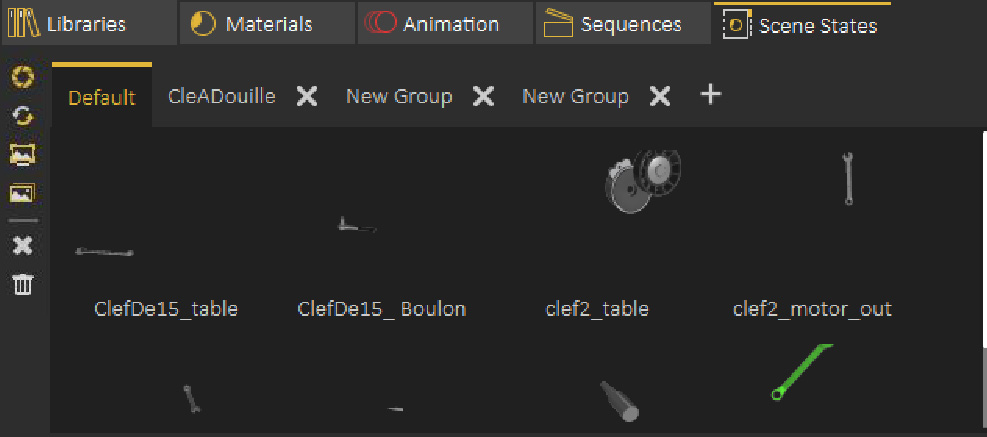
# Scene States Library
[Scene States](https://simlab-soft.com/help/link/14#bkmrk-page-title) enable the user to capture different configurations for the **selected 3D model**(s) (**Object** Properties), or useful properties for the **whole scene** (**Scene** properties).
To view what is selected in a scene state, make sure nothing is selected in the scene, then click on a scene state in the Scene State Library
[](https://simlab-soft.com/help/uploads/images/gallery/2025-03/scene-state-library.JPG)
The **Properties Panel** that appears on the right side of the 3D view will allow the user to see what properties where captured in the Scene State, as well as seeing and selecting objects and groups affected by the captured Scene State.
---
Scene State Library, includes small tool buttons on the left side, allowing the user to:
1- Open the Capture Scene State Dialog
2- Recapture Scene State
3- Regenerate Selected Scene State Preview Image
4- Regenerate All Scene States Preview Images (may take long loading times)
5- Delete Selected Scene State
6- Delete All Scene States
[](https://simlab-soft.com/help/uploads/images/gallery/2021-12/image-1640362862604.png)
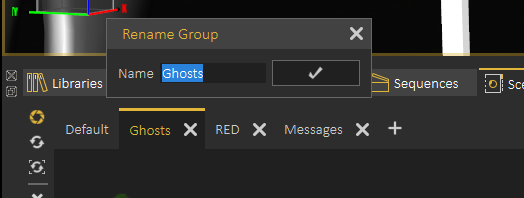
**Scene State Groups**
**Scene State Groups** are very similar to **Sequence Groups Library,** they can be used to organize Scene States, a new group can be added by clicking on the **+** button next to group tabs, to rename **Scene State Group** the user needs to double click on its tab label as shown below.
[](https://simlab-soft.com/help/uploads/images/gallery/2021-12/image-1640621706549.png)
When deleting a Scene State Group the user will get the option to delete Scene States in the group or to move them to the Default group
# Common Toolbar
[](https://simlab-soft.com/help/uploads/images/gallery/2021-12/image-1640264225011.png)
Common Toolbar is located in the lower part of the 3D area on top of the Library, it is always accessible to the user and it includes the following:
#### Select Object
The Default Pick mode in SimLab Composer/Studio returns the location and the normal direction at the selection point. The geometry at the picked location will be selected in the Object Tree, and its bounding box will be displayed in the 3D area.
[](https://simlab-soft.com/help/uploads/images/gallery/2021-12/image-1640264383816.png)
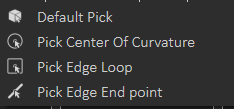
To get more precise picking the user can change selection to:
**Center of Curvature:** To select center of a circle or arc
**Edge Loop:** To select center of a closed loop, like center of one of the faces of a cube
**Edge End Point:** To select the closest end of an edge
#### Window Configuration
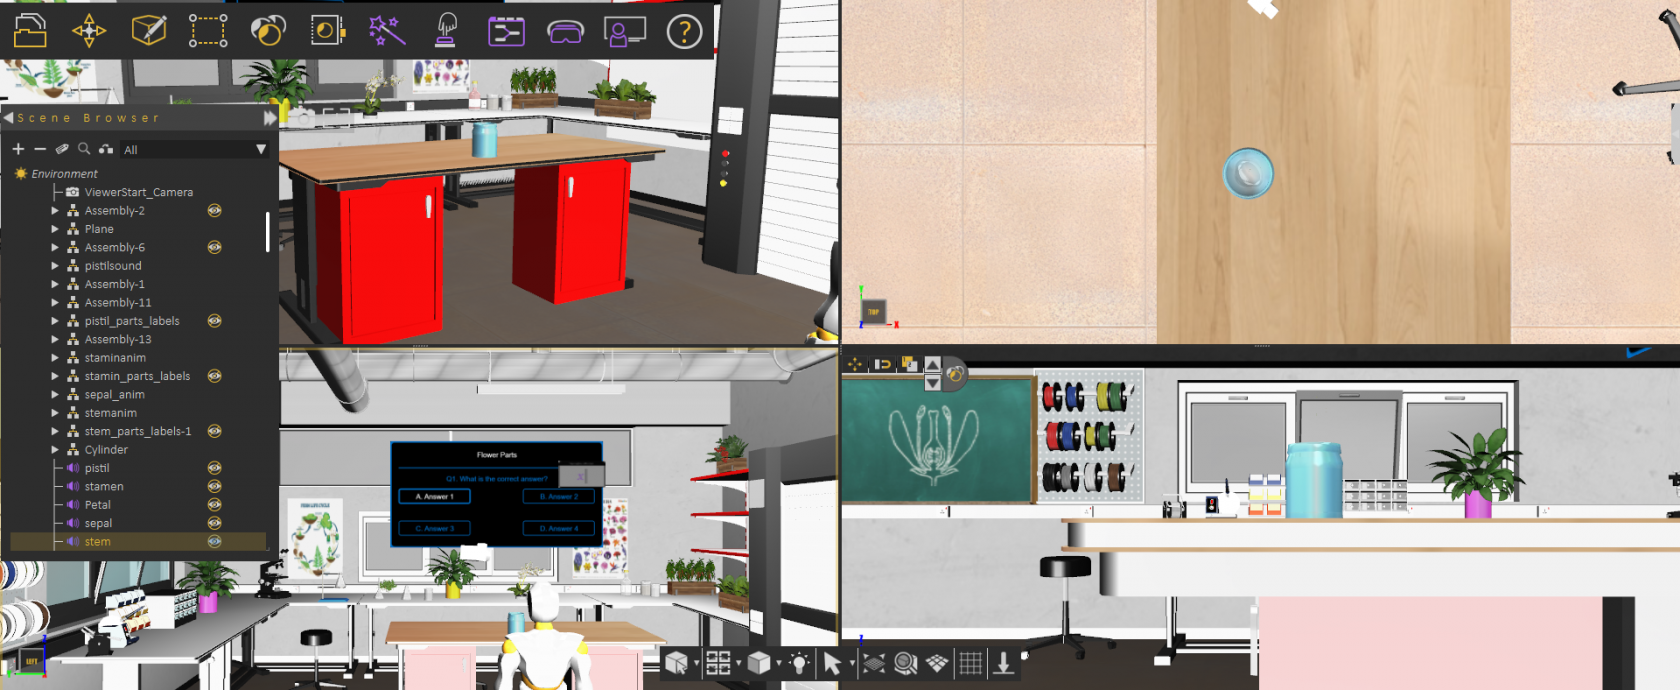
By default the user views 1 view in the 3D area, which covers all available space, this configuration allows the user to switch to 2 or 4 views. Different views can help the user better arrange elements in the scene.
[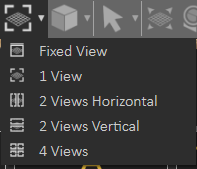](https://simlab-soft.com/help/uploads/images/gallery/2021-12/image-1640264658271.png)
The following image shows switching Window Configuration to 4 views:
[](https://simlab-soft.com/help/uploads/images/gallery/2021-12/image-1640264885425.png)
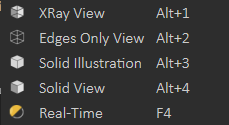
#### View Mode
The default view mode in SimLab Composer/Studio is the Solid View, which displays solid models with edges hidden. The user can change the view mode to any of the available modes from this menu.
1\. **XRay View:** Gives x-ray effect to the models in the scene.
2\. **Edges Only View:** Displays only the edges of the models in the scene.
3\. **Solid Illustration:** Displays models in solid view, with their edges illustrated.
4\. **Solid View:** Displays models in shaded solid view.
[](https://simlab-soft.com/help/uploads/images/gallery/2021-12/image-1640265091177.png)
The following image shows a scene in XRay View:
[](https://simlab-soft.com/help/uploads/images/gallery/2021-12/image-1640265073353.png)
#### Light On/Off
This option allows the user to turn off the default camera light in SimLab Composer/Studio to get a view better matching what the user will see in VR Viewer, or to only see lights coming from created artificial light sources (the ones found in the "Create" menu from the main toolbar).
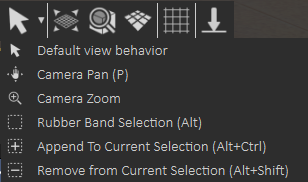
#### View Behavior
In this menu the user can set the behavior of the mouse while interacting with the scene.
[](https://simlab-soft.com/help/uploads/images/gallery/2021-12/image-1640265286633.png)
**Default view behavior**
The mouse behavior will be as shown in the table below:
**Navigation**
**Mouse Button**
Pan
Middle mouse button
Rotate
Left mouse button
Zoom
Right mouse button
**Camera Pan**
Changes the behavior of the left mouse button, to Pan.
**Camera Zoom**
Changes the behavior of the left mouse button, to Zoom.
**Rubber band**
This function changes the selection mode in the 3D area and it has three options:
**Rubber Band Selection:** Changes the selection icon to a square band, allowing the user to window select more than one geometry in the 3D area.
**Append To Current Selection:** The selection icon will show a ‘+’ sign inside the square band. The user can window select more geometry in a different section of the 3D scene, without losing the previous selections.
**Remove from Current Selection:** With a ‘-‘ sign added to the band, the user can remove geometry form selection, without losing previous selections.
---
#### Fit all
Updates camera to fit all geometry in the scene within the active view area.
#### Zoom to Object
Updates the camera in the active viewport, to zoom to the selected object. In case the user presses the button without selecting an object, a message will be displayed on top of the Common Toolbar asking him to do so.
#### Switch Between Parallel and Perspective Views
Switches the camera between perspective and parallel modes, in the active viewport. For engineers who are used to parallel mode, this option would be helpful.
#### Capture View image
Captures an image for the current view from the scene, and opens a dialog to save it.
# Quick Access Toolbar
When 3D geometry is selected in the 3D area, the Quick Access Toolbar will appear, with a set of handy functions, Quick Access Toolbar will appear close to the selected geometry.
[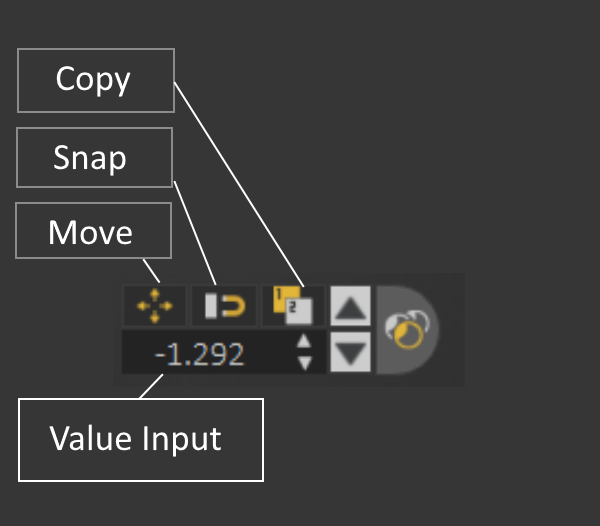](https://simlab-soft.com/help/uploads/images/gallery/2021-12/3wDquick-access.png)This options includes:
**Translate:** To show draggers needed to move the object
**Snap to Object:** To allow the user to snap the selected object to another.
**Copy:** To create a new copy of the selected geometry
**Value Input:** Allows the user to enter exact values for translation or rotation
**Material:** Opens Quick Material Access
---
**Move selection Up/Down:** It allows moving up or down in the Scene Browser based on selection, going up means selecting the parent, moving down means selecting a child, this makes it very easy to select and move through a specific part or assembly
**[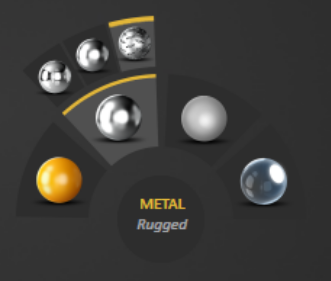](https://simlab-soft.com/help/uploads/images/gallery/2021-12/quick-access-material.png)Quick Material Access:** It makes it easy to change material finish to another type, for example you can set it to Plastic, Metal, or Glass
---
**Note:** From preferences the user can select to turn on/off appearance of Quick Access Toolbar
# Active Camera
[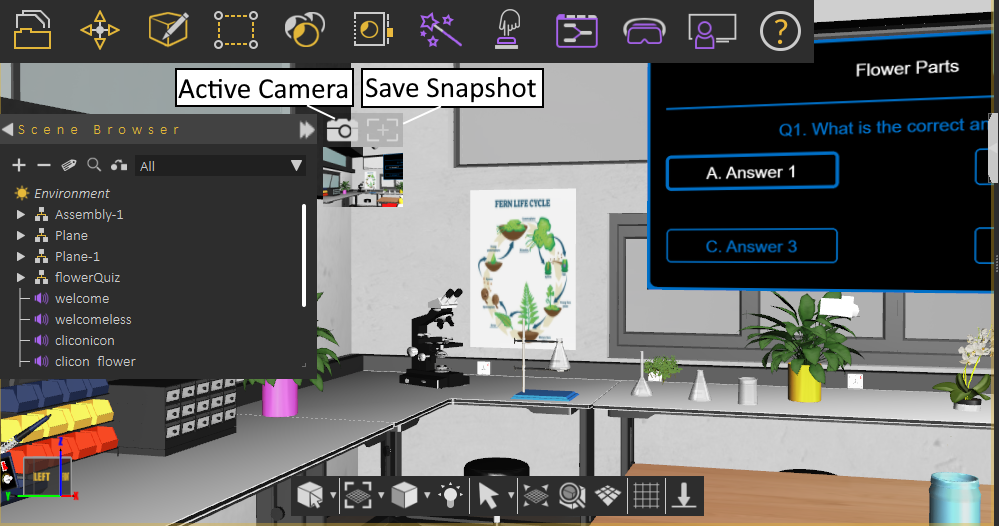](https://simlab-soft.com/help/uploads/images/gallery/2021-12/active-camera.png)
**Select Active Camera:** Selects the current active camera in the scene, and shows its properties, to make it easy to adjust those properties.
**Capture Camera Snapshot:** Saves the current camera view, and generates a new image below this button. Clicking the snapshot generated image, the camera is updated to look at the same view when the snapshot was created.