VR Collaboration Schedule
Learn how to Schedule a VR collaboration session, edit the session, start it and how to join the session on different platforms and devices
- Scheduling a VR Collaboration Session
- Joining a Scheduled VR Collaboration Session (Windows)
- Joining a Scheduled VR Collaboration Session (macOS)
- Joining a Scheduled VR Collaboration Session (Android)
- Joining a Scheduled VR Collaboration Session (iOS)
- Joining a Scheduled VR Collaboration Session (Meta Quest)
- Joining a Scheduled VR Collaboration Session (Vive XR Elite)
- Joining a Scheduled VR Collaboration Session (Pico)
Scheduling a VR Collaboration Session
Scheduling a collaboration session
This procedure details how to set up a multi-user VR Collaboration session using the SimLab Dashboard (website).
Steps to Schedule a Session
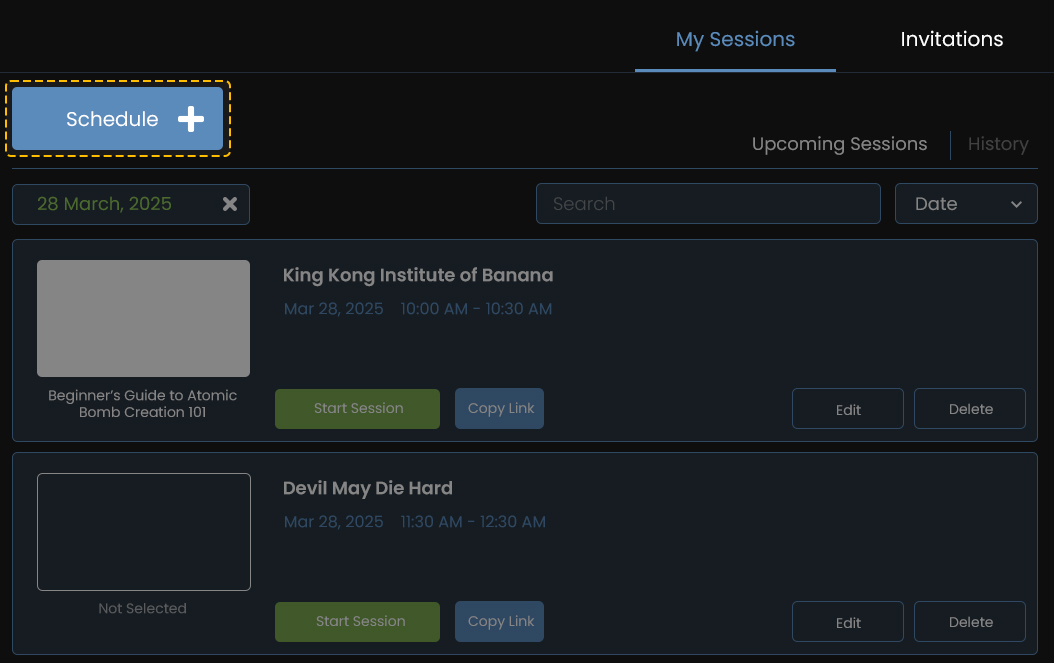
1. Access the Schedule Page:
-
-
Log in to the SimLab Dashboard.
-
Navigate to the My Sessions page (if you aren't already there).
-
Click the Schedule + button located above the calendar.
-
2. Enter Event Details (Refer to Web_Schedule.jpg and Web_Schedule_Groups.jpg):
-
-
Session Title: Enter a descriptive name for your session.
-
Date & Time: Select the desired Date and Time for the session.
-
Recurring Event (Optional): Check the box and select a frequency (e.g., "Daily") if the session should repeat.
-

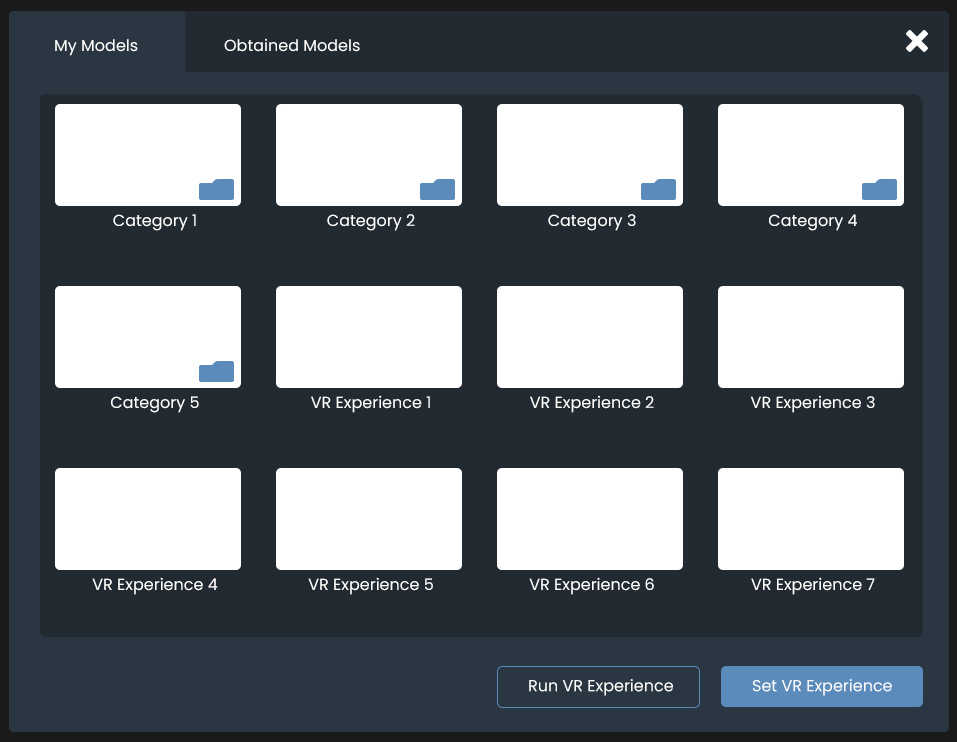
3. Select VR Experience (Optional):
-
-
Under the VR Experience section, click the Change button.
-
A pop-up will appear showing your available models/experiences .
-
Click on the desired model.
-
Click Set VR Experience.
-
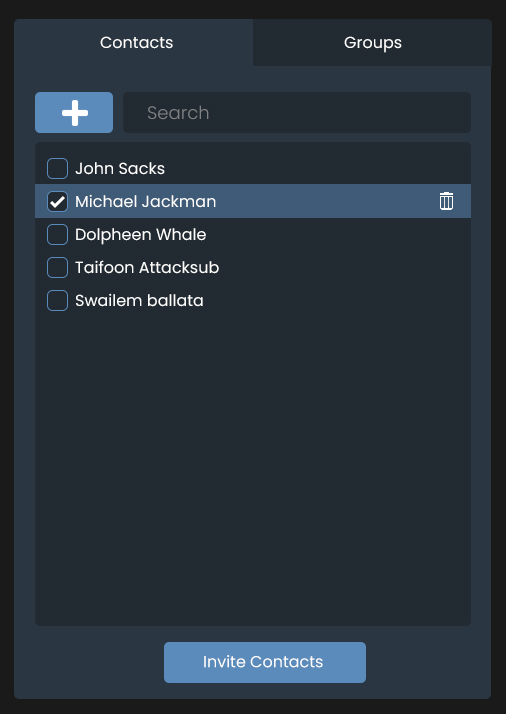
4. Invite Participants:
-
-
Click the Contacts Button to display your contacts manager.
-
Check the boxes next to the names or groups you wish to invite (e.g., "Michael Jackman" or "Testing Group").
-
Click the Invite Contacts button at the bottom of the panel. The invited users will appear under the Invitations list.
-
5. Review Invitation Settings:
-
-
Invitation Link: This link allows external users to join.
-
Access Policy: Choose who can join ("Anyone with the link" or "Contacts only").
-

6. Finalize Schedule:
-
-
Click the Schedule Session button.
-
Starting a scheduled collaboration session
As the host, you have two methods to start a scheduled session, even if the scheduled time has not yet arrived.
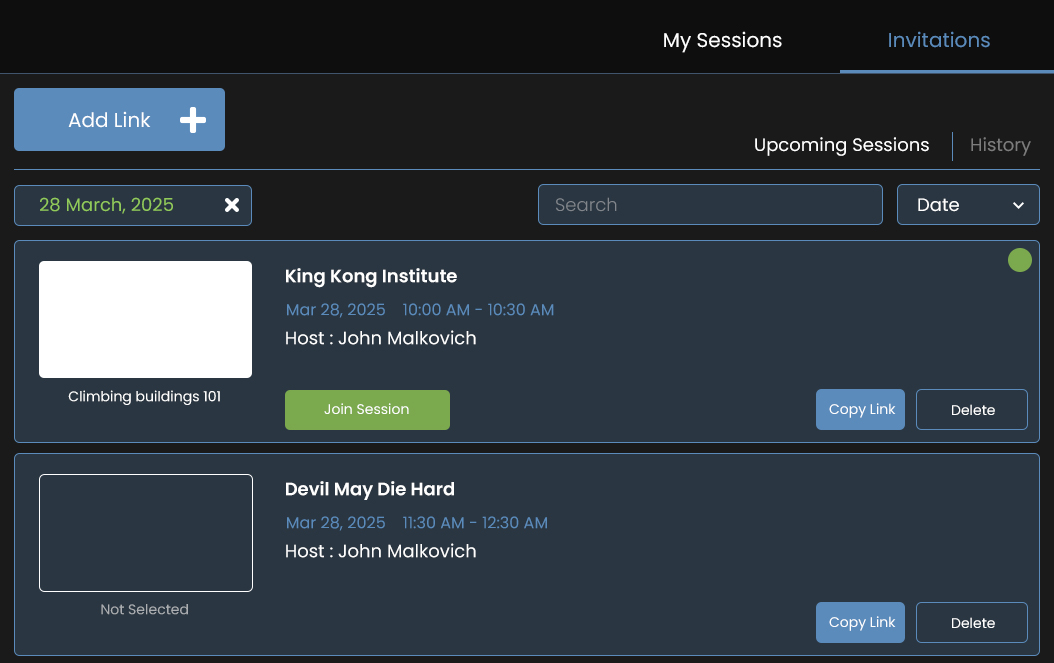
Method 1: Starting from the SimLab Dashboard (Website)
This method provides the most control and can be used to start a session before its scheduled time.
-
Access My Sessions: Log in to the SimLab Dashboard and navigate to the My Sessions tab.
-
Locate the Session: Find the session you wish to start under the Upcoming Sessions list.
-
Start the Session: Click the green Start Session button next to the event title.
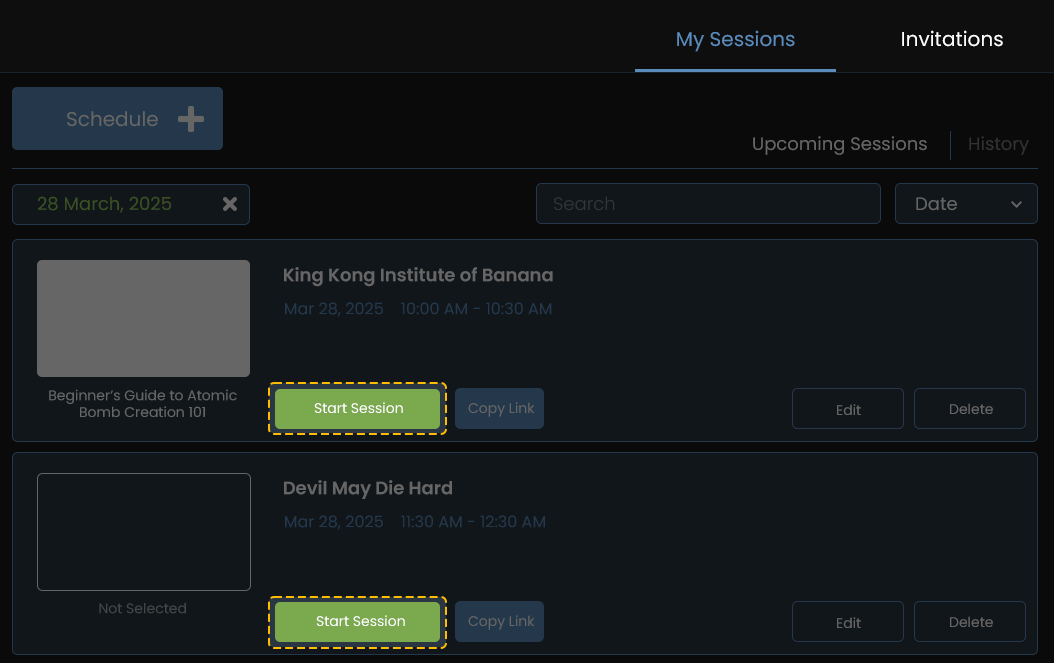
The session will immediately start for all invited and joining participants.
Method 2: Starting from SimLab VR Viewer (VR Application)
When the scheduled time arrives, the VR Viewer application will prompt the host to start the session.
-
Wait for Notification: At the scheduled time of the session (e.g., 10:00 AM on March 28, 2025), a pop-up message will appear inside your SimLab VR Viewer application.
-
Click Start: The message will contain a button labeled Start. Click this button to instantly initiate the VR Collaboration session.
Joining a Scheduled VR Collaboration Session (Windows)
Learn how download and install Simlab VR Viewer on your device, as well as joining a schedules VR Session through contact invitation or using a link invitation.
Installing SimLab VR Viewer
 |
This chapter details the procedure for installing the SimLab VR Viewer application on the Windows operating system. SimLab VR Viewer is a free, essential cross-platform application required to run, view, and participate in VR experiences, including collaboration sessions and viewing shared SimLab VR packages (.vrpackage files). |
1.1 Download and Installation
To download the latest version of the SimLab VR Viewer installer for Windows, follow the link below.
Action:
-
Download the latest version of SimLab VR Viewer for your operating system.
-
Once the download is complete, locate the installer file (typically named something like
SimLab_VR_Viewer_latest.exe) in your designated downloads folder. -
Double-click the installer file to initiate the installation process.
-
Note: You may be prompted by the Windows User Account Control (UAC) to allow the app to make changes to your device. Click Yes to proceed.
-
-
Follow the on-screen instructions of the Setup Wizard:
-
Read and accept the License Agreement.
-
Select the Installation Location (the default path is usually recommended).
-
Click Install to begin copying the files.
-
-
Wait for the installation to complete. A progress bar will indicate the status.
-
Once the installation is finished, click Finish. The option to Launch SimLab VR Viewer may be selected by default; if so, the application will start immediately.
1.2 System Requirements (Minimum)
Ensure your Windows system meets the following minimum requirements to run the SimLab VR Viewer effectively, especially for VR mode:
| Component | Windows Requirement |
| Operating System | Windows 10 64-bit or Windows 11 |
| Processor | Quad-core Intel or AMD 2.5 GHz or superior |
| Memory (RAM) | 8 GB or more |
| Graphics Card | Any DirectX 11 or 12 compatible card (e.g., NVIDIA GTX 960 2GB) |
| Free Storage | 4 GB |
Joining as a contact
This section details how to join a VR collaboration session on Windows when you have been invited as a contact by the host/administrator. This assumes you already have a SimLab account registered with the email address the invitation was sent to.
Joining via In-App Notification (SimLab VR Viewer)
If you are signed into the SimLab VR Viewer, the application will provide real-time notifications about scheduled sessions you are invited to.
Prerequisites:
-
SimLab VR Viewer is installed and running on your system.
-
You are Signed in to the SimLab VR Viewer application (refer to Section 1.3).
Action (In-App Join):
-
Notification Prompts: The Viewer will display timed messages leading up to the scheduled start time:
-
Example: At 4:45 PM for a 5:00 PM session, you will receive a notification stating you have 15 minutes before the session starts.
-
A similar prompt will appear at the 5-minute mark.
-
-
Host Initiates Session: When the host/administrator clicks Start Collaboration within their SimLab VR Viewer, you will receive the final launch prompt in the Viewer.
-
Message: "[Host Name] has invited you to join a Collaborative VR Experience session."
-
-
Click the 'Join' Button: Click the Join button within the notification window to immediately launch and enter the collaborative VR session lobby.

Joining via SimLab Dashboard (VR Collaboration Scheduling Page)
All scheduled collaboration invitations can be managed and joined directly from the SimLab Soft website.
Action (Dashboard):
-
Open your web browser and navigate to the SimLab Soft website.
-
Log in to your SimLab account.
-
Navigate to SimLab Dashboard.
-
Locate the Invitation tab or button.
-
View List of Sessions: A list will display all collaboration sessions you are invited to, including the Host's Name, Session Name, Date, and Time.
-
Locate Active Session: Sessions that are currently active or running will feature a Join Session button.
-
Click 'Join Session': Clicking this button will initiate the launch of the SimLab VR Viewer application on your Windows machine, and you will be connected to the collaborative session.
Joining via Email Invitation Link
You can bypass the in-app experience and join directly using the link provided in the email invitation.
Action (Email Link):
-
Open the invitation email sent by the host/administrator. The email will contain the session details (Topic, Date, Time, VR Experience name) and a direct invitation link.
-
Click the Invitation Link inside the email. This will open a web page in your default browser.
-
Web Page Validation: The web page will display the session details and the countdown until the start time.
-
Click 'Join Session' Button:
-
If you are currently logged in to the SimLab website: Clicking Join Session will automatically launch the installed SimLab VR Viewer application on your Windows machine and place you into the collaboration lobby.
-
If you are not logged in: You will be prompted to enter your SimLab account credentials (email and password) before the Viewer application is launched.
-

Joining using a Link invitation (Guest/Ad-Hoc)
This method allows a user to join a VR collaboration session using a direct link distributed through any communication medium (email, chat, SMS, etc.), irrespective of whether they are a pre-existing SimLab contact or have a registered SimLab account.
Prerequisite:
-
SimLab VR Viewer is installed on your Windows system
Accessing the Session Link
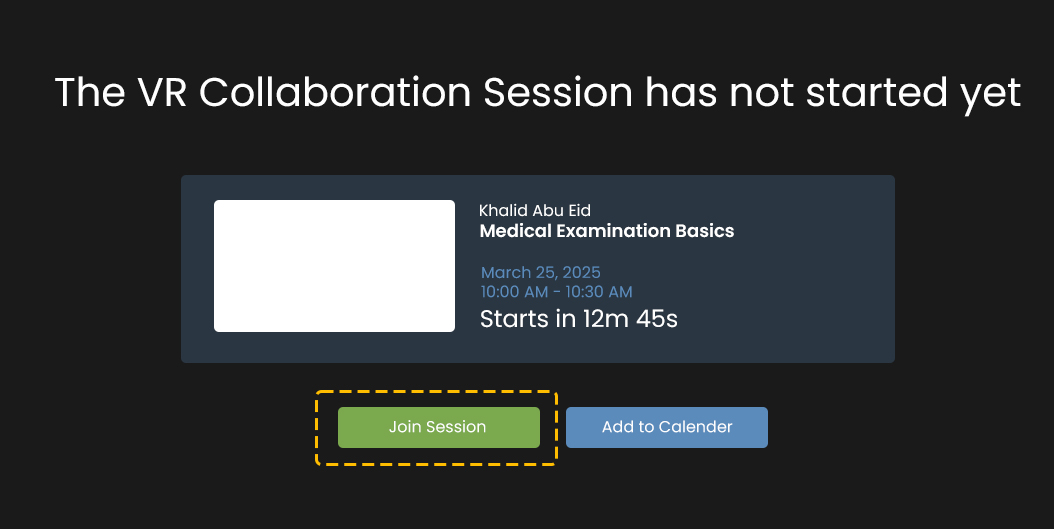
Method A: Joining via the Web Invitation Link
Accessing the Session Link
Action:
-
Click the Invitation Link provided by the host/administrator.
-
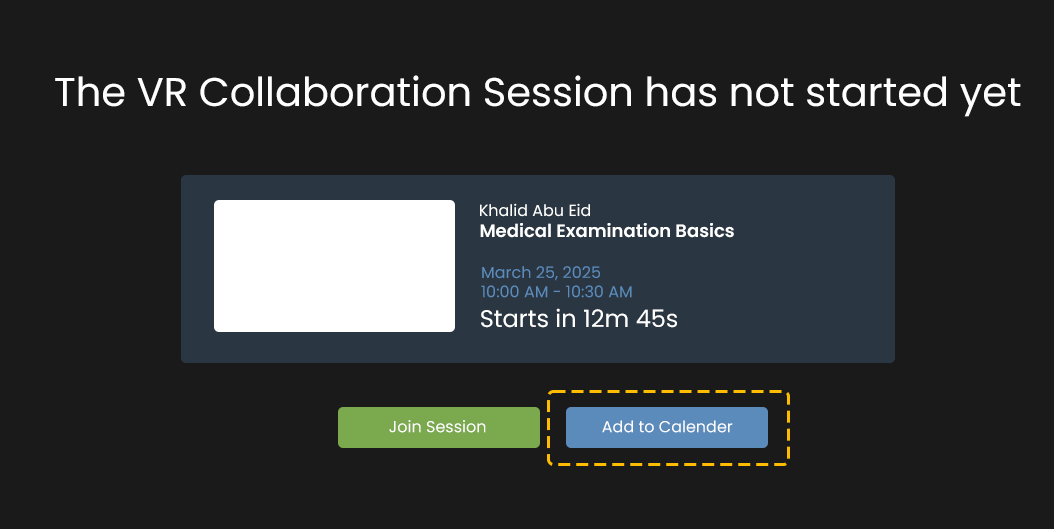
A dedicated web page will open in your browser, displaying:
-
Session Information: Session Name, Host's Name, Date, Time, and a countdown timer until the session starts.
-
The page will feature two main buttons: Join Session and Add to Calendar.
-
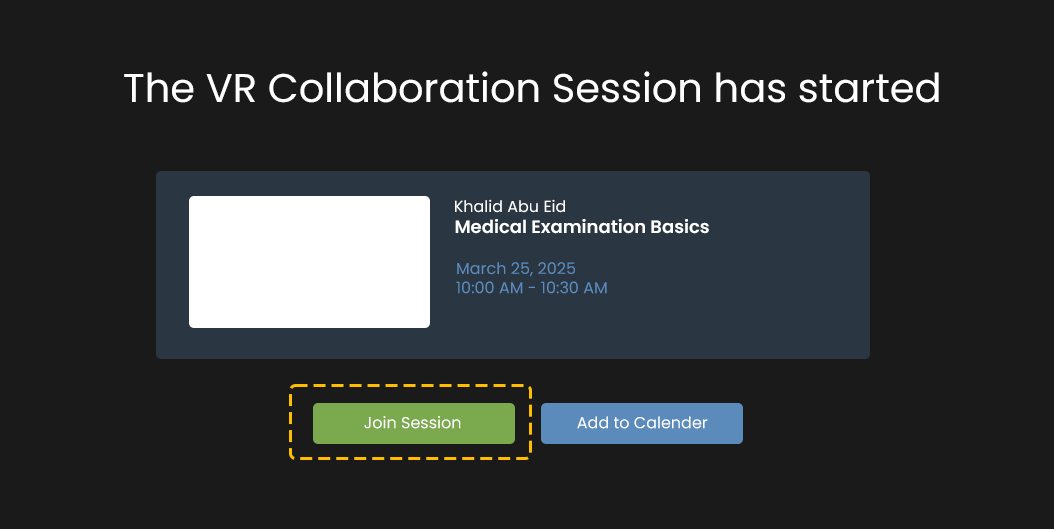
Joining the Session (Account vs. Guest)
Clicking the Join Session button will open a dialogue prompting you to either Login or Continue as a Guest.
| Option | Action Required | Result |
| Login | Enter your registered SimLab account email and password. | The SimLab VR Viewer will launch. Once the host starts the session, you will receive an in-app notification to Join the session. |
| Continue as a Guest | Provide an active Email Address and a Name (for identification within the session). | The SimLab VR Viewer will launch. You will receive an in-app notification when the session starts. Additionally, the provided email address will be used to create a new SimLab account, and you will receive a separate email containing an autogenerated password. It is highly recommended to change this password after your initial login. |
Adding the Session to Your Calendar
If you wish to save the session details for future access or standalone devices action, use the Add to Calendar option.
Action (Add to Calendar):
-
Click the Add to Calendar button on the invitation link's web page.
-
Authentication: You will be prompted to log in to your SimLab account if you are not already signed in.
-
SimLab Dashboard Redirect: Upon successful login, you will be redirected to the SimLab Dashboard page.
-
The session will be recorded as an event in the Invitations tab on the VR Collaboration Scheduling Page. You can use the Join Session button on this tab to join the collaboration when it is active
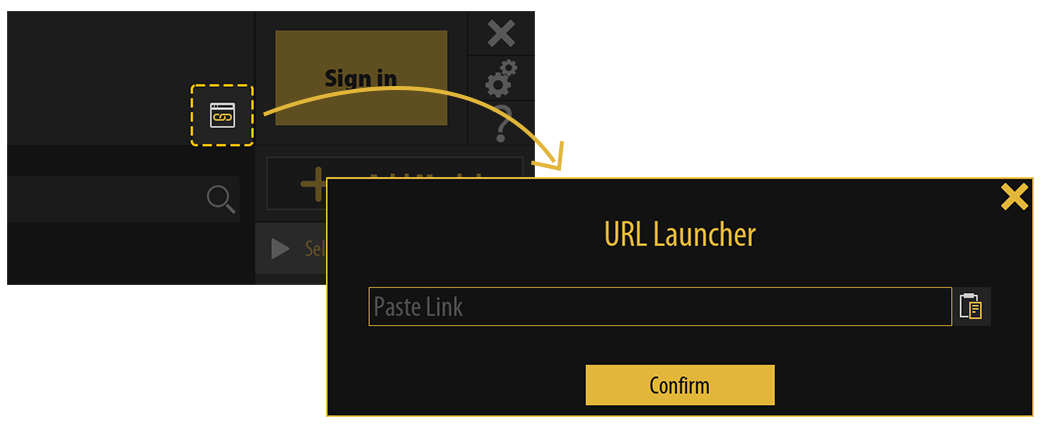
Method B: Joining via the URL Launcher
This method allows you to join a session directly within the SimLab VR Viewer application, bypassing the web browser flow, and it will prompt you for login/guest details only if you are not already signed in.
Action:
-
Launch the SimLab VR Viewer application.
-
Locate the URL Launcher button (typically found in the top-right corner of the interface) and click it.
-
A dialogue window will pop up. Paste the Invitation Link (the full URL provided by the host) into the designated field.
-
Click Confirm.
Result:
-
If you are Signed In: You will immediately connect to the session as your registered account.
-
If you are Not Signed In: A prompt will appear asking you to either Login or Continue as a Guest (which functions identically to the web method).
In either case, you will enter the Lobby screen to load the VR experience before the session officially begins.
Joining a Scheduled VR Collaboration Session (macOS)
Learn how download and install Simlab VR Viewer on your device, as well as joining a schedules VR Session through contact invitation or using a link invitation.
Installing SimLab VR Viewer
|
This chapter details the procedure for installing the SimLab VR Viewer application on macOS. SimLab VR Viewer is a free, essential cross-platform application required to run, view, and participate in VR experiences, including collaboration sessions and viewing shared SimLab VR packages (.vrpackage files). |
1.1 Download and Installation
To download the latest version of the SimLab VR Viewer installer for macOS, follow the link below.
Action:
Download the latest version of SimLab VR Viewer for your operating system.
-
Once the download is complete, locate the installer file (typically named something like
SimLab_VR_Viewer_latest.exe) in your designated downloads folder. -
Double-click the installer file to initiate the installation process.
-
Follow the on-screen instructions of the Setup Wizard:
-
Read and accept the License Agreement.
-
Select the Installation Location (the default path is usually recommended).
-
Click Install to begin copying the files.
-
-
Wait for the installation to complete. A progress bar will indicate the status.
-
Once the installation is finished, click Finish. The option to Launch SimLab VR Viewer may be selected by default; if so, the application will start immediately.
1.2 System Requirements (Minimum)
Ensure your macOS system meets the following minimum requirements to run the SimLab VR Viewer effectively, especially for VR mode:
| Component | macOS Requirement |
| Operating System | Latest macOS Monterey (12) or later |
| Processor | Quad-core Intel, 2.5 GHz or faster, or Apple Silicon (M1/M2/etc.) |
| Memory (RAM) | 8 GB or more |
| Graphics Card | Metal 1.2 Compatible Graphics Card |
| Free Storage | 4 GB |
Joining as a contact
This section details how to join a VR collaboration session on Windows when you have been invited as a contact by the host/administrator. This assumes you already have a SimLab account registered with the email address the invitation was sent to.
Joining via In-App Notification (SimLab VR Viewer)
If you are signed into the SimLab VR Viewer, the application will provide real-time notifications about scheduled sessions you are invited to.
Prerequisites:
-
SimLab VR Viewer is installed and running on your system.
-
You are Signed in to the SimLab VR Viewer application (refer to Section 1.3).
Action (In-App Join):
-
Notification Prompts: The Viewer will display timed messages leading up to the scheduled start time:
-
Example: At 4:45 PM for a 5:00 PM session, you will receive a notification stating you have 15 minutes before the session starts.
-
A similar prompt will appear at the 5-minute mark.
-
-
Host Initiates Session: When the host/administrator clicks Start Collaboration within their SimLab VR Viewer, you will receive the final launch prompt in the Viewer.
-
Message: "[Host Name] has invited you to join a Collaborative VR Experience session."
-
-
Click the 'Join' Button: Click the Join button within the notification window to immediately launch and enter the collaborative VR session lobby.
Joining via SimLab Dashboard (VR Collaboration Scheduling Page)
All scheduled collaboration invitations can be managed and joined directly from the SimLab Soft website.
Action (Dashboard):
-
Open your web browser and navigate to the SimLab Soft website.
-
Log in to your SimLab account.
-
Navigate to SimLab Dashboard.
-
Locate the Invitation tab or button.
-
View List of Sessions: A list will display all collaboration sessions you are invited to, including the Host's Name, Session Name, Date, and Time.
-
Locate Active Session: Sessions that are currently active or running will feature a Join Session button.
-
Click 'Join Session': Clicking this button will initiate the launch of the SimLab VR Viewer application on your Windows machine, and you will be connected to the collaborative session.
Joining via Email Invitation Link
You can bypass the in-app experience and join directly using the link provided in the email invitation.
Action (Email Link):
-
Open the invitation email sent by the host/administrator. The email will contain the session details (Topic, Date, Time, VR Experience name) and a direct invitation link.
-
Click the Invitation Link inside the email. This will open a web page in your default browser.
-
Web Page Validation: The web page will display the session details and the countdown until the start time.
-
Click 'Join Session' Button:
-
If you are currently logged in to the SimLab website: Clicking Join Session will automatically launch the installed SimLab VR Viewer application on your Windows machine and place you into the collaboration lobby.
-
If you are not logged in: You will be prompted to enter your SimLab account credentials (email and password) before the Viewer application is launched.
-
Joining using a Link invitation (Guest/Ad-Hoc)
This method allows a user to join a VR collaboration session using a direct link distributed through any communication medium (email, chat, SMS, etc.), irrespective of whether they are a pre-existing SimLab contact or have a registered SimLab account.
Prerequisite:
-
SimLab VR Viewer is installed on your Windows system
Accessing the Session Link
Method A: Joining via the Web Invitation Link
Accessing the Session Link
Action:
-
Click the Invitation Link provided by the host/administrator.
-
A dedicated web page will open in your browser, displaying:
-
Session Information: Session Name, Host's Name, Date, Time, and a countdown timer until the session starts.
-
The page will feature two main buttons: Join Session and Add to Calendar.
-

Joining the Session (Account vs. Guest)
Clicking the Join Session button will open a dialogue prompting you to either Login or Continue as a Guest.
| Option | Action Required | Result |
| Login | Enter your registered SimLab account email and password. | The SimLab VR Viewer will launch. Once the host starts the session, you will receive an in-app notification to Join the session. |
| Continue as a Guest | Provide an active Email Address and a Name (for identification within the session). | The SimLab VR Viewer will launch. You will receive an in-app notification when the session starts. Additionally, the provided email address will be used to create a new SimLab account, and you will receive a separate email containing an autogenerated password. It is highly recommended to change this password after your initial login. |
Adding the Session to Your Calendar
If you wish to save the session details for future access or standalone devices action, use the Add to Calendar option.
Action (Add to Calendar):
-
Click the Add to Calendar button on the invitation link's web page.
-
Authentication: You will be prompted to log in to your SimLab account if you are not already signed in.
-
Web Portal Redirect: Upon successful login, you will be redirected to the SimLab Web Portal.
-
The session will be recorded as an event in the Invitations tab on the VR Collaboration Scheduling Page. You can use the Join Session button on this tab to join the collaboration when it is active
Method B: Joining via the URL Launcher
This method allows you to join a session directly within the SimLab VR Viewer application, bypassing the web browser flow, and it will prompt you for login/guest details only if you are not already signed in.
Action:
-
Launch the SimLab VR Viewer application.
-
Locate the URL Launcher button (typically found in the top-right corner of the interface) and click it.
-
A dialogue window will pop up. Paste the Invitation Link (the full URL provided by the host) into the designated field.
-
Click Confirm.
Result:
-
If you are Signed In: You will immediately connect to the session as your registered account.
-
If you are Not Signed In: A prompt will appear asking you to either Login or Continue as a Guest (which functions identically to the web method).
In either case, you will enter the Lobby screen to load the VR experience before the session officially begins.
Joining a Scheduled VR Collaboration Session (Android)
Learn how download and install Simlab VR Viewer on your device, as well as joining a schedules VR Session through contact invitation or using a link invitation.
Installing SimLab VR Viewer
|
This chapter guides you through installing the SimLab AR/VR Viewer on Android devices (smartphones and tablets). SimLab VR Viewer is a free, essential cross-platform application required to run, view, and participate in VR experiences, including collaboration sessions and viewing shared SimLab VR packages (.vrpackage files). |
Download and Installation
The SimLab AR/VR Viewer is installed directly from the respective app stores. Click the appropriate link below to navigate to the download page:
| Platform | Download Source | Link |
| Android | Google Play Store | Download for Android |
-
Open the appropriate store (Google Play) on your device.
-
Search for "SimLab AR/VR Viewer".
-
Tap the Install or Get button to download and install.
System Requirements
| Specification | Android Minimum |
| OS Version | Android 8.1 (API 27) or later |
| Processor | 64-bit Arm-based CPU |
| RAM | 4 GB or more |
| Storage | Sufficient free space for the application and VR experience files (.vrpackage). |
Joining as a contact
This section details how to join a VR collaboration session on Android when you have been invited as a contact by the host/administrator. This assumes you already have a SimLab account registered with the email address the invitation was sent to.
Joining via In-App Notification (SimLab VR Viewer)
If you are signed into the SimLab VR Viewer, the application will provide real-time notifications about scheduled sessions you are invited to.
Prerequisites:
-
SimLab AR/VR Viewer is installed and running on your system.
-
You are Signed In to the SimLab AR/VR Viewer application.
Action (In-App Join):
-
Notification Prompts: The Viewer will display timed messages leading up to the scheduled start time:
-
Example: At 4:45 PM for a 5:00 PM session, you will receive a notification stating you have 15 minutes before the session starts. A similar prompt will appear at the 5-minute mark.
-
-
Host Initiates Session: When the host/administrator clicks Start Collaboration within their SimLab VR Viewer, you will receive the final launch prompt in the Viewer.
-
Message: "[Host Name] has invited you to join a Collaborative VR Experience session."
-
-
Tap the 'Join' Button: Tap the Join button within the notification window to immediately launch and enter the collaborative VR session lobby.
Joining via SimLab Dashboard (VR Collaboration Scheduling Page)
All scheduled collaboration invitations can be managed and joined directly from the SimLab Soft website using your mobile browser.
Action (Dashboardl):
-
Open your mobile web browser and navigate to the SimLab Soft website.
-
Log in to your SimLab account.
-
Navigate to the VR Collaboration Scheduling Page.
-
Locate the Invitation tab or button.
-
View List of Sessions: A list will display all collaboration sessions you are invited to.
-
Locate Active Session: Sessions that are currently active or running will feature a Join Session button.
-
Tap 'Join Session': Clicking this button will initiate the launch of the SimLab AR/VR Viewer application on your mobile device, and you will be connected to the collaboration lobby.
Joining via Email Invitation Link
You can bypass the in-app experience and join directly using the link provided in the email invitation.
Action (Email Link):
-
Open the invitation email sent by the host/administrator. The email will contain the session details and a direct invitation link.
-
Tap the Invitation Link inside the email. This will open a web page in your default browser.
-
Web Page Validation: The web page will display the session details and the countdown until the start time.
-
Tap 'Join Session' Button:
-
If you are currently logged in to the SimLab website: Tapping Join Session will automatically launch the installed SimLab AR/VR Viewer application and place you into the collaboration lobby.
-
If you are not logged in: You will be prompted to enter your SimLab account credentials (email and password) before the Viewer application is launched.
-
Joining using a Link invitation (Guest/Ad-Hoc)
This method allows a user to join a VR collaboration session using a direct link distributed through any communication medium (email, chat, SMS, etc.), irrespective of whether they are a pre-existing SimLab contact or have a registered SimLab account.
Prerequisite:
-
SimLab AR/VR Viewer is installed on your mobile device.
Method A: Joining via the Web Invitation Link
Accessing the Session Link:
Action:
-
Tap the Invitation Link provided by the host/administrator.
-
A dedicated web page will open in your browser, displaying:
-
Session Information: Session Name, Host's Name, Date, Time, and a countdown timer until the session starts.
-
The page will feature two main buttons: Join Session and Add to Calendar.
-
Joining the Session (Account vs. Guest):
Tapping the Join Session button will open a dialogue prompting you to either Login or Continue as a Guest.
| Option | Action Required | Result |
| Login | Enter your registered SimLab account email and password. | The SimLab AR/VR Viewer will launch, and you will proceed to the Lobby. Once the host starts the session, you will receive an in-app notification to Join the session. |
| Continue as a Guest | Provide an active Email Address and a Name (for identification within the session). | The SimLab AR/VR Viewer will launch, and you will proceed to the Lobby. You will receive an in-app notification when the session starts. Additionally, the provided email address will be used to create a new SimLab account, and you will receive a separate email containing an autogenerated password. It is highly recommended to change this password after your initial login. |
Adding the Session to Your Calendar:
If you wish to save the session details for future access, use the Add to Calendar option.
Action (Add to Calendar):
-
Tap the Add to Calendar button on the invitation link's web page.
-
Authentication: You will be prompted to log in to your SimLab account if you are not already signed in.
-
SimLab Dashboard Redirect: Upon successful login, you will be redirected to the SimLab Dashboard page.
-
The session will be recorded as an event in the Invitations tab on the VR Collaboration Scheduling Page. You can use the Join Session button on this tab to join the collaboration when it is active.

Method B: Joining via the URL Launcher
This method allows you to join a session directly within the SimLab AR/VR Viewer application, bypassing the web browser flow.
Action:
-
Launch the SimLab AR/VR Viewer application.
-
Locate the URL Launcher button (typically found in the interface) and tap it.
-
A dialogue window will pop up. Paste the Invitation Link (the full URL provided by the host) into the designated field.
-
Tap Confirm.
Result:
-
If you are Signed In: You will immediately connect to the session as your registered account and enter the Lobby.
-
If you are Not Signed In: A prompt will appear asking you to either Login or Continue as a Guest (which functions identically to the web method).
-
In either case, you will enter the Lobby screen to load the VR experience before the session officially begins.
Joining a Scheduled VR Collaboration Session (iOS)
Learn how download and install Simlab VR Viewer on your device, as well as joining a schedules VR Session through contact invitation or using a link invitation.
Installing SimLab VR Viewer
|
This chapter guides you through installing the SimLab AR/VR Viewer on iOS devices (smartphones and tablets). SimLab VR Viewer is a free, essential cross-platform application required to run, view, and participate in VR experiences, including collaboration sessions and viewing shared SimLab VR packages (.vrpackage files). |
Download and Installation
The SimLab AR/VR Viewer is installed directly from the respective app stores. Click the appropriate link below to navigate to the download page:
| Platform | Download Source | Link |
| iOS (iPhone/iPad) | Apple App Store | Download for iOS |
-
Open the appropriate store (Google Play or App Store) on your device.
-
Search for "SimLab AR/VR Viewer".
-
Tap the Install or Get button to download and install.
System Requirements
| Specification | iOS Minimum |
| OS Version | iOS 15.0 / iPadOS 15.0 or later |
| Processor | A12 Bionic chip or greater processor |
| RAM | 4 GB or more |
| Storage | Sufficient free space (App size is approximately 1 GB). |
Joining as a contact
This section details how to join a VR collaboration session on iOS when you have been invited as a contact by the host/administrator. This assumes you already have a SimLab account registered with the email address the invitation was sent to.
Joining via In-App Notification (SimLab VR Viewer)
If you are signed into the SimLab VR Viewer, the application will provide real-time notifications about scheduled sessions you are invited to.
Prerequisites:
-
SimLab AR/VR Viewer is installed and running on your system.
-
You are Signed In to the SimLab AR/VR Viewer application.
Action (In-App Join):
-
Notification Prompts: The Viewer will display timed messages leading up to the scheduled start time:
-
Example: At 4:45 PM for a 5:00 PM session, you will receive a notification stating you have 15 minutes before the session starts. A similar prompt will appear at the 5-minute mark.
-
-
Host Initiates Session: When the host/administrator clicks Start Collaboration within their SimLab VR Viewer, you will receive the final launch prompt in the Viewer.
-
Message: "[Host Name] has invited you to join a Collaborative VR Experience session."
-
-
Tap the 'Join' Button: Tap the Join button within the notification window to immediately launch and enter the collaborative VR session lobby.
Joining via SimLab Dashboard (VR Collaboration Scheduling Page)
All scheduled collaboration invitations can be managed and joined directly from the SimLab Soft website using your mobile browser.
Action (Dashboard):
-
Open your mobile web browser and navigate to the SimLab Soft website.
-
Log in to your SimLab account.
-
Navigate to the VR Collaboration Scheduling Page.
-
Locate the Invitation tab or button.
-
View List of Sessions: A list will display all collaboration sessions you are invited to.
-
Locate Active Session: Sessions that are currently active or running will feature a Join Session button.
-
Tap 'Join Session': Clicking this button will initiate the launch of the SimLab AR/VR Viewer application on your mobile device, and you will be connected to the collaboration lobby.
Joining via Email Invitation Link
You can bypass the in-app experience and join directly using the link provided in the email invitation.
Action (Email Link):
-
Open the invitation email sent by the host/administrator. The email will contain the session details and a direct invitation link.
-
Tap the Invitation Link inside the email. This will open a web page in your default browser.
-
Web Page Validation: The web page will display the session details and the countdown until the start time.
-
Tap 'Join Session' Button:
-
If you are currently logged in to the SimLab website: Tapping Join Session will automatically launch the installed SimLab AR/VR Viewer application and place you into the collaboration lobby.
-
If you are not logged in: You will be prompted to enter your SimLab account credentials (email and password) before the Viewer application is launched.
-
Joining using a Link invitation (Guest/Ad-Hoc)
This method allows a user to join a VR collaboration session using a direct link distributed through any communication medium (email, chat, SMS, etc.), irrespective of whether they are a pre-existing SimLab contact or have a registered SimLab account.
Prerequisite:
-
SimLab AR/VR Viewer is installed on your mobile device.
Method A: Joining via the Web Invitation Link
Accessing the Session Link:
Action:
-
Tap the Invitation Link provided by the host/administrator.
-
A dedicated web page will open in your browser, displaying:
-
Session Information: Session Name, Host's Name, Date, Time, and a countdown timer until the session starts.
-
The page will feature two main buttons: Join Session and Add to Calendar.
-
Joining the Session (Account vs. Guest):
Tapping the Join Session button will open a dialogue prompting you to either Login or Continue as a Guest.
| Option | Action Required | Result |
| Login | Enter your registered SimLab account email and password. | The SimLab AR/VR Viewer will launch, and you will proceed to the Lobby. Once the host starts the session, you will receive an in-app notification to Join the session. |
| Continue as a Guest | Provide an active Email Address and a Name (for identification within the session). | The SimLab AR/VR Viewer will launch, and you will proceed to the Lobby. You will receive an in-app notification when the session starts. Additionally, the provided email address will be used to create a new SimLab account, and you will receive a separate email containing an autogenerated password. It is highly recommended to change this password after your initial login. |
Adding the Session to Your Calendar:
If you wish to save the session details for future access, use the Add to Calendar option.
Action (Add to Calendar):
-
Tap the Add to Calendar button on the invitation link's web page.
-
Authentication: You will be prompted to log in to your SimLab account if you are not already signed in.
-
SimLab Dashboard Redirect: Upon successful login, you will be redirected to the SimLab Dashabord.
-
The session will be recorded as an event in the Invitations tab on the VR Collaboration Scheduling Page. You can use the Join Session button on this tab to join the collaboration when it is active.
Method B: Joining via the URL Launcher
This method allows you to join a session directly within the SimLab AR/VR Viewer application, bypassing the web browser flow.
Action:
-
Launch the SimLab AR/VR Viewer application.
-
Locate the URL Launcher button (typically found in the interface) and tap it.
-
A dialogue window will pop up. Paste the Invitation Link (the full URL provided by the host) into the designated field.
-
Tap Confirm.
Result:
-
If you are Signed In: You will immediately connect to the session as your registered account and enter the Lobby.
-
If you are Not Signed In: A prompt will appear asking you to either Login or Continue as a Guest (which functions identically to the web method).
-
In either case, you will enter the Lobby screen to load the VR experience before the session officially begins.
Joining a Scheduled VR Collaboration Session (Meta Quest)
Learn how download and install Simlab VR Viewer on your device, as well as joining a schedules VR Session through contact invitation or using an invitation link.
Installing SimLab VR Viewer
|
This chapter guides you through installing the SimLab VR Viewer on your Meta Quest Device. SimLab VR Viewer is a free, essential cross-platform application required to run, view, and participate in VR experiences, including collaboration sessions and viewing shared SimLab VR packages (.vrpackage files). |
The SimLab VR Viewer can be installed onto your Meta Quest headset using any of the four convenient methods below. Using the mobile app or web browser is often the easiest way, as the app will download to your headset wirelessly while it's in standby mode.
Method 1 : Via Headset (installation Device : Meta Quest Device)
- Put on your headset and open the Store.
- Search for "SimLab VR Viewer" and select the app.
- Click Download or Install.
Method 2 : Via Mobile App (installation Device : Meta Horizon Mobile App)
- Open the Meta Horizon mobile app on your phone/tablet and ensure your headset is connected.
- Tap the Store icon (usually a shopping bag).
- Search for "SimLab VR Viewer".
- Select the app and tap Download or Get. The app will be remotely installed on your headset.
Method 3 : Via Website (installation Device : Meta Quest Web Store)
- Go to the official Meta Quest Store webpage (or click the link below).
- Ensure you are signed into your Meta account.
- Navigate to the SimLab VR Viewer page.
- Click the Get button. The app will be remotely installed on your headset.
Application Link
SimLab VR Viewer on Meta Quest Store
Method 4 :
Via Installation Manager (PC/Mac & Cable)
-
Request Access: Go to the official SimLab Meta Quest VR page.
-
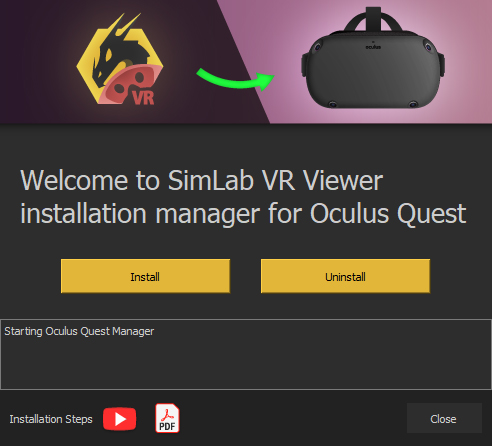
Get Installer: Click the "Get it Now" button, fill in your information (Name, Email, Industry), and you will be directed to the download page. Download the SimLab VR Viewer Installation Manager for Quest VR for your operating system (Windows or macOS).
-
Unlock Developer features on your Oculus Account (If you already have a developer account, skip this step):
- Go to https://dashboard.oculus.com/organizations/create/ and make sure you are logged in to your Oculus account.
- Put any name you want then complete the submission.
- On your mobile device, run the Oculus app, select the Oculus Quest device and go to developer options, then turn on developer mode.
-
Connect Headset: Connect your Quest headset to the PC or Mac using a USB-C cable.
-
Allow Debugging: Put on the headset, wait for the confirmation message, and Allow the USB Debugging prompt to establish a connection.
-
Install App: Run the downloaded Installation Manager on your computer. Click the (Install) button within the manager to sideload the VR Viewer application onto your Quest VR device.
-
Locate App: After installation is complete, find and launch the app on your Quest VR headset by navigating to the appropriate section for sideloaded or unknown sources applications (typically found in Library > Unknown resources > SimLab VR Viewer).
Joining as a contact
This is the simplest way to join. If the host/administrator has already added your email to their SimLab Contacts list, you don't need a link.
Prerequisites:
-
The host must have added your email to their SimLab Contacts list.
-
You must be Signed In to the SimLab VR Viewer app on your Quest headset.
Joining via In-App Notification
Because you are an invited contact, the SimLab VR Viewer will handle the invitation entirely inside your headset.
Action (In-App Join):
-
Notification Prompts: When you are inside the SimLab VR Viewer, you may see timed messages leading up to the scheduled start time.
-
Host Initiates Session: When the host clicks Start Collaboration, you will receive the final launch prompt directly inside your headset.
-
Message: "[Host Name] has invited you to join a Collaborative VR Experience session."
-
-
Click the 'Join' Button: Use your Quest controller to click the Join button within the notification window to immediately launch and enter the collaborative VR session Lobby.
Joining using a Link invitation (Guest/Ad-Hoc)
This method is for when the host only sends you a direct link. Since the Quest browser doesn't easily handle direct link launching, you must first register the link using a helper device or manually enter the URL.
Prerequisites:
-
The host sends you the invitation link via email or chat.
-
You must access the link on a PC or mobile device (Method A) or manually type it in VR (Method B).
Method A: Registering the Link to Your Account (Recommended)
Use a PC or mobile device to register the link, which converts the invitation into a registered session, allowing the Quest to treat you as an invited contact.
Action (on PC/Mobile Device):
-
Click the Invitation Link provided by the host on your PC or Mobile Device.
-
On the web page that opens, click the Add to Calendar or Add Link button.
-
Log In: If prompted, log into your SimLab account.
-
The session is now registered in the Invitations tab on the SimLab Dashboard.
Joining the Session (in Quest Headset):
-
Put on your Quest Headset and launch the SimLab VR Viewer while logged into the same account.
-
Because the session is registered to your account, when the host starts the session, you will receive the in-app notification (as described on Page 2).
-
Click Join to enter the Lobby.
Method B: Joining via the URL Launcher (Manual Input)
This method lets you bypass the web registration by entering the link directly in the VR Viewer.
Action (in Quest Headset):
-
Launch the SimLab VR Viewer application.
-
Locate and click the URL Launcher button (often a small icon or button).
-
Use the VR keyboard to type or paste the Invitation Link into the dialogue window.
-
Click Confirm.
Result:
-
You will be taken to the Lobby screen where the VR experience will load, and you can join the session. If you were not already signed in, you may be prompted to Login or Continue as a Guest.
Joining a Scheduled VR Collaboration Session (Vive XR Elite)
Learn how download and install Simlab VR Viewer on your device, as well as joining a schedules VR Session through contact invitation or using an invitation link.
Installing SimLab VR Viewer
|
This chapter guides you through installing the SimLab VR Viewer on your Vive XR Elite Device. SimLab VR Viewer is a free, essential cross-platform application required to run, view, and participate in VR experiences, including collaboration sessions and viewing shared SimLab VR packages (.vrpackage files). |
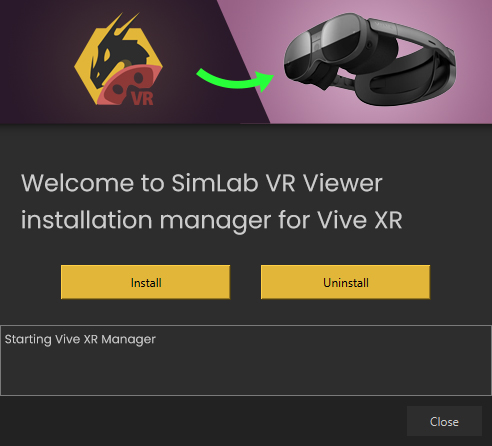
Installation Method: Via Installation Manager (PC/Mac & Cable)
-
Request Access: Go to the official SimLab VIVE XR page.
-
Get Installer: Click the "Get it Now" button, fill in your information (Name, Email, Industry), and you will be directed to the download page. Download the SimLab VR Viewer Installation Manager for Vive XR for your operating system (Windows or macOS).
-
Configure Headset for Sideloading (One-Time Setup):
-
Put on the VIVE XR Elite headset.
-
Go to Settings > Advanced > and enable Allow unknown apps.
-
Go to Settings > Advanced > Developer options > and enable USB debugging.
-
-
Connect Headset: Connect your VIVE XR Elite headset to the PC or Mac using a USB-C cable.
-
Allow Debugging: Put on the headset, wait for the confirmation message, and Allow the USB Debugging prompt to establish a connection.
-
Install App: Run the downloaded Installation Manager on your computer. Click the (Install) button within the manager to sideload the VR Viewer application onto your VIVE XR Elite.
-
Locate App: After installation is complete, find and launch the app on your VIVE XR Elite by navigating to the appropriate section for sideloaded or unknown sources applications (typically found in the Library or All Apps section under a filter like Unknown source).
Account Sign In:
-
In your VIVE XR Elite headset, launch the SimLab VR Viewer application.
-
Select Sign In and use your VIVE controllers to enter your SimLab account email and password.
Joining as a contact
This is the simplest way to join. If the host/administrator has already added your email to their SimLab Contacts list, you don't need a link.
Prerequisites:
-
The host must have added your email to their SimLab Contacts list.
-
You must be Signed In to the SimLab VR Viewer app on your VIVE XR Elite headset.
Joining via In-App Notification
Because you are an invited contact, the SimLab VR Viewer will handle the invitation entirely inside your headset.
Action (In-App Join):
-
Notification Prompts: When you are inside the SimLab VR Viewer, you may see timed messages leading up to the scheduled start time.
-
Host Initiates Session: When the host clicks Start Collaboration, you will receive the final launch prompt directly inside your headset.
-
Message: "[Host Name] has invited you to join a Collaborative VR Experience session."
-
-
Click the 'Join' Button: Use your VIVE controller to click the Join button within the notification window to immediately launch and enter the collaborative VR session Lobby.
Joining using a Link invitation (Guest/Ad-Hoc)
This method is for when the host only sends you a direct link. Since the Vive browser doesn't easily handle direct link launching, you must first register the link using a helper device or manually enter the URL.
Prerequisites:
-
The host sends you the invitation link via email or chat.
-
You must access the link on a PC or mobile device (Method A) or manually type it in VR (Method B).
Method A: Registering the Link to Your Account (Recommended)
Use a PC or mobile device to register the link, which converts the invitation into a registered session, allowing the Vive to treat you as an invited contact.
Action (on PC/Mobile Device):
-
Click the Invitation Link provided by the host on your PC or Mobile Device.
-
On the web page that opens, click the Add to Calendar or Add Link button.
-
Log In: If prompted, log into your SimLab account.
-
The session is now registered in the Invitations tab on the SimLab Dashboard.
Joining the Session (in Vive Headset):
-
Put on your Vive Headset and launch the SimLab VR Viewer while logged into the same account.
-
Because the session is registered to your account, when the host starts the session, you will receive the in-app notification (as described on Page 2).
-
Click Join to enter the Lobby.
Method B: Joining via the URL Launcher (Manual Input)
This method lets you bypass the web registration by entering the link directly in the VR Viewer.
Action (in Vive Headset):
-
Launch the SimLab VR Viewer application.
-
Locate and click the URL Launcher button (often a small icon or button).
-
Use the VR keyboard to type or paste the Invitation Link into the dialogue window.
-
Click Confirm.
Result:
-
You will be taken to the Lobby screen where the VR experience will load, and you can join the session. If you were not already signed in, you may be prompted to Login or Continue as a Guest.
Joining a Scheduled VR Collaboration Session (Pico)
Learn how download and install SimLab VR Viewer on your device, as well as joining a schedules VR Session through contact invitation or using an invitation link.
Installing SimLab VR Viewer
|
This chapter guides you through installing the SimLab VR Viewer on your Pico Device. SimLab VR Viewer is a free, essential cross-platform application required to run, view, and participate in VR experiences, including collaboration sessions and viewing shared SimLab VR packages (.vrpackage files). |
Installation Method: Via Installation Manager (PC/Mac & Cable)
-
Request Access: Go to the official SimLab Pico VR page.
-
Get Installer: Click the "Get it Now" button, fill in your information (Name, Email, Industry), and you will be directed to the download page. Download the SimLab VR Viewer Installation Manager for Pico VR for your operating system (Windows or macOS).
-
Configure Headset for Sideloading (One-Time Setup):
-
Put on the Pico headset.
-
Go to Settings > Advanced Settings > and enable Allow unknown apps.
-
Enable Developer Mode (if not already enabled, usually by clicking the PUI Version multiple times in System > About Device).
-
Go to Settings > Advanced Settings > Developer options > and enable USB debugging.
-
-
Connect Headset: Connect your Pico headset to the PC or Mac using a USB-C cable.
-
Allow Debugging: Put on the headset, wait for the confirmation message, and Allow the USB Debugging prompt to establish a connection.
-
Install App: Run the downloaded Installation Manager on your computer. Click the (Install) button within the manager to sideload the VR Viewer application onto your Pico VR device.
-
Locate App: After installation is complete, find and launch the app on your Pico VR headset by navigating to the appropriate section for sideloaded or unknown sources applications (typically found in the Library or All Apps section under a filter like Unknown source).
Account Sign In:
-
In your Pico VR headset, launch the SimLab VR Viewer application.
-
Select Sign In and use your Pico controllers to enter your SimLab account email and password.
Joining as a contact
This is the simplest way to join. If the host/administrator has already added your email to their SimLab Contacts list (managed in the SimLab Dashboard), you don't need a link.
Prerequisites:
-
The host must have added your email to their SimLab Contacts list.
-
You must be Signed In to the SimLab VR Viewer app on your Pico VR headset.
Joining via In-App Notification
Because you are an invited contact, the SimLab VR Viewer will handle the invitation entirely inside your headset.
Action (In-App Join):
-
Notification Prompts: When you are inside the SimLab VR Viewer, you may see timed messages leading up to the scheduled start time.
-
Host Initiates Session: When the host clicks Start Collaboration, you will receive the final launch prompt directly inside your headset.
-
Message: "[Host Name] has invited you to join a Collaborative VR Experience session."
-
-
Click the 'Join' Button: Use your Pico controller to click the Join button within the notification window to immediately launch and enter the collaborative VR session Lobby.
Joining using a Link invitation (Guest/Ad-Hoc)
This method is for when the host only sends you a direct link. Since the Pico VR browser does not easily launch VR apps from web links, you must first register the link using a helper device or manually enter the URL.
Prerequisites:
-
The host sends you the invitation link via email or chat.
-
You must access the link on a PC or mobile device (Method A) or manually type it in VR (Method B).
Method A: Registering the Link to Your Account (Recommended)
Use a PC or mobile device to register the link, which converts the invitation into a registered session, allowing the Pico headset to treat you as an invited contact.
Action (on PC/Mobile Device):
-
Click the Invitation Link provided by the host on your PC or Mobile Device.
-
On the web page that opens, click the Add to Calendar or Add Link button.
-
Log In: If prompted, log into your SimLab account.
-
The session is now registered in the Invitations tab on the SimLab Dashboard.
Joining the Session (in Pico VR Headset):
-
Put on your Pico VR Headset and launch the SimLab VR Viewer while logged into the same account.
-
Because the session is registered to your account, when the host starts the session, you will receive the in-app notification (as described on Page 2).
-
Click Join to enter the Lobby.
Method B: Joining via the URL Launcher (Manual Input)
This method lets you bypass the web registration by entering the link directly in the VR Viewer.
Action (in Pico VR Headset):
-
Launch the SimLab VR Viewer application.
-
Locate and click the URL Launcher button (often a small icon or button).
-
Use the VR keyboard to type or paste the Invitation Link into the dialogue window.
-
Click Confirm.
Result:
-
You will be taken to the Lobby screen where the VR experience will load, and you can join the session. If you were not already signed in, you may be prompted to Login or Continue as a Guest.