
Cloud
 Get Cloud Attribute
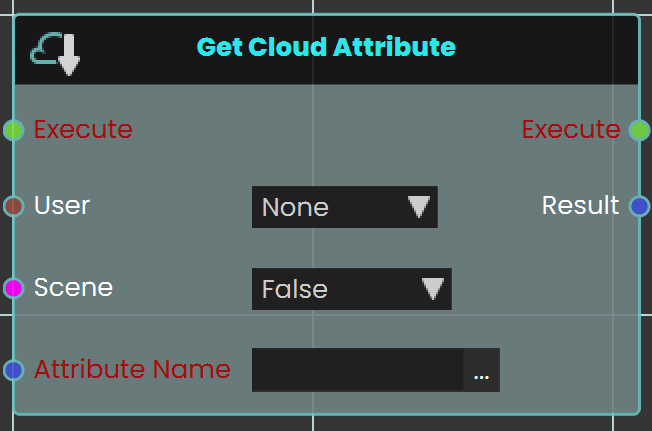
The Get Cloud Attribute node enables the user to retrieve saved progress for a specific VR Experience by assigning the attribute in the Attribute Name field. The progress can be saved for either the scene, the user, or both. Once the node is executed, the retrieved value can be acquired through the Result port.
Example

In this example, a Get Cloud Attribute node is used to retrieve stored data from Cloud. When the user enters the object named FinishLine, the object named Scoreboard will be shown. The data saved for this specific scene for all users is retrieved and stored in a variable named Scoreboard, which can then be displayed during the VR Experience.
Set Cloud Attribute
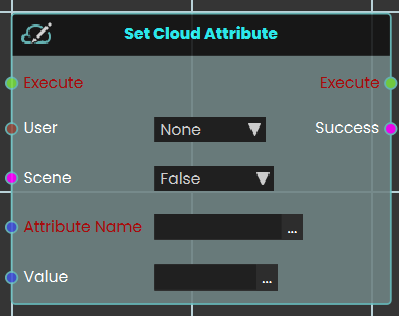
The Set Cloud Attribute node enables the user to store data for a specific VR Experience by assigning the attribute in the Attribute Name field then set the value of it. the data can be stored for either the user, the scene, or both. Once the node is executed, the specified data is saved accordingly.
Example
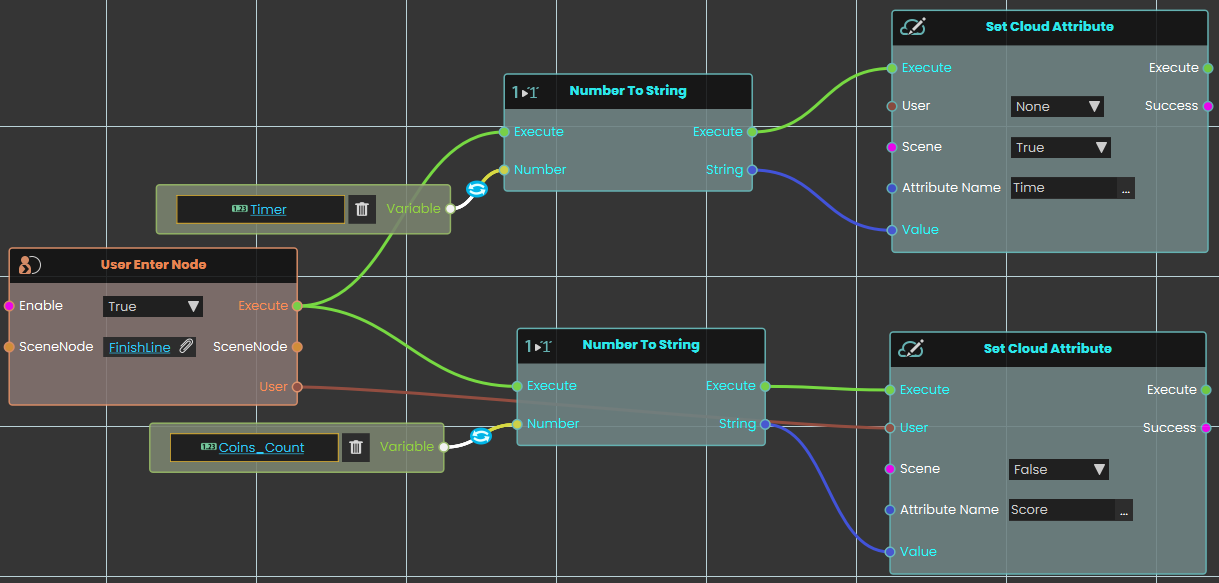
In this example, a Set Cloud Attribute node is used to store data in Cloud. When the user enters the object named FinishLine, the value of the variable Time will be converted to String and stored under the attribute named Time for the Scene Only, meanwhile the value of the variable Coins_Count will be converted to String and then stored under the attribute Score for the User Only.
Note: To retrieve the Cloud data, the experience must be run from a logged-in account in SimLab VR Viewer.
HTTP Requests
These two nodes let your scene talk to a web service over the internet — for example to fetch some information from a server, send a result to one, or call an online tool. You give the node a web address and a few details about the request; it contacts the server, waits for the reply, and hands you back whatever the server sent. The two nodes are identical except for one thing — the form the reply comes back in:
- Http Request — gives the reply back as a JSON object. Use this when the server answers with JSON.
- Http Request (String) — gives the reply back as plain text. Use this for raw text, or when you'd rather read the text yourself later.
Things to know before you start
These points apply to both nodes.
They wait for the request to finish before carrying on
Talking to a server isn't instant — it can take a moment for the reply to come back. These nodes handle that waiting for you. The node's Execute output does not fire the moment the request is sent; it fires only once the request has finished — that is, once the server has answered or the attempt has failed. So the nodes you wire after this one run when the request comes back, not the instant it goes out, and you don't need to add any delay of your own. The rest of your scene keeps running in the meantime — only this branch waits.
Because the Execute output fires whether the request succeeded or not, always check the result before trusting the reply — see below.
Always check Success before using the reply
A request can go wrong for many reasons — a mistyped address, no internet connection, or the server itself reporting a problem (such as “not found”). That is what the Success output is for. It is Yes only when the server was reached and answered normally; otherwise it is No and the Response comes back empty. Always send Success into a Branch node and only use the Response on the “Yes” side.
The request, in four parts
Every request you send is built from the same few pieces. You set these on the inputs of both nodes:
- Verb — what kind of request it is, chosen from a drop-down. GET (the default) asks the server for something and is by far the most common. POST sends new information to the server; PUT and PATCH update something that already exists; DELETE removes something. (REQUEST is a general-purpose option for unusual cases.) If you are just reading data, leave this on GET.
- URL — the web address to contact, for example
https://api.example.com/status. This is required. - Header (optional) — extra details about the request, given as a JSON object of name-and-value pairs (text values). It is most often used to pass a key or token that proves who you are, such as
{"Authorization": "Bearer abc123"}. - Body (optional) — the information you are sending to the server, given as a JSON object. It is used with POST, PUT, and PATCH. A GET request never carries a body, so anything you connect here is ignored when the verb is GET.
Which one should I use?
Most modern web services answer with JSON. If yours does, use Http Request and you'll get a JSON object you can read straight away with the JSON Object nodes. If the server sends back plain text, or you aren't sure of the format and want the exact text, use Http Request (String). You can always turn text into a JSON object afterwards with Create Json Object From String.
Http Request
Sends a request to a web address and gives you the server's reply as a JSON object.
What it does
This is the node to reach for when the server answers with JSON, which most web services do. It contacts the address you give it, waits for the reply, and reads that reply into a JSON object — so you can pull values straight out of it with the Get Json Object Field nodes on the JSON Objects page. Only the reply's content comes back; this node doesn't hand you the technical status number separately. Remember to check Success first: if the request failed, or the reply wasn't valid JSON, Success is No and the Response is empty.
Inputs
| Port | Type | What to connect |
|---|---|---|
| Execute | Trigger | Wire this from the previous node's Execute output. |
| Verb | Choice | The kind of request: GET, POST, DELETE, PUT, REQUEST, or PATCH. Defaults to GET. |
| URL | Text | The web address to contact. |
| Header | JSON object | Optional. Extra request details as name-and-value pairs, such as an authorization key. |
| Body | JSON object | Optional. The information to send to the server. Used with POST, PUT, and PATCH; ignored for GET. |
Outputs
| Port | Type | What you get |
|---|---|---|
| Execute | Trigger | Fires once the request finishes — whether it succeeded or not. |
| Success | True / false | Yes if the server was reached, answered normally, and the reply could be read as JSON; No otherwise. |
| Response | JSON object | The server's reply, as a JSON object. Empty when Success is No. |
Example
| Verb input | GET |
| URL input | https://api.example.com/weather?city=Dubai |
| Header input | {"Accept": "application/json"} — optional |
| Success output | Yes |
| Response output | {"city": "Dubai", "temperature": 41, "unit": "C"} |
Tips
- Check Success first. Wire Success into a Branch node and only read the Response when it's Yes. A server error such as “not found” counts as No.
- Read one value out. Wire the Response into a Get Json Object Field node with the field name to pull a single value (for example
temperature) out of the reply. - Sending data? Fill in the Body and choose POST (or PUT / PATCH). When a body is sent, the request is automatically marked as JSON for you.
- Reply isn't JSON? If the server sends plain text rather than JSON, use Http Request (String) below instead.
Http Request (String)
Sends the same kind of request, but gives you the server's reply as plain text.
What it does
Works exactly like Http Request, with one difference: the reply comes back as a piece of text, exactly as the server sent it, instead of being read into a JSON object. Use this when the server returns plain text, when the reply isn't JSON, or when you simply want the raw text to store, display, or read yourself later. As with the other node, check Success first; if the request failed, Success is No and the text comes back empty.
Inputs
| Port | Type | What to connect |
|---|---|---|
| Execute | Trigger | Wire this from the previous node's Execute output. |
| Verb | Choice | The kind of request: GET, POST, DELETE, PUT, REQUEST, or PATCH. Defaults to GET. |
| URL | Text | The web address to contact. |
| Header | JSON object | Optional. Extra request details as name-and-value pairs, such as an authorization key. |
| Body | JSON object | Optional. The information to send to the server. Used with POST, PUT, and PATCH; ignored for GET. |
Outputs
| Port | Type | What you get |
|---|---|---|
| Execute | Trigger | Fires once the request finishes — whether it succeeded or not. |
| Success | True / false | Yes if the server was reached and answered normally; No otherwise. |
| Response | Text | The server's reply, as plain text. Empty when Success is No. |
Example
| Verb input | GET |
| URL input | https://api.example.com/version |
| Success output | Yes |
| Response output | v2.4.1 |
Tips
- Check Success first. Wire Success into a Branch node and only read the Response when it's Yes. A server error such as “not found” counts as No.
- Good for non-JSON replies. Plain text, a version number, a short status word, or a line of CSV all come back cleanly as text.
- Text that's really JSON? If the reply happens to be JSON and you want to read fields out of it, pass the Response into Create Json Object From String — or just use Http Request above, which does that step for you.
Related
- JSON Objects — build the Header and Body objects you send, and read values out of the reply from Http Request.
- Create Json Object From String — turn the text from Http Request (String) into a JSON object.
- Branch — use the Success output to decide what happens next.
No Comments