
Material
A material decides how a surface looks in your scene — its color, how see-through it is, and the image (called a texture) painted across it. The nodes on this page let your scene read and change those looks while it is running: fade an object out, recolor a warning light, combine two images, or save a texture to a picture file. You normally get a material by reading it from an object in your scene, then wire it into the Material input of these nodes. Because objects can share the same material, changing a material updates every object using it at once.
What's on this page
- Alpha — read or change how see-through a material is.
- Color — read or change a material’s color.
- Texture — blend two images into a new one, or save a material’s texture out as a picture file.
Alpha
A material’s alpha is how see-through it is, given as a number from 0 (fully transparent) to 1 (fully solid). A value like 0.5 is half see-through. These two nodes read a material’s current alpha or set a new one — useful for fading objects in and out.
Get Material Alpha
Reads how transparent a material is, so you can check its current see-through level.
What it does
This node looks at a material and tells you its alpha — the amount the material lets you see through it. The alpha is given as a Number from 0 (fully see-through) to 1 (fully solid), where a value like 0.5 is half see-through.
It only reads the value — it does not change the material in any way. The same material you fed in comes straight back out, so you can keep working with it in the next node.
Inputs
| Port | Type | What to connect |
|---|---|---|
| Execute | Trigger | Wire this from the previous node’s Execute output. |
| Material | Material | The material you want to check. Connect a node that gives you a material, such as one that reads the material from an object in your scene. |
Outputs
| Port | Type | What you get |
|---|---|---|
| Execute | Trigger | Fires once the node has finished. Wire it to whatever should happen next. |
| Material | Material | The same material you connected, passed straight through unchanged so you can use it again. |
| Value | Number | The material’s alpha, from 0 (fully see-through) to 1 (fully solid). |
Example
| Material input | The glass panel material from your scene |
| Value output | 0.5 |
Tips
- A value of
0means the material is completely see-through, and1means it is fully solid. - Pair this with Set Material Alpha when you want to remember a material’s current transparency, change it for a while, and then put it back.
Set Material Alpha
Changes how see-through a material is, from fully invisible to fully solid.
What it does
This node sets the transparency of a material. You give it a material and a number between 0 and 1: 0 makes the material completely invisible (see-through), 1 makes it completely solid, and values in between make it partly see-through — for example 0.5 is half-transparent.
The change takes effect right away on the material you pass in. The node hands the same material straight back out, along with the transparency value you set, so you can keep using them in the next steps of your script.
Inputs
| Port | Type | What to connect |
|---|---|---|
| Execute | Trigger | Wire this from the previous node’s Execute output. |
| Material | Material | The material whose transparency you want to change. |
| Value | Number | How see-through to make it, from 0 (fully invisible) to 1 (fully solid). Must be in the range 0 to 1. |
Outputs
| Port | Type | What you get |
|---|---|---|
| Execute | Trigger | Fires once the node has finished. |
| Material | Material | The same material you passed in, now with its new transparency. |
| Value | Number | The transparency value you set, passed back so you can reuse it. |
Example
| Material input | The glass material on a window |
| Value input | 0.3 |
| Material output | The same glass material, now mostly see-through |
| Value output | 0.3 |
Tips
- Keep the value between
0and1. Think of it as a percentage:0is 0% solid (invisible),1is 100% solid, and0.5is halfway. - To fade something out over time, run this node repeatedly with a value that steps down from
1toward0.
Color
These two nodes read or change a material’s color. A color is shown as a small swatch you can click to open a color picker — a color wheel with RGB, HSV, and HEX entry. Remember that setting a color changes every object that shares the material.
Get Material Color
Reads the current color of a material so you can use it elsewhere in your scene.
What it does
Give this node a material and it hands you back that material’s current color — the color a viewer sees on every object using that material. The color comes out as a color value (shown as a small colored swatch), which you can feed into other nodes, compare against another color, or store for later.
Reading the color does not change anything — the material keeps looking exactly as it did. If you actually want to change a material’s color, use the Set Material Color node instead, where you pick the new color from a swatch and color picker.
Inputs
| Port | Type | What to connect |
|---|---|---|
| Execute | Trigger | Wire this from the previous node’s Execute output. |
| Material | Material | The material whose color you want to read. Connect a material coming from another node, such as one you picked from an object in your scene. |
Outputs
| Port | Type | What you get |
|---|---|---|
| Execute | Trigger | Fires once the node has finished. |
| Material | Material | The same material you connected, passed straight through — handy for wiring it into the next node without fetching it again. |
| Value | Color | The material’s current color, as a color value you can reuse. It shows as a colored swatch and can be passed to any node that accepts a color. |
Example
| Material input | The material on a warning light in your scene |
| Material output | The same material, passed through |
| Value output | A red color value — for example #C81E1E |
Tips
- Use the Material output to keep your wiring tidy — you can read the color and pass the same material along to the next step in one go.
- Pair this with Set Material Color to save a material’s original color, change it for a while, then put the saved color back later.
Set Material Color
Changes the color of a material so everything using that material takes on the new look.
What it does
This node paints a material with the color you choose. Once it runs, every object in your scene that uses that material is shown in the new color right away — handy for things like turning a warning light red, swapping a wall’s paint, or highlighting a part during a training step.
It only changes the color of the material; the material’s shape, texture, and everything else stay the same. The same material comes back out so you can keep working with it, along with the color you applied.
Inputs
| Port | Type | What to connect |
|---|---|---|
| Execute | Trigger | Wire this from the previous node’s Execute output. |
| Material | Material | The material you want to recolor. Connect it from a node that gives you a material, such as one that picks an object’s material. |
| Color | Color | The new color you want the material to have. Click the color swatch on the node to open the color picker, then pick a color from the wheel, type in RGB or HSV numbers, or enter a HEX code such as #C81E1E. You can also connect a color coming from another node. |
Outputs
| Port | Type | What you get |
|---|---|---|
| Execute | Trigger | Fires once the node has finished, so you can continue to the next step. |
| Material | Material | The same material you sent in, now showing the new color. Pass it on if you want to make more changes to it. |
| Value | Color | The color that was applied, in case you want to reuse it elsewhere. |
Example
| Material input | The material on a warning lamp in your scene |
| Color input | #C81E1E (a red, chosen from the color picker) |
| Material output | The same lamp material, now red |
| Value output | #C81E1E |
Tips
- Because the color is set on the material, every object that shares that material changes together. If you only want one object to change, give it its own material first.
- To put the original color back later, save it first with a Get Material Color node, then feed that saved color back into this node when you want to restore it.
Texture
A texture is the image painted across a material’s surface. These two nodes work with image files inside your project: one blends two images into a new one, the other saves a material’s texture out as a PNG picture. Both do their work in the background and hand back a true/false result telling you whether they succeeded.
Blend Textures
Combines two image files from your project into a single new image, with one laid on top of the other.
What it does
This node takes two images that already live in your project — a Base image and an Overlay image — and lays the Overlay on top of the Base to create one combined picture. It saves the result as a brand-new image file inside your project and gives you back that new file’s name, so you can use it as a texture, a label, or any other image.
Your two original images are left untouched — the node only creates a new combined image and never changes the Base or the Overlay. Because building the new image can take a moment, this node works in the background: its Execute output fires only once the blend has finished. You also get a true/false result telling you whether it worked.
Inputs
| Port | Type | What to connect |
|---|---|---|
| Execute | Trigger | Wire this from the previous node’s Execute output. |
| Base | Text | The name of the bottom image — the one that goes underneath. Use a short file name (including its extension) for an image inside your project, such as wood_panel.png. |
| Overlay | Text | The name of the top image — the one laid over the Base. Use a short file name (including its extension) for an image inside your project, such as logo.png. |
Outputs
| Port | Type | What you get |
|---|---|---|
| Execute | Trigger | Fires once the two images have finished blending. Wire this to whatever should happen next. |
| Base | Text | The Base image name you provided, passed straight through so you can reuse it. |
| Overlay | Text | The Overlay image name you provided, passed straight through so you can reuse it. |
| Success | True / false | true if the new combined image was created, or false if it could not be made (for example, if one of the image names was wrong). |
| FileName | Text | The short file name of the new combined image inside your project. When the blend fails this comes back empty. |
Example
| Base input | wood_panel.png |
| Overlay input | logo.png |
| Success output | true |
| FileName output | wood_panel_blended.png |
Tips
- Make sure both images are already part of your project and that you type their names exactly, including the file extension (for example
.png). - Check the Success output before using the new image — if it comes back
false, the FileName will be empty. - The order matters: the Overlay always sits on top of the Base. Swap the two inputs if the result looks upside-down.
Save Texture
Saves a material’s texture image out as a PNG picture file inside your project.
What it does
This node takes the texture (the surface image) used by a material and writes it out as a PNG picture file inside your current SimLab project. You give it the material to read from and a file name to save under, and it produces that picture for you.
It does not change the material or its texture in any way — it simply makes a copy of the texture as a separate picture file. The node works in the background, so its Execute output only fires once the picture has been fully saved. You also get a true/false result telling you whether the save worked.
Inputs
| Port | Type | What to connect |
|---|---|---|
| Execute | Trigger | Wire this from the previous node’s Execute output. |
| Material | Material | The material whose texture you want to save. Its surface image is the one that gets written out as a PNG. |
| FileName | Text | The name to save the picture under, including the .png ending — for example crate_diffuse.png. This is a short name; the file is saved inside your current project. |
Outputs
| Port | Type | What you get |
|---|---|---|
| Execute | Trigger | Fires once the picture has finished saving. Wire this to whatever should happen next. |
| Material | Material | The same material you passed in, handed straight back so you can keep using it in later nodes. |
| FileName | Text | The short name the picture was saved under, such as crate_diffuse.png. |
| Success | True / false | true if the picture was saved, or false if it could not be saved (for example, the material has no texture). |
Example
| Material input | The material on a crate object |
| FileName input | crate_diffuse.png |
| FileName output | crate_diffuse.png |
| Success output | true |
Tips
- Remember to include the
.pngending in the file name yourself — for examplecrate_diffuse.png. - Check the Success output before relying on the saved picture; a material with no texture image will return
false. - Because the save happens in the background, build the rest of your steps off this node’s Execute output so they only run after the picture is ready.
 Copy Material
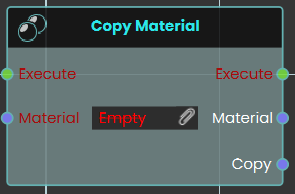
The Copy Material node duplicates an existing material and create a completely independent instance. Upon triggering the Execute input, the node takes the specified Material input and outputs a newly generated Copy of that material, which can then be freely modified without altering the original source.
 Copy Material Properties
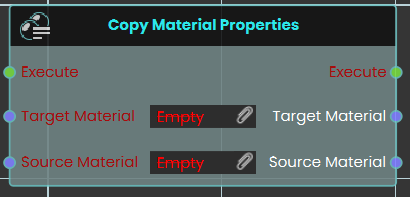
The Copy Material Properties node transfers visual attributes directly from one material to another without generating a new instance. When the Execute input is triggered, the node takes the characteristics of the Source Material input and applies them directly to the Target Material input, instantly overwriting the target's previous properties.
Example:
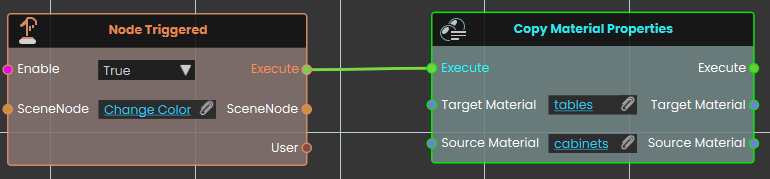
In this example, triggering the "Change Color" object prompts the system to execute the Copy Material Properties node. Once activated, the node takes all the visual attributes from the "cabinets" source material and immediately applies them to the "tables" target material, causing any 3D objects using the tables material to instantly match the appearance of the cabinets.
No Comments